
Declare cargo, packages and containers
Guide information
Requirements
This tutorial requires the installation of the following applications/modules:
Freight Forwarder Management (installs Logistics Accounting automatically, which in turn installs Logistics Shipment)
The cargo description, HS code and dangerous-goods flag you declare here are the only source Documentation and Customs use for the Shipping Instruction and the export declaration. The containers you build in this guide are the same containers Operations marks as Empty Picked and Stuffed afterwards, and the same container and seal numbers appear on the House B/L. Fix a wrong description or a swapped seal number after the Shipping Instruction is sent may require a booking or document amendment; confirm the impact and any fee with the carrier. If a term here is new to you, see the Freight forwarding glossary.
Running scenario: Hai Long Logistics ships 1,200 cartons of sneakers (HS 6404.19.90) for Nhat Long Footwear from Hai Phong Port to Port of Los Angeles with carrier ONE Line, split evenly across 2 Container 40FT HC already booked under ONEYBK204581 (Book carrier space for a shipment leg). By the end of this guide both containers carry their real container and seal numbers and the 1,200 cartons are fully allocated.
Before you start
The shipment (SHP/26xx/000nn, Nhat Long Footwear, HBL HLLHPHLAX2611-001) is Confirmed and already has a confirmed booking with 2 containers from Book carrier space for a shipment leg - the Load Cargo to Containers button only appears once the shipment is out of Draft and has at least one container.
You are in the User: All Shipments group or Administrator. User: Own Shipments can only read the Cargo, Package, Container and Item records on this tab, not create or edit them.
Before Operations enters this cargo line, an Administrator has created the required Cargo Type FTW and HS Code 6404.19.90. User: All Shipments can select existing values but cannot create these master records.
Under , All Shipments is a group heading, not a clickable menu - open the shipment through Direction –> Export instead.
See also
The containers used on this page already exist from the carrier booking: Book carrier space for a shipment leg.
Step 1: Declare the cargo line
The description, HS code and weight/volume on the Cargo line are what Documentation and Customs read later - there is no separate place to correct the HS code once the Shipping Instruction is issued without amending the booking.
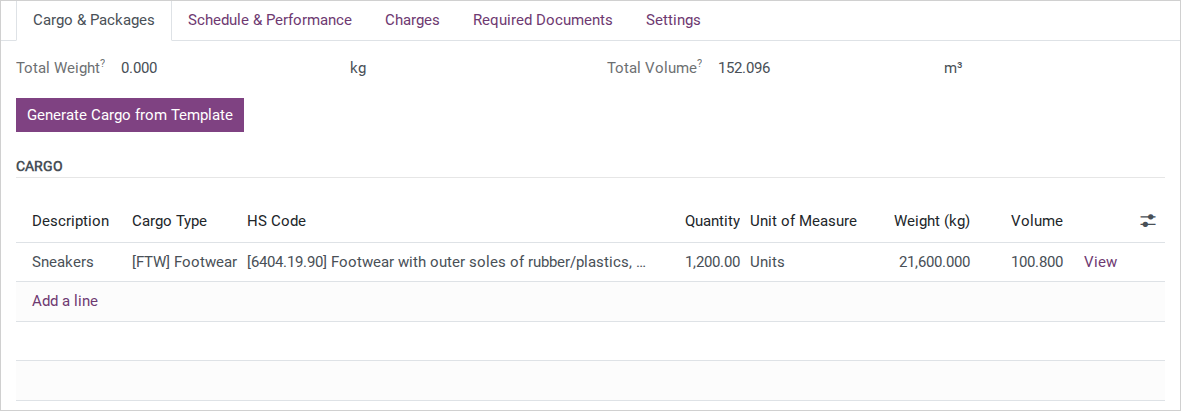
Go to , open the Nhat Long Footwear shipment, then open the Cargo & Packages tab. Marking the carrier booking as Requested creates a preliminary Quoted FCL containers cargo row from its booking basis. Open that row and replace its preliminary details with the verified cargo particulars below; keep one cargo row for this shipment. If no preliminary row exists, click Add a line instead. Fill in:
Description: Sneakers. Open the cargo row form and also set Goods Description to Sneakers; the loading wizard uses this description when naming the packages.
Cargo Type: select FTW.
HS Code: select 6404.19.90. If either value is missing, ask an Administrator to create and verify the master data before continuing; do not leave the field blank or invent a code.
Quantity: 1,200 (Unit of Measure stays Units for this worked example: count one carton as one unit, so the total is 1,200 cartons, not the number of individual shoe pairs or a per-container count).
Weight: 21,600 (kg) and Volume: 100.8 (CBM), taken from the Invoice, not derived from the container capacity.
Is Dangerous Goods: leave unticked (this cargo is Non-DG).
Note
The Package Type field and the Is Individual Package checkbox that exist on the base Cargo form are hidden once Freight Forwarder Management is installed - this module tracks packaging one level down, on the Package created in Step 2, not on the Cargo line itself.
Note
Check the Weight and Volume on the cargo row at this step. Before loading, the shipment’s Total Weight and Total Volume can differ: they are calculated from the execution containers. Declaring the cargo row alone does not allocate that cargo to the containers. Continue with Step 2 to create the loading records.
After you save the line, the Cargo smart button appears on the shipment header (it only shows once there is at least one Cargo line).
Tip
Step 1 is done when:
The Cargo line reads 1,200 Units, HS Code 6404.19.90, Weight 21,600 kg, Volume 100.8 CBM.
Is Dangerous Goods is unticked.
The Cargo smart button is visible on the shipment header.
Decide how to build the packages
Option |
Use when |
What changes |
|---|---|---|
Loading Method = By Packages (in the wizard used below) |
You want to track individual packages inside each container, like the 2 groups of 600 units in this scenario |
Enter Pkg Qty = the number of packages to split into; the system divides the quantity, weight and volume evenly |
Loading Method = Direct to Container |
The shipment is simple enough that you only need to know which cargo sits in which container, without a package-level record |
The Pkg Qty and Package Type columns disappear; Items are created directly against each container, no Package records |
Button Load Cargo to Packages (a different button, LCL only) |
Never for an FCL shipment like this one |
Opens a different wizard that groups cargo into standalone packages with no container - FCL shipments cannot have containerless packages |
By Packages is the default, but choose the loading method that matches the records your team needs. Use By Packages when the Packing List or warehouse handoff needs each package recorded; use Direct to Container when the team only needs to record which cargo goes in each container. If you are unsure which record your customer or warehouse requires, confirm that before loading.
Step 2: Split the cargo into packages per container
An FCL shipment has no standalone Package table on the shipment form - a Package only exists once you assign cargo to a container, and the wizard below is the only place to do that in bulk instead of creating Package and Item records one at a time.
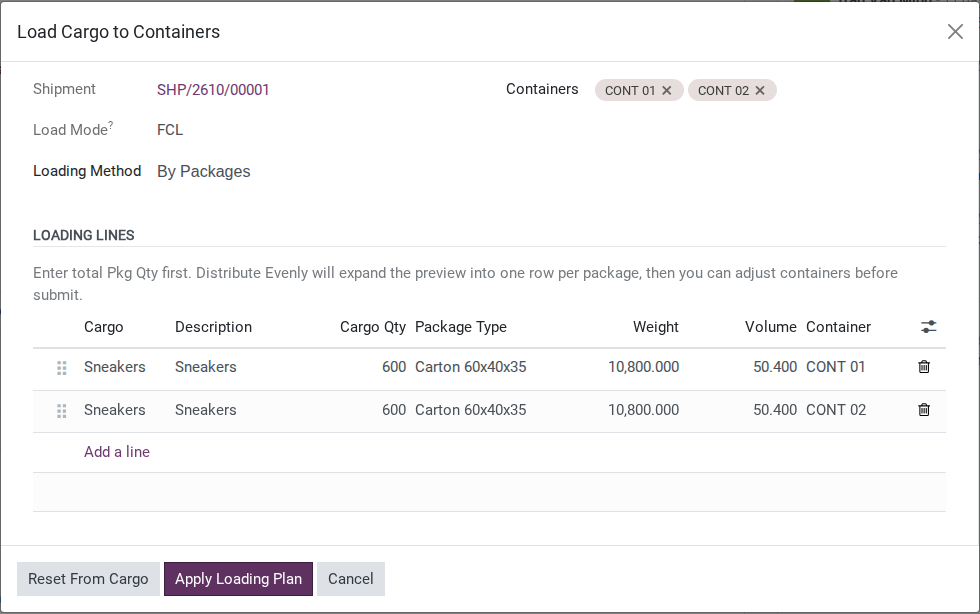
On the Cargo & Packages tab, click Load Cargo to Containers (visible once the shipment is out of Draft and has at least one Cargo line and one container). In the Load Cargo to Containers wizard:
Loading Method: By Packages (already the default).
Containers: both containers from the booking are already selected.
The Loading Lines table already has one row copied from the Cargo line: Cargo Sneakers, Cargo Qty 1,200, Weight 21,600, Volume 100.8, with Package Type and Container still blank.
On that row, fill in:
Package Type: Carton 60x40x35 (ask your freight Administrator to create this package type before starting).
Pkg Qty: 2 (the number of package rows to split into - not the number of pieces packed).
Click Distribute Evenly: the single row splits into 2 rows, each with Cargo Qty 600, Weight 10,800, Volume 50.4, Package Type Carton 60x40x35 kept on both, and each row assigned round-robin to one of the 2 containers.
Note
Pkg Qty is not the number of pieces - it is the number of package rows you want. The real piece count per package is the Cargo Qty column, filled in after Distribute Evenly.
Warning
Clicking Apply Loading Plan creates the Package and Item records immediately - there is no separate “review the plan, then approve” step. Check the 2 preview rows against the Equipment Interchange Receipt or the packing plan before clicking it.
Click Apply Loading Plan: the wizard creates 2 Package records and 2 Item records, closes, and opens the Packages list showing the 2 rows just created (not the Items list).
Tip
Step 2 is done when:
The Packages list shows 2 rows, Quantity 600 each, Package Type Carton 60x40x35, one per container.
The shipment header now shows an Items smart button reading 2.
Step 3: Record the real container and seal numbers
Container and seal numbers only exist for real once the trucker has picked up the empty containers and the warehouse has sealed them - before that they are only booking placeholders.
On the same tab, in the Containers table, edit both rows directly:
First container - Container Number: ONEU4567895, Seal Number: OL2604187.
Second container - Container Number: ONEU4568124, Seal Number: OL2604188.

Warning
Nothing in the system cross-checks the two numbers against each other - typing the seal number of container 1 onto container 2’s row saves without any warning. Read the Equipment Interchange Receipt carefully before typing, not from memory.
Both fields are required before Operations can mark a container Empty Picked or Stuffed on Track container milestones from empty pickup to return - leaving either blank there raises a “Cannot mark container … yet. Please fill in: …” error naming the missing field.
Tip
Step 3 is done when: both container rows show a Container Number and a Seal Number - no row left blank.
Step 4: Update the actual packed quantity if it differs from the plan
If the warehouse packs a different split than planned in Step 2 (for example 610 and 590 instead of 600 and 600), the record has to match what was physically packed before VGM and the Shipping Instruction are prepared.
Open the Cargo line Sneakers, then the Item Allocation tab, and edit the Quantity, Weight and Volume of the Item row for the container that differs from plan.
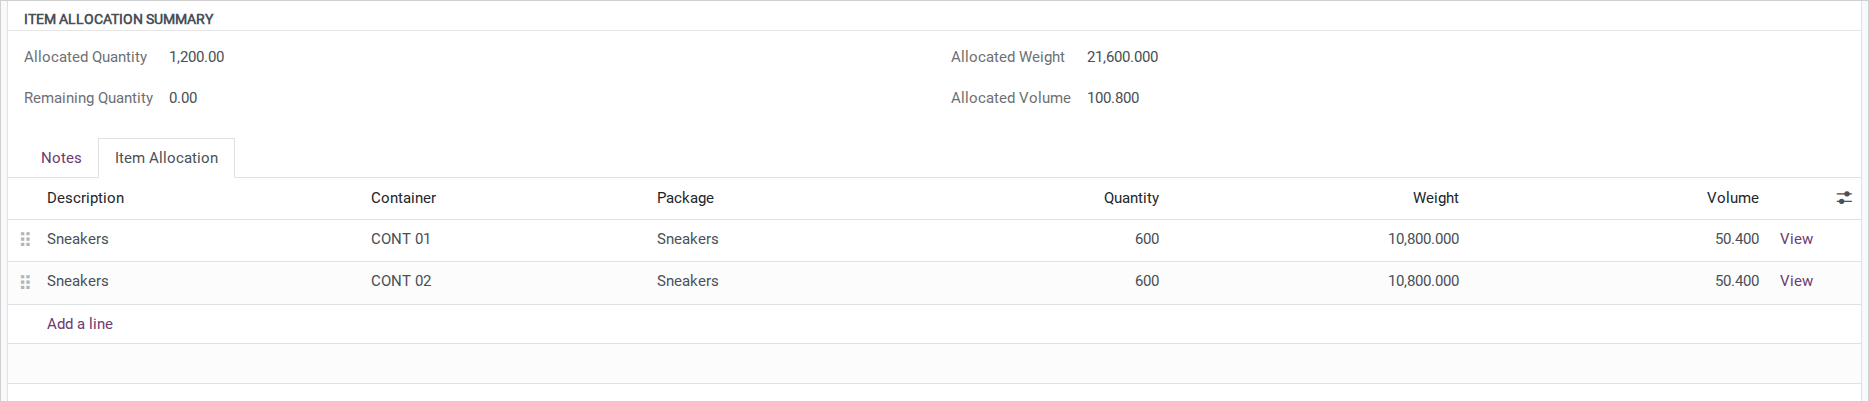
Saving recalculates Allocated Quantity, Remaining Quantity, Allocated Weight and Allocated Volume in the Item Allocation Summary group on the Cargo form.
Note
Remaining Quantity is a self-check for you to read, not a gate - nothing in the system blocks Confirm or any other action if it is different from 0.
Tip
Step 4 is done when: Remaining Quantity on the Cargo line reads 0 - all 1,200 units accounted for, none missing and none double-counted.
Step 5: Print the Packing List and hand off to Documentation
Documentation needs a printed Packing List to cross-check against the customer’s original before preparing the Shipping Instruction (check the cargo details against the shipper’s documents before preparing the SI or draft B/L) - there is no “hand off” button in the system, this is a working convention between Ops and Documentation.
From the shipment, open Actions and click Print Packing List. In the window that opens, review any applicable transshipment or reefer instructions, then click Print. Leave the reefer settings empty for this dry-container shipment.
Warning
On the current version, the Packing List can repeat the full cargo quantity on each container row when one cargo line is split across containers. In this example, the loading records allocate 600/600, but the PDF prints 1,200/1,200. Do not send that PDF as the final Packing List. Check Item Allocation, use the verified Packing List supplied by the shipper, and report the discrepancy to your support team. This PDF quantity issue does not change the underlying loading records.
Tip
Step 5 is done when: the verified Packing List supplied by the shipper lists 1,200 Units split 600/600 (or the corrected split from Step 4) across 2 containers, matching the loading records and Nhat Long Footwear’s original Invoice. Keep the incorrect Viindoo PDF for support review; do not send it as the final document.
Known limitations
Step |
What Viindoo does today |
What you do instead |
|---|---|---|
Step 2 (build packages) |
Apply Loading Plan writes real Package and Item records immediately - there is no
“plan pending approval” state. The container fields |
Review the preview rows in the wizard carefully before clicking Apply; if a row is wrong after creation, correct the Item/Package directly in Step 4 - there is no “cancel the plan” action. |
Step 3-4 (container/seal, actual quantities) |
Container Number, Seal Number and Item quantities are plain text/number fields with no cross-check between rows, and editing them overwrites the previous value with no history. |
Cross-check against the Equipment Interchange Receipt before typing; if you need the earlier value, check the Chatter log manually. |
Step 4 (Remaining Quantity checkpoint) |
Remaining Quantity on the Cargo line is display-only - no constraint blocks Confirm or any other action when it is different from 0. |
Read the number yourself before telling Documentation the shipment is ready. |
Step 5 (handoff to Documentation) |
There is no status or checkbox marking “reconciled, ready for SI” between this page and check the cargo details against the shipper’s documents before preparing the SI or draft B/L. |
Hand off by chatter note, e-mail or a working convention with Documentation, not a software gate. |
Troubleshooting
Clicking “Distribute Evenly” shows “Select at least one package before distributing cargo.”
Symptom: this exact message appears.
Cause: you opened Load Cargo to Packages (the LCL wizard) instead of Load Cargo to Containers - that wizard has no concept of a container and asks for packages instead.
Fix: close the wizard and click the correct Load Cargo to Containers button for this FCL shipment (see Decide above).
Clicking “Apply Loading Plan” shows “Each loading line must be assigned to a container before submit.”
Symptom: this exact message appears.
Cause: containers were selected at the top of the wizard, but one or more preview rows in Loading Lines were never assigned a container.
Fix: go back to the Loading Lines table and assign a container to every remaining row, then click Apply Loading Plan again.
Cannot mark a container Empty Picked or Stuffed on the container-execution page
Symptom: marking the container shows (names filled in):
Cannot mark container "<container>" as <milestone> yet.
Please fill in: <fields>.
where the missing fields are Container Number and/or Seal Number.
Cause: Track container milestones from empty pickup to return requires Container Number before Empty Picked or Stuffed, and Seal Number before Stuffed.
Fix: return to this page (Step 3) and fill in both fields before moving to container-execution.
Editing a Package’s Package Type shows “Packages assigned into a container must use non-container Package Types.”
Symptom: this exact ValidationError when changing the Package Type of a Package row that is already linked to a container.
Cause: a Package linked to a container cannot use a container-type Package Type (like 40FT HC) - that type belongs on the Container record, not the Package inside it.
Fix: only choose a non-container Package Type (such as Carton 60x40x35 or Pallet) for a Package; leave the container type set on the Container row itself.
See also
Related articles
check the cargo details against the shipper’s documents before preparing the SI or draft B/L