Create and Manage ZBS Message Templates (Admin/IT)
Guide Info
Note
Out of scope for this guide:
How Sales sends templates from sales orders → see Send ZBS Message Templates from Sales Orders
CS replying to Advisory Messages in Discuss → see Reply to Zalo OA Messages
OAuth setup and initial Zalo OA configuration → see Configure Zalo OA
Creating a Zalo OA account on Zalo Business — that is done at business.zalo.me, not in Viindoo
—
Scenario in this guide: Khánh (IT Admin) receives a request from Marketing: create a new template “Delivery Schedule Notification” so the Sales team can send it to customers 1 day before scheduled delivery. The template must display: customer name, order code, expected delivery date, delivery address, and driver phone. Khánh will create the template in Viindoo, configure parameters to auto-populate from the sales order, submit to Zalo for approval, then enable it for Sales to use.
—
Step 1 — Understand why ZBS templates must be approved by Zalo first
Each ZBS message template (Zalo Business Solutions Template Message) is a structured message strictly controlled by Zalo. Businesses cannot send any content they choose — Zalo requires approval of each template before sending, for two reasons:
Anti-spam and abuse: ZBS templates can be sent proactively to customers without waiting for customers to message first, unlike Advisory Messages limited to a 7-day window. Without control, businesses could flood customers with advertisements.
Ensure quality: Zalo wants messages reaching users to be useful and of the right type. Templates with unclear purpose or vague content will be rejected.
Real-world impact for Khánh: The “Delivery Schedule Notification” template must be created in Viindoo, submitted to Zalo, and then the team must wait for Zalo’s approval — 1–3 business days — before Sales can start sending it. If the template is urgently needed for end-of-month deliveries, approval time must be factored into the plan.
—
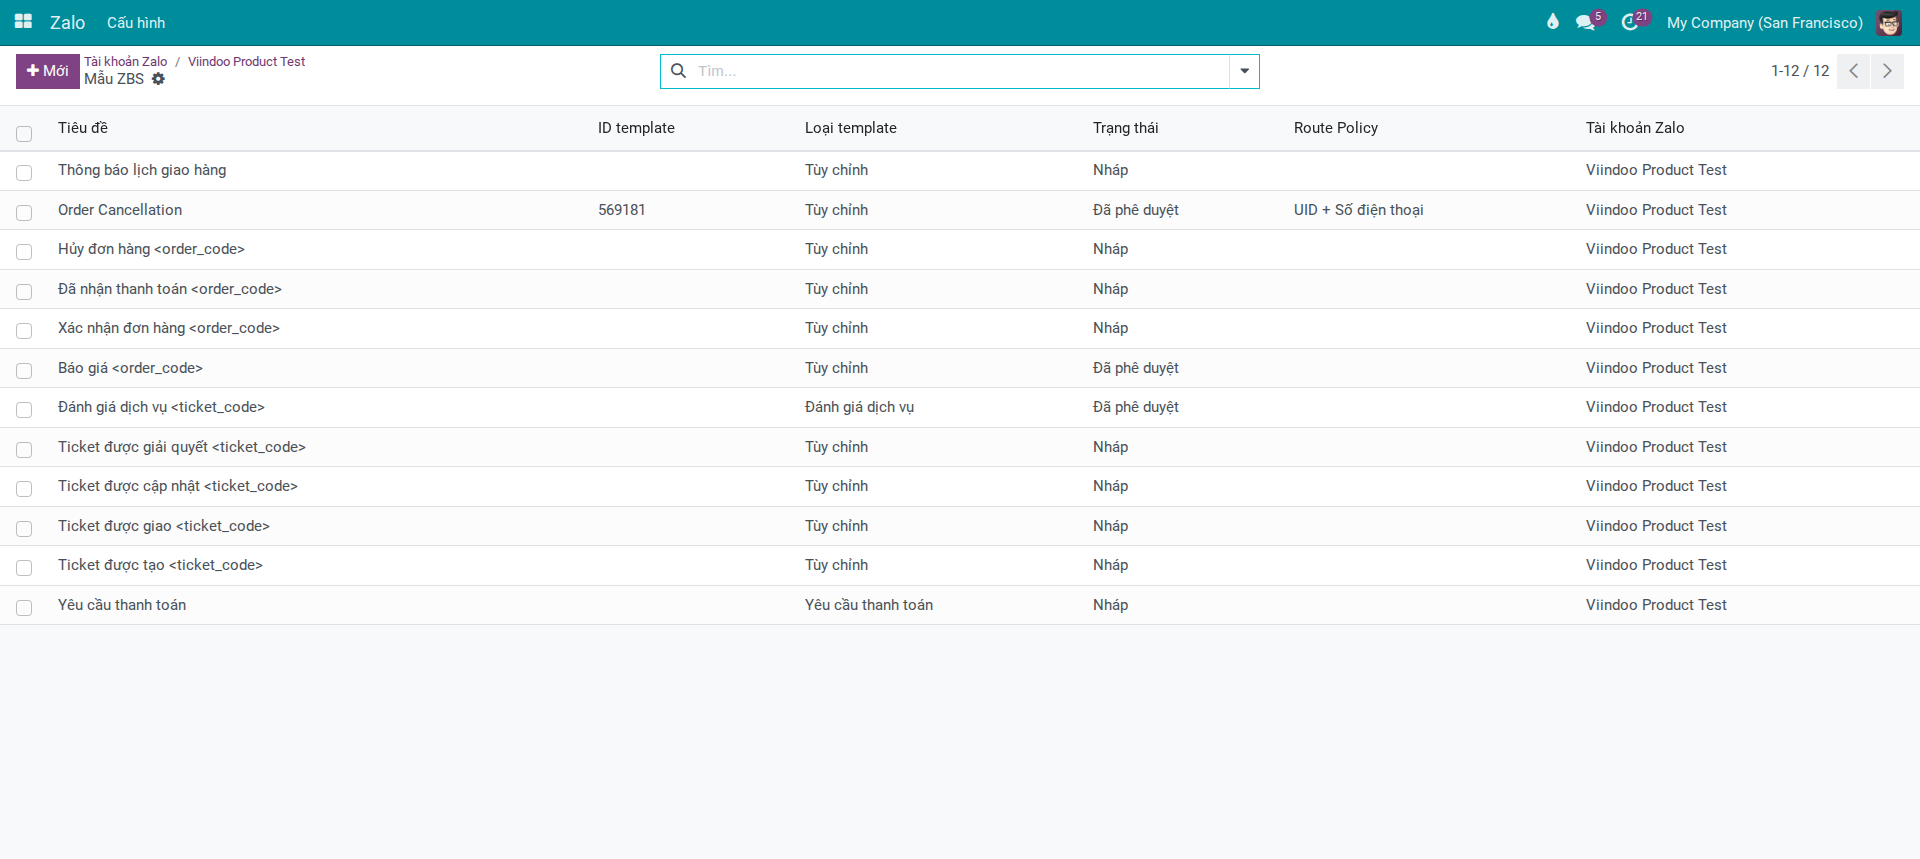
Step 2 — Access the ZBS Template list
ZBS templates are managed per OA account. The entry point to the template list is the specific OA account record, not a shared menu.
How to access:
Go to .
Select the OA account to manage templates for (example: An Phát Southern Region).
On the OA record, click the ZBS Templates counter button in the top right — the number next to it shows the total templates for this OA.
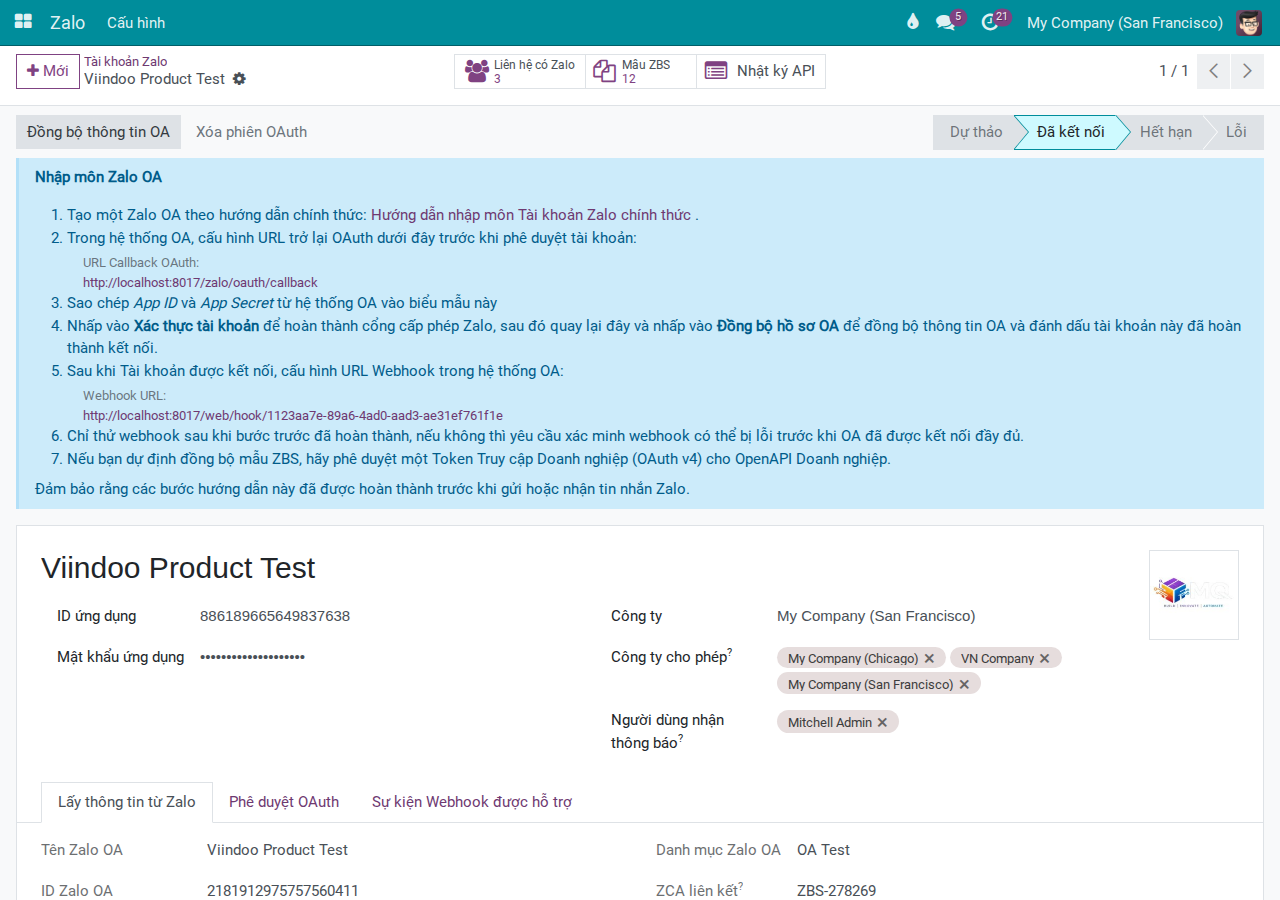
The system opens the template list for the exact OA you selected. When you click New here, the new template is automatically linked to this OA — Admin does not need to re-select the OA in Step 3.
The list shows all templates for this OA, including system-provided templates prepared for integrated business modules. These templates are typically in Draft status and require Admin to submit them for approval before the team can use them.
Note
Business modules with pre-built templates include: Sales (Send ZBS Message Templates from Sales Orders), Accounting (Send Payment Request Messages via Zalo from Invoices), and Helpdesk (Update Helpdesk Tickets via Zalo). Admin only needs to submit them for approval — no need to build content from scratch.
Tip
Verify Step 2 is complete:
Breadcrumb displays OA name → ZBS Templates, confirming you are in the correct OA.
The number of templates in the list matches the counter on the OA record.
When you click New, the Zalo Account field on the form is already filled with this OA — no need to re-select it.
—
Step 3 — Create a new template: understand required fields before filling
Click New to open the ZBS template form. Khánh will see multiple fields. It is important to understand the purpose of each field group before filling them, because some choices cannot be changed after submission.
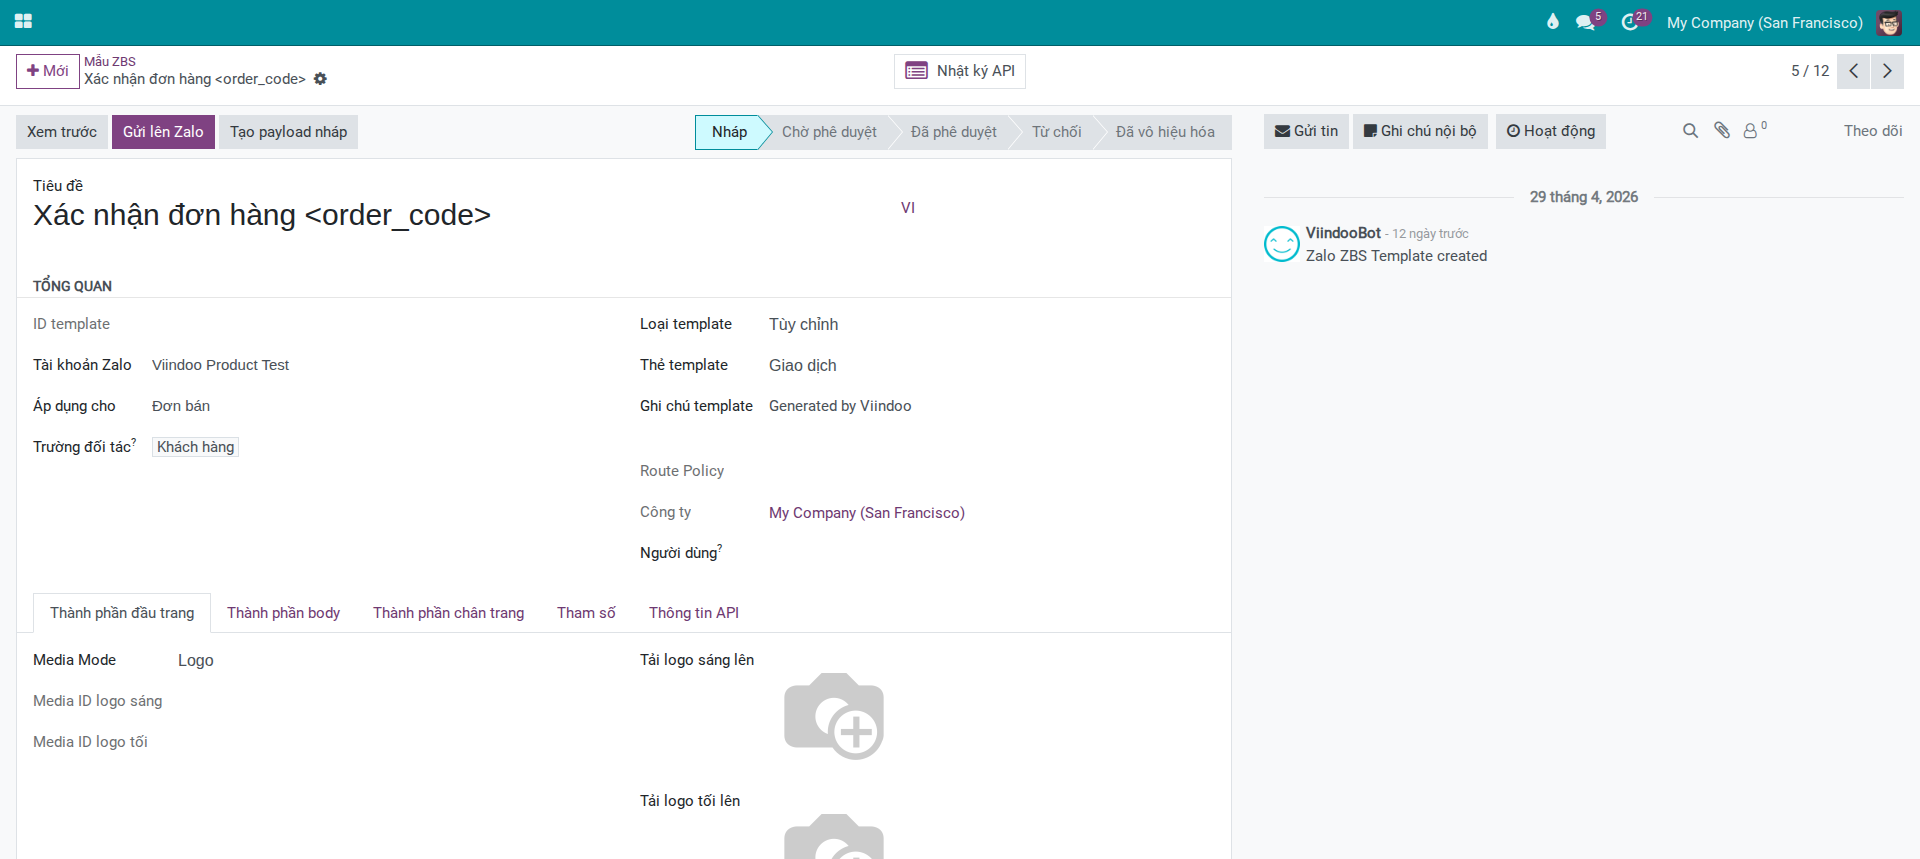
Step 3a — Overview section: fill in basic identifier fields
Overview section — fields to fill first
Title field — at the top of the form, this is the template name displayed internally in Viindoo. Enter a clear name so Sales recognizes the right template when selecting it in the wizard. Khánh enters: Delivery Schedule Notification.
Zalo Account field — links this template to an OA. Important when the business has multiple OAs (e.g., Southern Region OA and Northern Region OA). Can only be changed in Draft status — it locks after submission.
Applies On field — the business document type this template pulls data from. Khánh selects Sales Order because the delivery schedule notification is linked to a sales order.
Partner Field — choose the customer field on the source document. For Sales Order, select the primary customer field so the system identifies the correct recipient.
Tip
Checkpoint for Step 3a:
Title is filled with a clear name: Delivery Schedule Notification.
Zalo Account has the correct OA selected.
Applies On = Sales Order, Partner Field is set to the correct primary customer field.
—
Step 3b — Template Type and Template Tag: decisions that affect approval speed and fees
Decide on Template Type and Template Tag:
These two choices significantly affect Zalo’s approval speed and fees. Khánh must choose correctly before submitting.
Template Type:
Type |
Purpose |
Use When |
|---|---|---|
Custom |
Standard notification message with flexible content: can include table, paragraphs, buttons |
Order notifications, delivery schedules, status updates — the most common type |
Authentication |
Send OTP verification code — only logo + OTP + 1 paragraph, no buttons |
When you need to verify user identity via Zalo. Rare in standard sales operations |
Payment Request |
Message with bank transfer information — must have logo and at least 1 button |
When customers pay directly via bank account information shown in the message |
Voucher |
Message sending coupon/discount code with terms of use |
Promotional campaigns, VIP customer care |
Service Rating |
Collect 5-star feedback from customers after delivery or service completion |
After delivery or support ticket closure |
Khánh selects Custom — the best fit for a delivery schedule notification.
When in doubt, default to Custom. Other types have stricter structure with required components.
Template Tag:
The tag determines the template’s purpose and directly affects Zalo’s approval likelihood:
Transaction — Use when: message triggered by customer action (placing order, payment, delivery request). This tag has the fastest Zalo approval and lowest rejection rate. Use for “Delivery Schedule Notification”.
Customer Care — Use when: proactive customer care after purchase (check-in, usage guidance, reminders). Usually approved if content is appropriate.
Promotion — Use when: advertisements, discounts, marketing campaigns. Zalo’s strictest control — higher rejection rate; often requires the business to have registered for ad packages or have good OA history.
Khánh selects Transaction as the template tag. The “Delivery Schedule Notification” originates directly from a confirmed sales order — this is a transaction, not an advertisement.
Warning
Declaring the wrong tag → Zalo rejects and may flag the OA.
Example: declare tag as “Transaction” but the actual content is an upsell pitch → Zalo rejects + records violation. Repeated violations may restrict the entire OA’s ability to submit new templates, not just that one. An OA under submission restrictions affects the entire Sales and Accounting teams using Zalo.
Route Policy:
Zalo sets this after approval and sync — Admin cannot set it when creating a new template. After the template is approved and synced, the system displays:
UID — send via Zalo UID, customer must have followed the OA
Phone (SDT) — send via phone number, no need to follow OA
UID + Phone — try UID first, fallback to phone
Users field:
By default, this field auto-fills with the user creating the template — clear it if you want all internal staff to use it. Or add/edit specific user names to restrict access to only certain people (example: only Sales Manager can send “Delivery Schedule Notification”).
Tip
Checkpoint for Step 3b:
Template Type = Custom
Template Tag = Transaction
Users field is set correctly (or left empty if everyone should have access)
All fields above cannot be changed after submission — review carefully before moving to Step 4.
—
Step 4 — Design template content
After filling Overview, Khánh must design template content using the form’s tabs.
Note
The ZBS template form has three content tabs: Header Components, Body Components, and Footer Components. Each tab is separate and must be filled in sequence. The system does not auto-populate template content — Admin must design each section before moving to Step 5 to configure parameters.
Header Components tab
Select Media Mode: Logo or Image.
Logo — Use for: business notifications (orders, deliveries). The system uses the company logo. This is Khánh’s choice for “Delivery Schedule Notification”.
Image — Use for: messages with large image banners (vouchers, promotions). Requires JPG/PNG upload, max 500 KB, 16:9 aspect ratio.
If you choose Logo, upload Light Logo and Dark Logo if the company logo differs between backgrounds. If not uploaded, the system uses the company logo from Settings.
Body Components tab
The body tab has two main sections:
Table — A label-value information list. Khánh creates table rows for “Delivery Schedule Notification”:
Label:
Order Code, Value:<order_code>(Variable type)Label:
Expected Delivery Date, Value:<delivery_date>(Variable type)Label:
Delivery Address, Value:<delivery_address>(Variable type)Label:
Driver Phone, Value:<driver_phone>(Variable type)
Syntax: variables use angle brackets <parameter_name> — this name must exactly match the parameter name declared later in the Params tab.
Paragraph — Maximum 4 lines. Khánh adds 1 line: Hello <customer_name>, your order will be delivered tomorrow. Please keep your phone available to receive the package.
Footer Components tab
Add buttons if needed. Example: “View Order Details” button linking to portal.
Note
For Custom template type, if the Header uses Image then at least 1 Footer button is required — this is a Zalo constraint, not Viindoo. If Header uses only Logo, buttons are optional.
—
Step 5 — Configure parameters: the step that determines if messages are sent correctly
This is the most important and frequently skipped step. If skipped or misconfigured, messages may send but customers will receive variables like <order_code> or <delivery_date> instead of actual data.
Why parameters must be configured:
Each variable <parameter_name> in template content must declare its data source. Without this declaration, the system does not know where to pull data from, and the variable remains unchanged.
Open the Params tab.

Auto Params feature:
Click Auto Params — the system scans the entire template content (title, paragraphs, table, buttons), finds all variables <name>, and pre-creates corresponding parameter rows. Khánh clicks this first to build the foundation, then only needs to fill the Field Path for each row.
After running Auto Params, 5 parameters appear: customer_name, order_code, delivery_date, delivery_address, driver_phone. By default, the Source for new parameters is Manual Value. Khánh needs to change parameters that pull from sales orders to Field of Model, then fill in the corresponding Field Path:
Fill in Field Path for each parameter:
Parameter Name |
Params Type |
Source |
Field Path |
|---|---|---|---|
|
Customer Name (30) |
Field of Model |
Customer name field on sales order |
|
Code (30) |
Field of Model |
Sales order code field |
|
Time (20) |
Field of Model |
Confirmed delivery date field on sales order |
|
Address (200) |
Field of Model |
Delivery address field on sales order |
|
Phone (15) |
Manual Value |
(leave empty — Sales fills in when sending) |
For driver_phone, select Manual Value as the source instead of Field of Model because driver phone is typically not stored on the order. Sales will fill it in manually when sending.
Example Record:
After filling parameters, select an actual sales order with data in the Example Record field. The system uses this record to preview content and verify that parameters pull the correct data.
Tip
Verify Step 5 is complete:
All 5 parameters are in the list; no row is missing a Params Type
Field Path is filled in correctly according to sales order data
Click Preview → the preview shows correct customer name and order code from the example SO — no variables like
<customer_name>remain unfilledFor
driver_phone: preview shows empty or sample text — this is correct because it is a manual value
—
Step 6 — Submit template to Zalo
After completing content and parameters, Khánh submits the template to Zalo. This is the actual approval request submission, not just internal saving.
Step 6.1 — Build Draft Payload:
Click Build Draft Payload. The system consolidates all configuration to prepare for submission and saves it in the API Information tab. Check this tab to confirm the draft payload was created.
This step helps Khánh preview exactly what data will be sent. If there are configuration errors, they display here before clicking submit.
Step 6.2 — Submit to Zalo:
Click Submit to Zalo (blue button, primary action on the form header). This button only appears when the template is in Draft status.
When clicked: - If the template has no Template ID yet: the system sends a new approval request to Zalo. - If the template already has a Template ID (resubmission after rejection): the system sends an update request.
After Zalo responds successfully: - The Template ID field appears — this is the ID assigned by Zalo - Status changes from Draft → Pending - The form locks most content fields while status is Pending
Warning
Cannot withdraw approval request after submission.
Once in Pending status, if you discover content errors, you must wait for Zalo to respond (approve or reject). Only if Zalo rejects can you edit and resubmit immediately. Carefully review the preview in Step 5 before submitting.
Tip
Verify Step 6 is complete:
Status displays Pending
Template ID field has a value — Zalo received and assigned an ID
Submit to Zalo button has disappeared (only shows when status is Draft)
If API encounters an error: Viindoo displays an error message from Zalo — see the troubleshooting section to interpret API errors
—
Step 7 — Monitor approval status from Zalo
After submission, Zalo reviews and responds via webhook (auto-updates in Viindoo) or Admin manually syncs. Actual approval time: 1–3 business days.
Possible statuses:
Pending — Zalo is reviewing. No action needed yet.
Approved — Zalo approved. Move to Step 8 to enable for team.
Rejected — Zalo did not approve. See Step 9 to fix and resubmit.
Disabled — Template was previously Approved but Zalo disabled it (usually due to quality drop that triggered Zalo intervention, or OA admin manually disabled it in Zalo OA Manager).
How to sync status manually:
If after 3 days you still don’t see automatic updates (webhook may be delayed due to server restart or temporary disconnection): open the template form → click Sync Template (button on header, only visible to Admin when template has a Template ID). The system calls the API to fetch the latest template details from Zalo and updates the status.
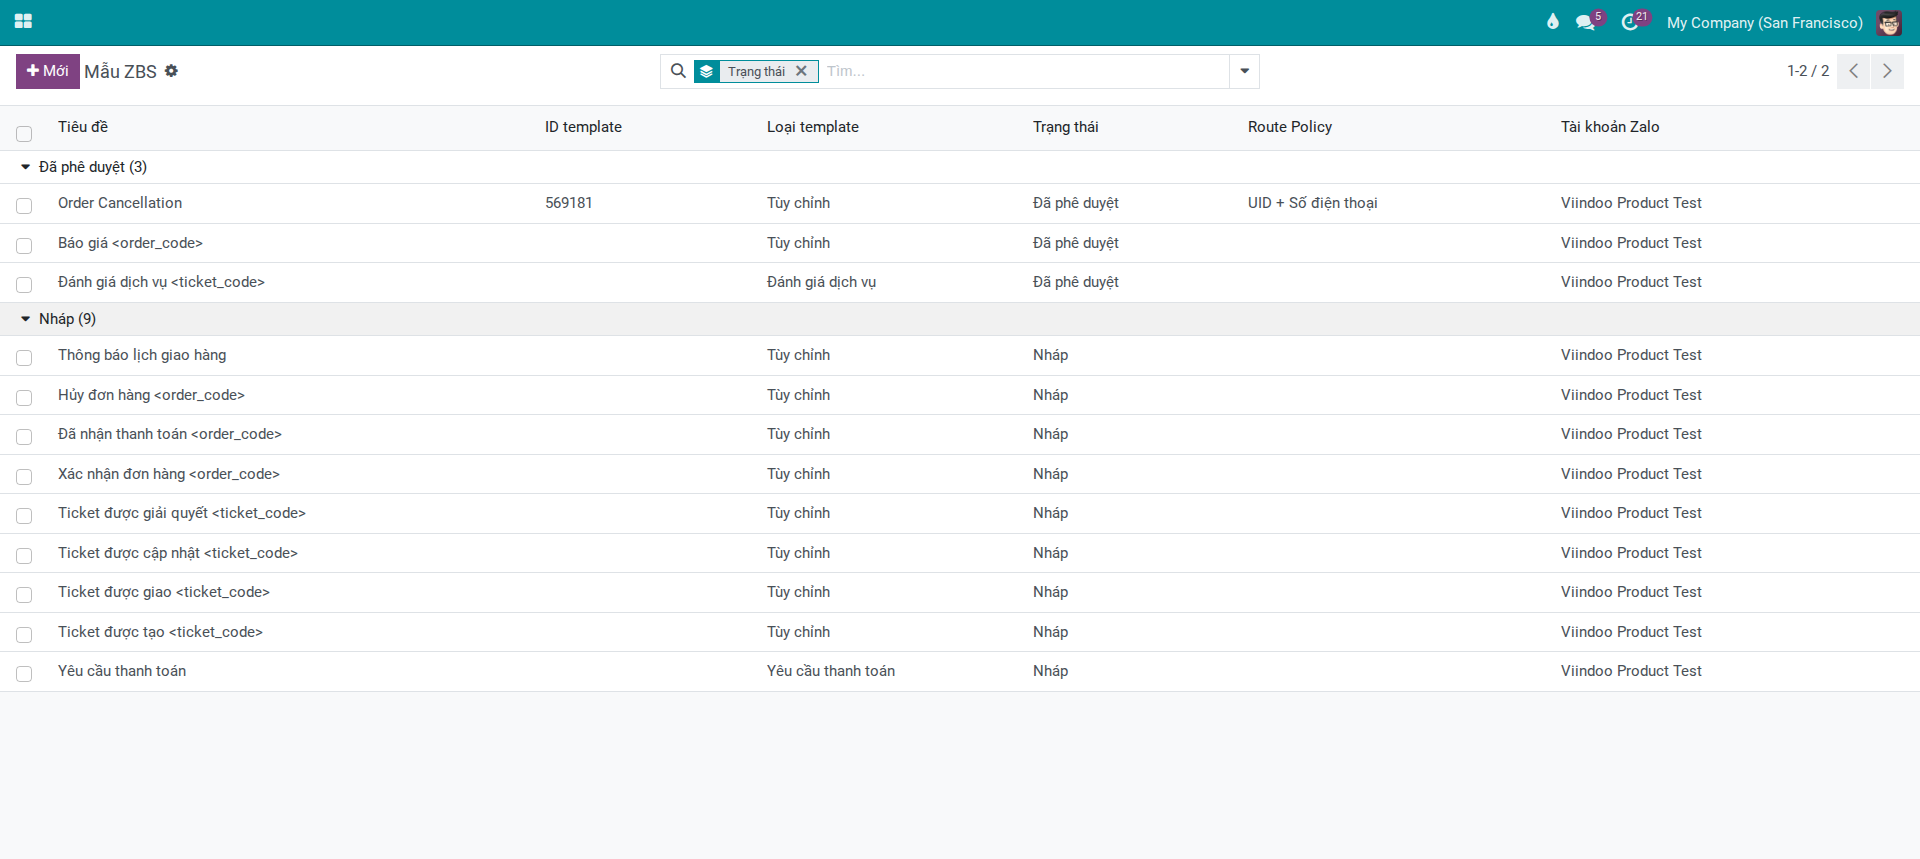
How to monitor multiple templates at once:
Return to ZBS Templates list → filter or group by Status to see total counts of Pending, Approved, Rejected. The list displays Title, Template ID, Template Type, Status, Route Policy, and Zalo Account columns.
—
Step 8 — When Zalo approves: verify team can use it
When status changes to Approved, the template is available for team use if it is not archived and access permissions are correct.
Check archive status:
By default, new templates are active. In practice, if a template is archived, Sales will not see it in the send screen.
In practice: Approved status + not archived + user has correct access permissions = template appears in send screen.
When to temporarily archive a template:
Seasonal template: used only during a specific period (example: “Special Delivery Notification for Lunar New Year”). Archive after the period ends to hide it from Sales’ send screen.
Legacy template being phased out: old template being replaced by a new one; disable the old one to prevent Sales confusion.
Template with LOW quality under investigation: temporarily disable while reviewing content to avoid further damaging the quality score.
To temporarily hide a template: open form → Action (⚙) → Archive. To re-enable: open archived template (remove Active filter in list) → Action → Unarchive.
Tip
Verify Step 8 is complete:
Status = Approved, template is not archived
Go to , open any SO → click Send by Zalo → in the send screen, the ZBS Template field displays “Delivery Schedule Notification” in the dropdown
Preview shows correct customer name and order code from that SO — no variables like
<customer_name>or<order_code>remain unfilled
—
Step 9 — Monitor Template Quality and performance after launch
After the Sales team starts sending, Khánh must monitor the Template Quality score to know if the template is performing well or starting to have issues.
View Template Quality:
Open the template form → API Information tab → Pricing and Quota section → Template Quality field.
Zalo updates this value via webhook when it changes, or Khánh can manually sync using the Sync Template button.
What each quality level means:
HIGH — Template performs well. Recipients don’t report spam or block the OA. Sending continues normally within monthly quota.
MEDIUM — Template is receiving negative feedback. Zalo may start limiting daily send volume for this template. Review how the team is using it.
LOW — Zalo is heavily restricting the template. Its send quota drops significantly. At LOW level, one template affects the shared quality score of the entire OA — other templates on the same OA may slow down.
Warning
A LOW Template Quality affects the entire OA, not just that one template.
When one template is rated LOW, Zalo reduces the OA’s overall rate limit. For an OA using 5–10 templates across Sales and Accounting, a single LOW template can prevent the whole team from sending the messages they need that day. Real-world impact: the Sales team loses the ability to send order notifications on time, and customers must wait until the next day.
Common causes of a LOW rating: - Sales sends the template to the wrong audience (a customer with no order receives a “Delivery Schedule Notification”) - Sending the same message to the same customer repeatedly over a short period - Template content does not match the message type registered with Zalo
Procedure when quality drops:
Archive this template to immediately pause the team’s sending and avoid worsening the score further.
Review the send history: who sent it, to which audience, and over what time period.
Identify root cause with Marketing/Sales.
Update template content or retrain team on proper usage.
If you fix content: resubmit (see Step 10). If it’s just a usage issue: re-enable after team confirms understanding.
Track fees and quota:
The API Information tab displays:
Price (UID) and Price (SDT) — per-message fees by route, synced from Zalo after approval.
Note
Viindoo currently displays pricing by route and template quality (when Zalo provides data), but does not yet show monthly quota counter (used/limit) on the template form. Admin checks quota and balance at Zalo Business Portal.
—
Step 10 — Maintain templates: when to create new, when to archive old
After a template is approved and in use, Marketing sometimes wants to change content. With the current UI, the Submit to Zalo button only appears when a template is in Draft status. For approved templates running smoothly, the safe strategy is to create new templates in parallel.
Recommended operational principles:
Approved templates actively in use: keep unchanged to prevent disruption.
When major content changes are needed: create a new template, submit it, wait for approval, then switch team to the new template.
Old templates no longer in use: Archive to hide from wizard, but retain for audit history.
Warning
For templates actively used by the team daily, do not edit directly during operating hours. Prioritize creating a new template and only switch when the new one is approved, to prevent disruption to messaging.
Decision table — edit, create new, or deprecate:
Situation |
Action |
Reason |
|---|---|---|
Edit content of widely-used template |
Create NEW template in parallel; after approval switch team to new template |
Prevents disrupting the old template currently in production |
Major structural change (add/remove parameters or change messaging) |
Create NEW template in parallel; after approval activate new + deactivate old |
Keeps old template running while waiting for new approval; no team disruption |
Seasonal template no longer needed |
Archive (deactivate) old template — do not delete to preserve history |
Template ID remains useful for audits or if Zalo asks |
Template rejected and needs content fix |
Read rejection reason → click Reset to Draft → edit → resubmit |
Standard workflow for fixing rejected templates |
—
Common troubleshooting scenarios
Symptom: Status shows Rejected. API Information tab → Reject Reason field contains Zalo’s feedback.
Common causes and fixes:
“Content is promotional in nature” — Template declares Transaction tag but contains words like “discount”, “promotion”, “buy now”. Remove these phrases; keep only operational notification content.
“Wrong template type” — Example: declare Transaction but actual content is feedback collection. Change tag to Customer Care or adjust content.
“Content is unclear” — Template has vague phrases or unexplained variables. Rewrite for clarity; ensure recipients understand what this message is about.
“Missing required component” — Example: Payment Request template missing bank info. Add all components Zalo requires for this template type.
How to fix:
Read the Reject Reason field in API Information tab carefully.
Click Reset to Draft button (only visible when status is not Draft or Approved) to return the template to Draft so you can edit.
Fix content according to the rejection reason.
Click Build Draft Payload again → click Submit to Zalo.
Add a note in Chatter explaining the rejection and how you fixed it, for the team’s future reference.
Symptom: Click Preview on the template form → in the preview window, some fields still show <order_code> or <delivery_date> instead of actual values from the example record.
Causes:
Field Path field was entered incorrectly.
Wrong data source selected for the parameter.
Example record has no data in the field being pulled.
How to fix:
Open the Params tab → review each row: - Is Source = “Field of Model” with a Field Path value? - Try changing the example record to an SO with complete data.
If the field path is wrong: correct it based on the source document’s data.
If no suitable auto-populated data exists: change Source to Manual Value — Sales will fill it in when sending.
Click Preview again to confirm the fix.
Do not submit if preview still has unfilled variables — Zalo will approve the payload, but when Sales actually send, the message delivered to customers will still have empty variables.
Symptom: Template shows Approved in ZBS Templates list, but in Sales’ send screen, the template does not appear, or clicking Send shows an error.
Causes and checks in order:
Template is archived — Open template form → Action → Unarchive.
Route Policy doesn’t match customer data — Example: template route is UID but customer hasn’t followed OA. Sales must ask customer to follow OA, or use a different template with matching route.
Zalo Account mismatch — Template is linked to “An Phát Southern Region” OA but Sales is working from a Northern Region company SO. Check Zalo Account field on template form.
User access restricted — Template has a user restriction, but Sales user is not in the list. Open template → add the user or remove the restriction.
Temporary connection error — Rare but possible. Check API Logs on the template form. If there is temporary infrastructure error, try sending again later.
Symptom: Template Quality field shows “LOW”. Sales team reports sending is restricted or failures are higher than usual.
How to handle by priority:
Immediately: Archive the LOW template to stop further distribution.
Investigate today: Review send history in API Logs tab or Zalo message list. Identify: who sent, to whom, when did volume spike.
Assess root cause: - Sales sent to wrong audience → retrain team - Template content is confusing → fix content and resubmit - Customers don’t expect these messages → adjust send process
Resubmit if fixing content: After fixing, click Reset to Draft → click Submit to Zalo again. Zalo will re-evaluate quality through real-world sending after approval, not immediately.
Symptom: Multiple templates show send errors. Errors from Zalo API usually mention “quota exceeded” or “limit reached”.
How to fix:
Check your ZBS Account (ZCA) on Zalo Business (outside Viindoo) — Admin accesses at business.zalo.me to view balance and transaction history.
Determine why quota is exhausted: did you send more than expected, did one LOW template drain shared quota, or is this month unusual.
If ZCA balance is empty: add credit at Zalo Business Portal.
In the meantime: notify Sales to reach customers via other channels (phone, email, or Advisory Messages if customer messaged in the last 7 days).
No mechanism for “instant quota increase” — quota resets by calendar month or per OA subscription plan.
—