
Fill a booking or shipment from a document with AI
Guide information
Warning
The screenshots on this page use hypothetical sample data. The documents, extracted values and AI results shown are illustrative only and do not come from a real AI analysis or a real business.
Requirements
This tutorial requires the installation of the following applications/modules:
Document Parsing - an add-on you install separately. It installs Freight Document Parsing automatically alongside Freight Forwarder Management, which adds the Import from Document action and the 5 freight document templates.
A Shipping Instruction or Booking Confirmation repeats data that is already sitting in a PDF, a scanned image or a photo. Retyping it into Viindoo costs time and risks a slipped digit on a container number or an MBL No. that later blocks printing the HBL. AI Document Parsing reads the uploaded file and proposes the values - it never writes to the record until you review them and click Apply to Record. If a term here is new, see the Industry Glossary.
Running scenario: the Documentation officer fills the confirmed export shipment SHP/2611/00010 for
Phuoc An Wood Co., Ltd (2 x Container 40FT HC, Cai Mep International Terminal to Port of Hamburg,
carrier Maersk Line Vietnam - Hai Phong Branch, Incoterm FOB) from the customer’s Shipping
Instruction file SI_PhuocAnWood_SHP-2611-00010.pdf. The records are the Viindoo demo data, so yours
will differ.
Before you start
The Shipment or Booking already exists. Import from Document only fills a record that is already open - it cannot create a new Shipment or Booking from a document. Create the shipment first, for example from a confirmed quotation: see Freight Quotation.
You are in the User: All Shipments group (see the user’s Freight access in ). User: Own Shipments can only view shipments, so it cannot apply extracted data to one.
An administrator has set up and tested an approved AI Provider with a model that can read the uploaded file type - see Set up AI providers and freight document templates.
You already have the customer’s document in hand: a PDF, or an image such as a photo or a scan.
Step 1: Open the Import from Document wizard
This wizard is the only entry point for AI to read a document - there is no dedicated menu item, only an action on a record that is already open. The same action exists on a booking.
Go to and open the shipment SHP/2611/00010. Click the gear icon (Actions) next to the shipment reference, then choose Import from Document.
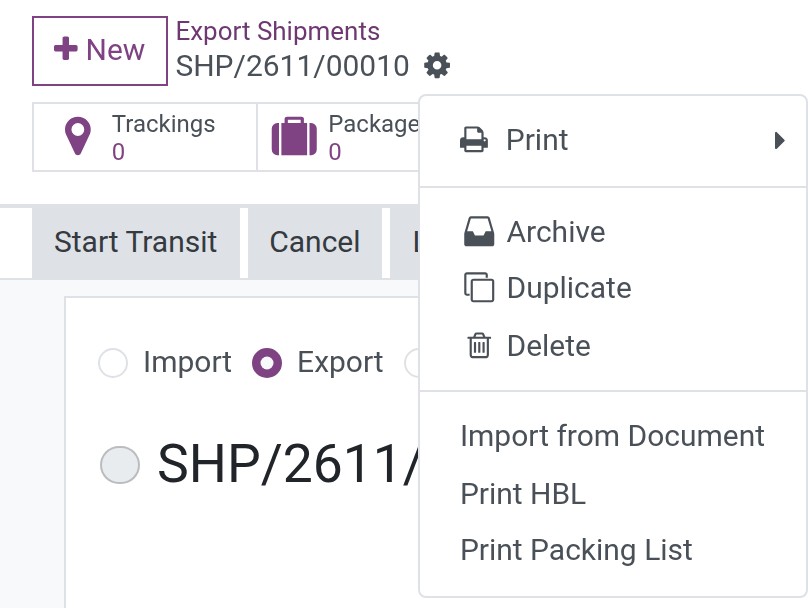
After you click it: the Import from Document wizard opens on this shipment, with the status bar on Pending and nothing extracted yet.
Tip
Step 1 is done when: the Record: line of the wizard shows SHP/2611/00010 - the shipment you meant to fill, not another one.
Step 2: Upload the file and check the document type and AI provider
Choosing the wrong document type sends the AI looking for the wrong set of fields - each document type has its own list of fields to extract.
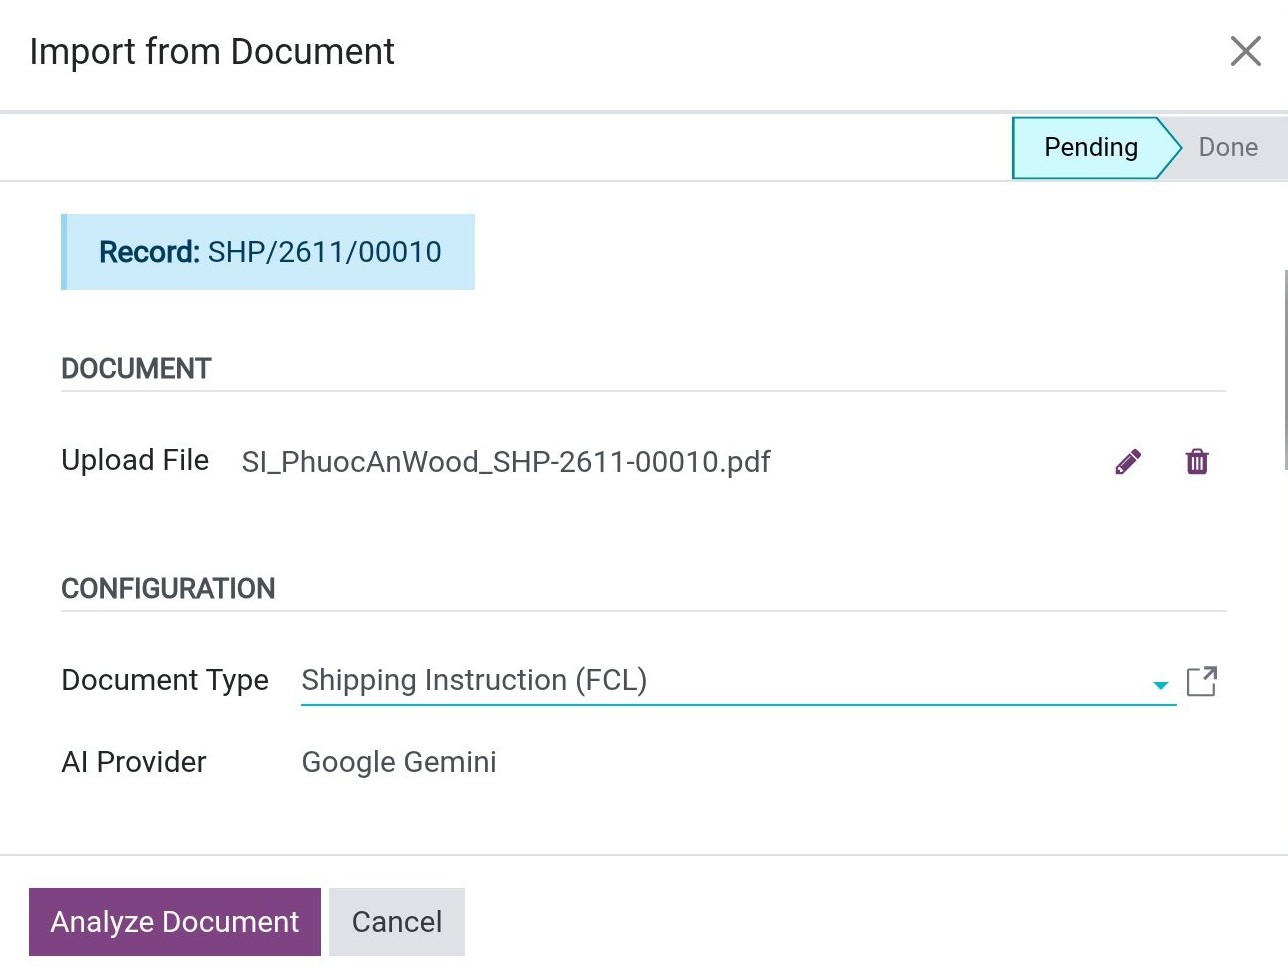
Upload File: choose
SI_PhuocAnWood_SHP-2611-00010.pdf.Document Type: when the PDF contains readable text that matches a freight template, the type is filled in as soon as the file is uploaded - here Shipping Instruction (FCL). Check it, and choose the right type yourself when it is empty (for example for an image or a scan, which are not read for this) or wrong. Only 4 choices appear on a shipment: Shipping Instruction (FCL), Shipping Instruction (LCL), Bill of Lading (Ocean) and Arrival Notice. The Booking Confirmation type is offered on a booking.
AI Provider: the default provider is preselected (Google Gemini in the demo data; when no provider is flagged as default, the first active one). Keep it, or choose another approved provider.
Tip
Step 2 is done when: Document Type reads Shipping Instruction (FCL) and the file name is visible in the Upload File box.
Step 3: Analyze the document
This is the step that actually calls the AI - it can take a few seconds to tens of seconds, depending on how long the file is.
Click Analyze Document.
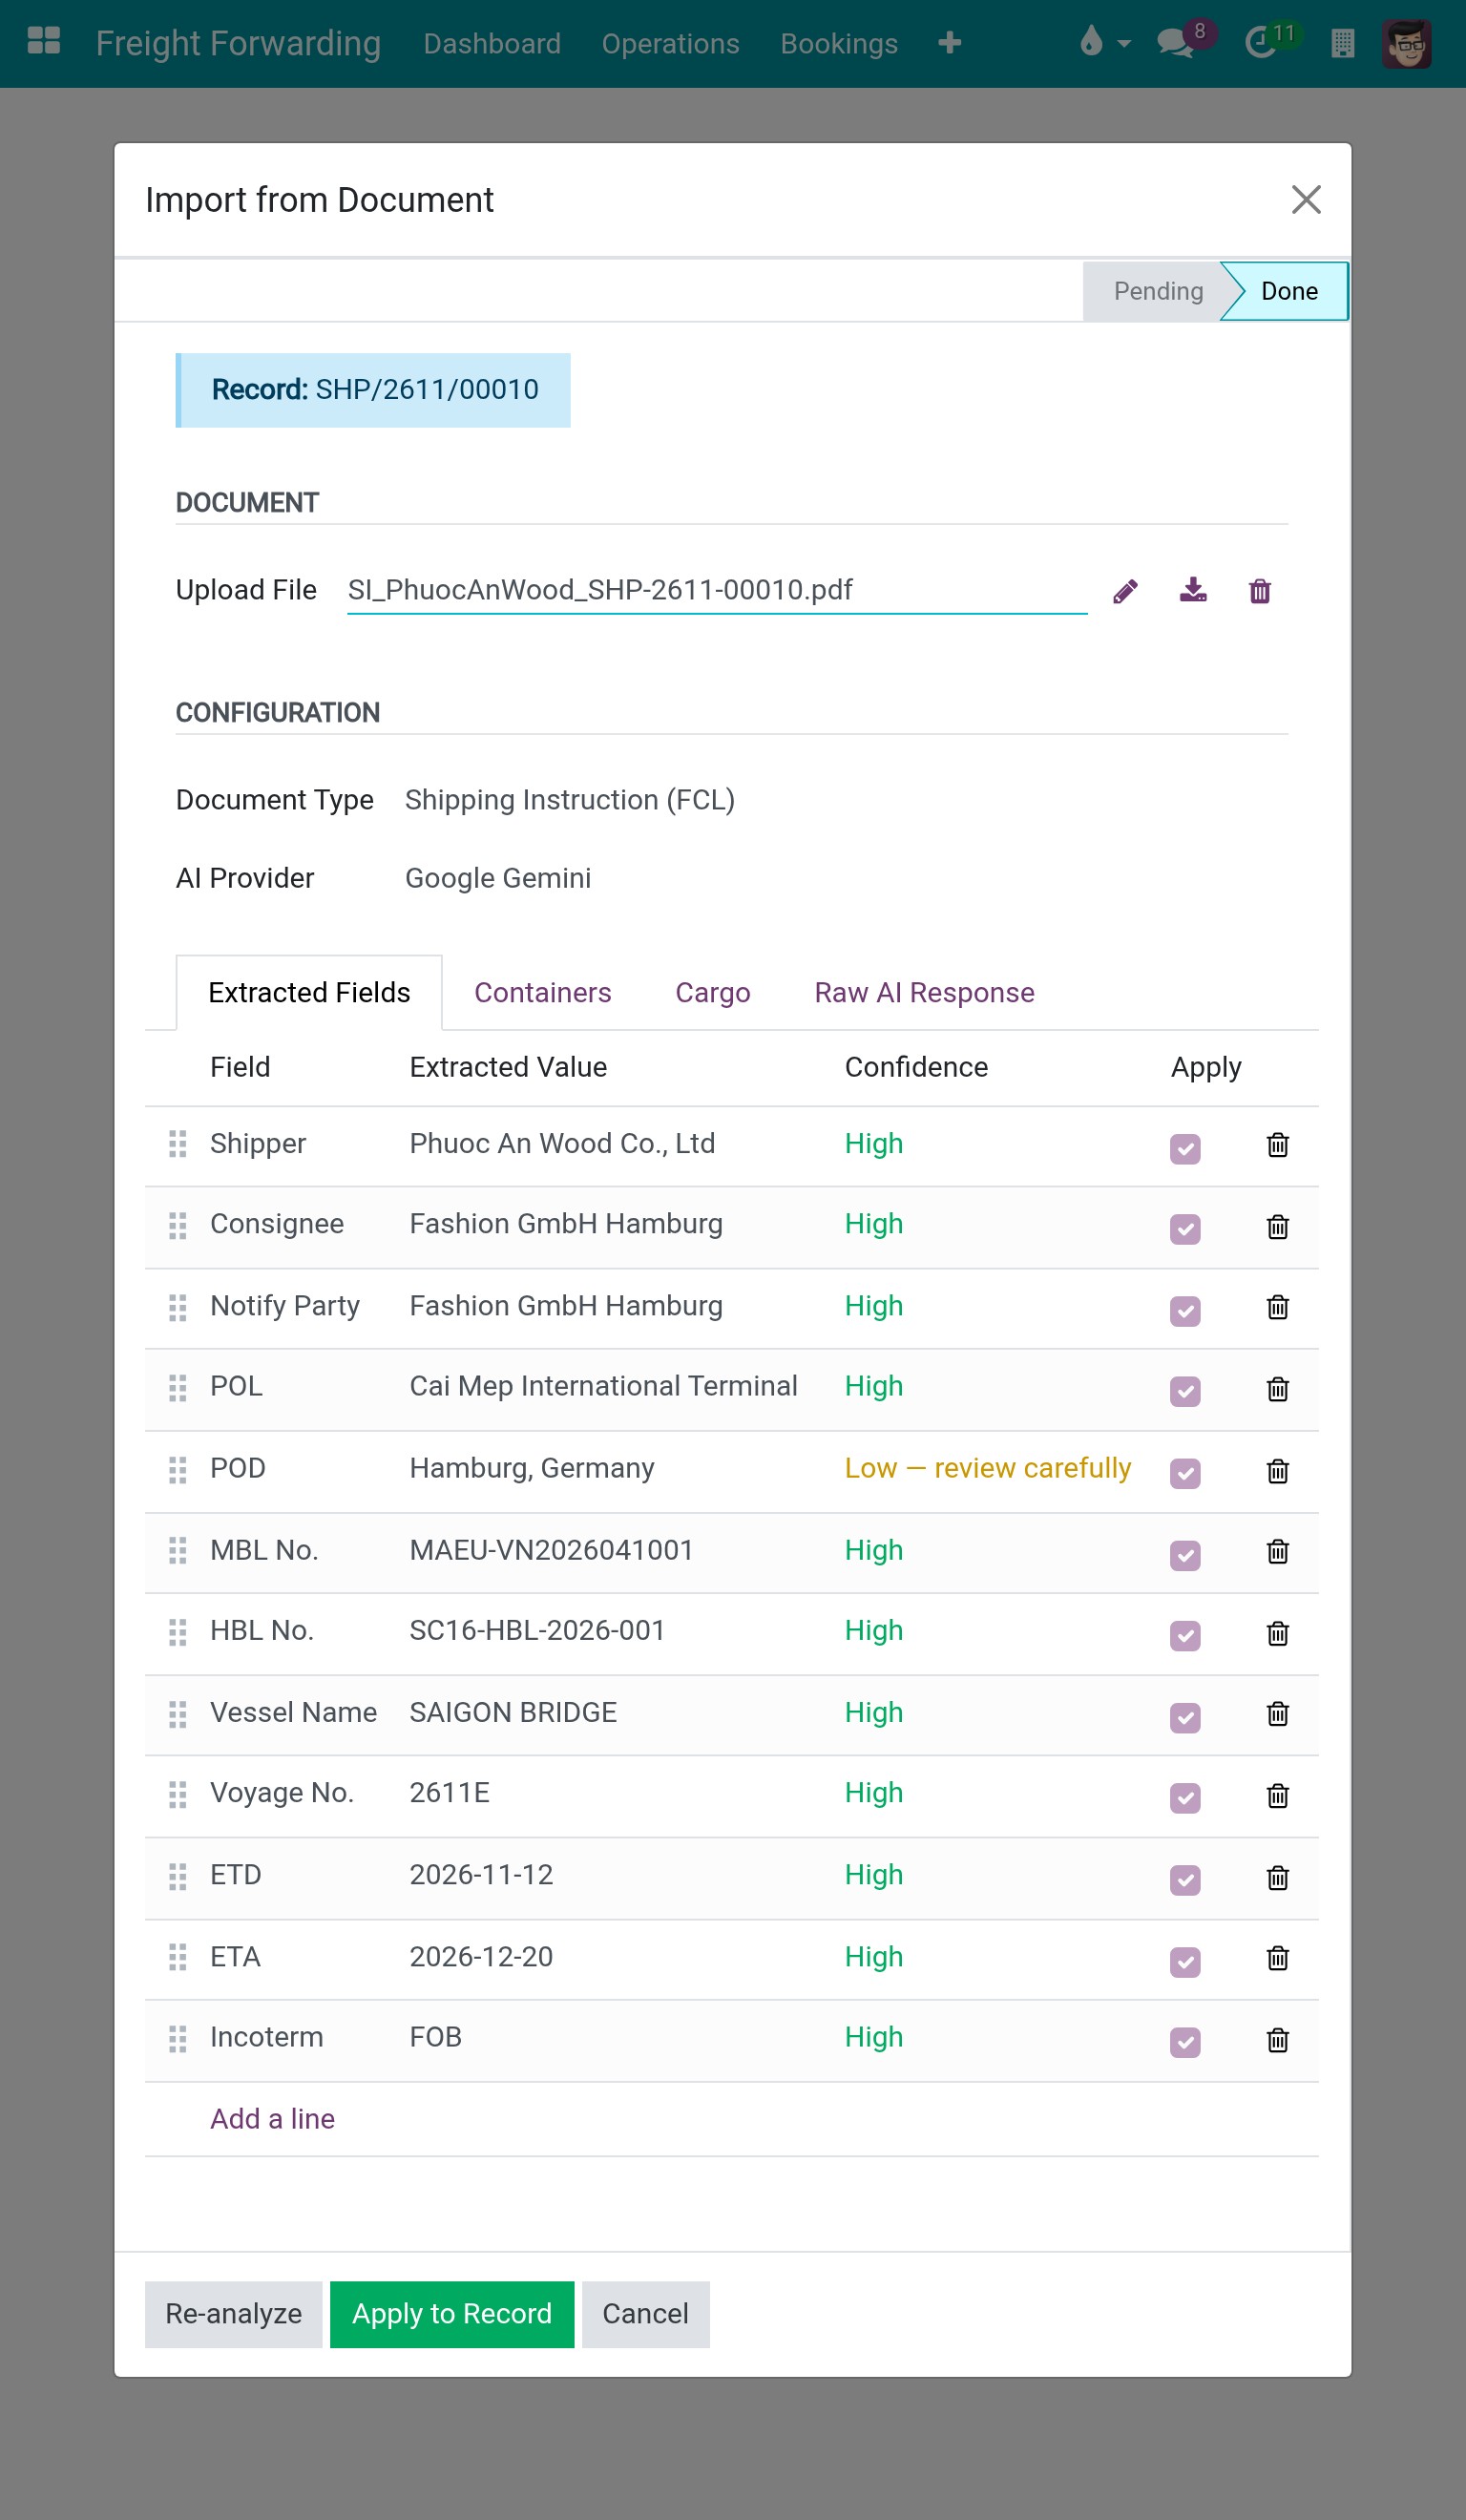
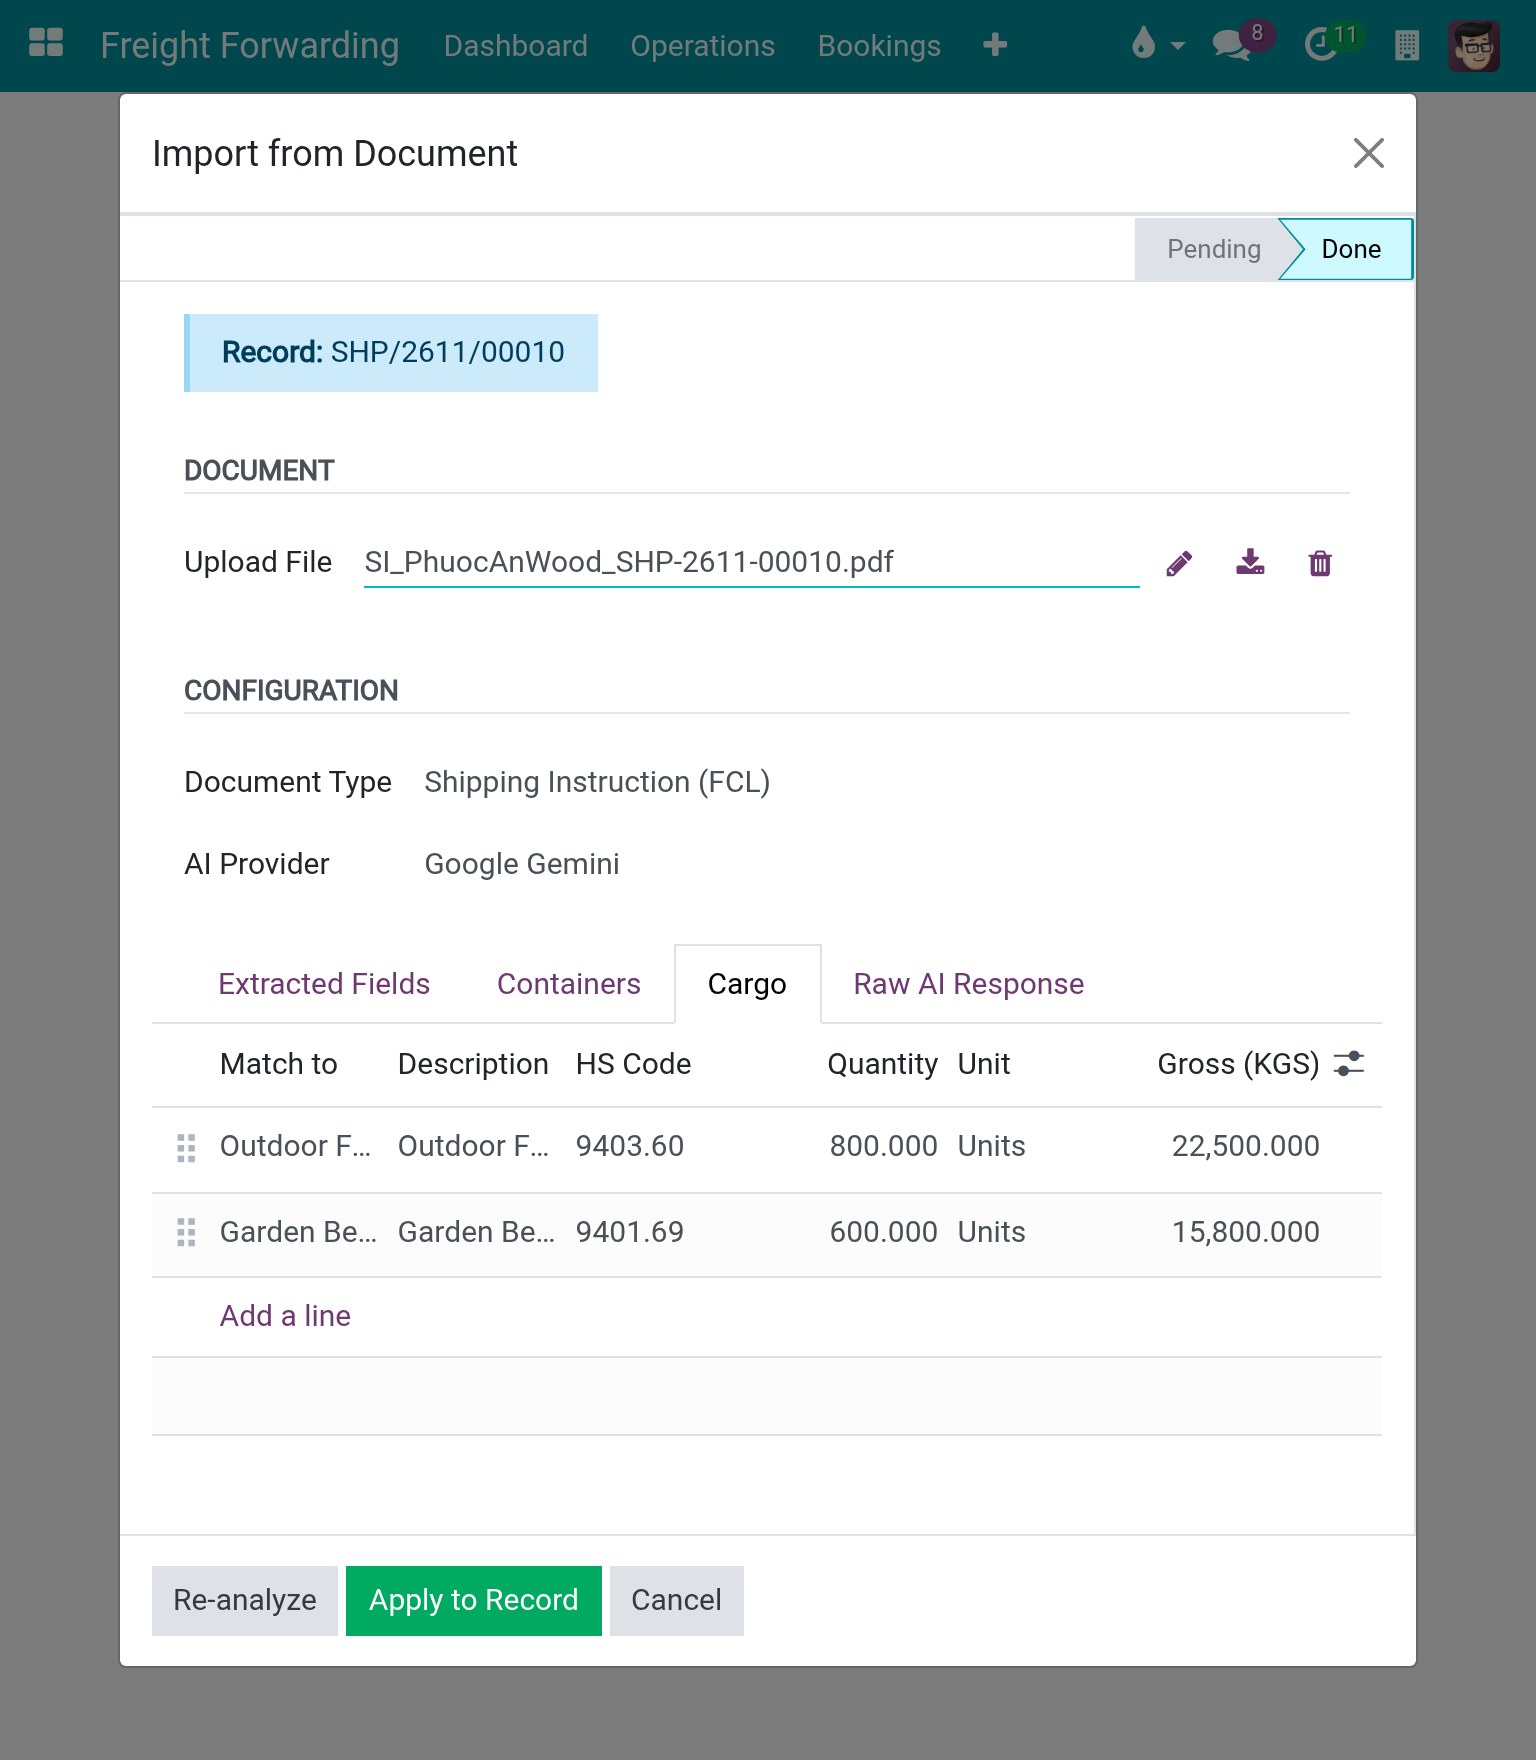
After you click it: the status bar at the top moves to Done, and up to three tabs appear:
Extracted Fields - one row per field of the template; for Shipping Instruction (FCL) there are 12: Shipper, Consignee, Notify Party, POL, POD, MBL No., HBL No., Vessel Name, Voyage No., ETD, ETA and Incoterm. Each row shows the Extracted Value, a Confidence rating and an Apply tick box.
Containers - one row per container the AI read, when it found any.
Cargo - one row per cargo line the AI read, when it found any.
Note
The number of container and cargo rows is exactly what the AI returned from the file - the system does not count or cross-check this number against a second source in the document (for example a “total packages” line). If the AI misreads and merges 2 containers into 1, the Containers tab shows 1 row with no warning at all.
Warning
If a PDF is longer than 40 pages, the system rejects it outright with a message such as: “The document has <N> pages, over the 40-page limit for AI extraction. Please split it into smaller files.” This does not apply to a 1-2 page SI like this one.
Tip
Step 3 is done when: the status is Done and the extracted rows are available for review. A High rating does not replace checking the original document. Review every Low and Not found row in Step 4 before applying any data.
Step 4: Cross-check the extracted fields, containers and cargo
This step is mandatory by process, even though the software does not force it: the AI can misread a name or split or merge containers incorrectly.
Open the original PDF side by side and read every row of Extracted Fields against it - Shipper, Consignee, Notify Party, POL, POD, MBL No., HBL No., vessel, voyage, dates and Incoterm.
Note
An SI often writes “SAME AS CONSIGNEE” for the Notify Party. The system replaces that phrase (and “same as above”, “as above”, “ditto”) with the Consignee’s value and its confidence, so the row shows the name instead of the literal text.
A port row is rated Low when no port record - a sea port or an airport - has a name that contains the text the AI read. For example, an SI that says Hamburg, Germany does not match the port record Port of Hamburg that the shipment shows as Germany - HAM (DE), so POD shows Low while the other rows show High. Check that the text refers to the same port. If the location already on the shipment is correct, untick Apply for that row to keep it; do not assume that a readable port name has been matched to the right record.
Then check the other two tabs:
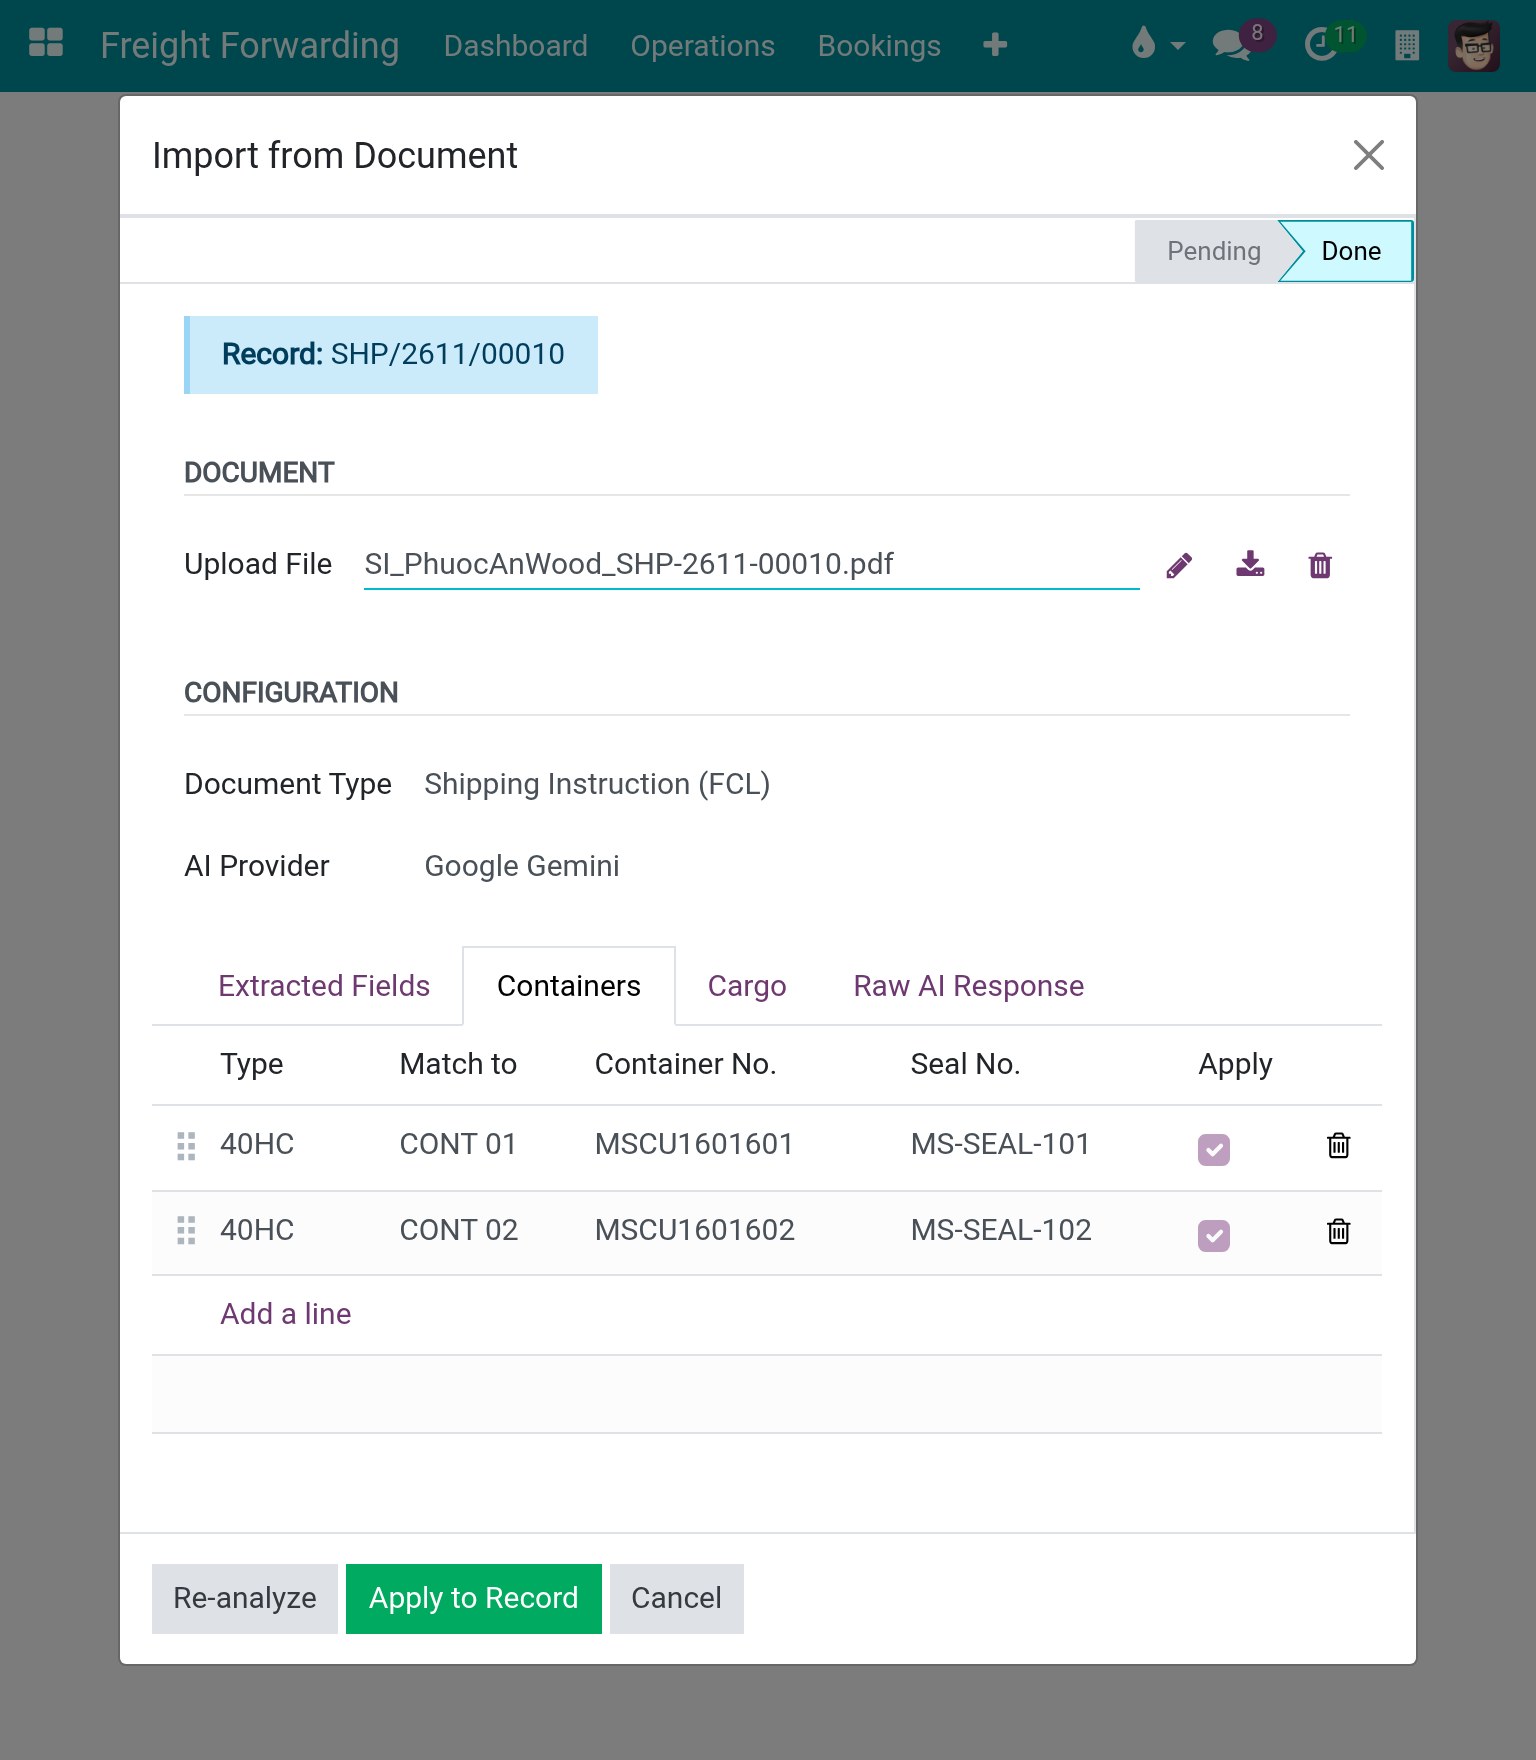
Containers: the columns are Type, Match to, Container No., Seal No. and Apply. Type shows the text returned by the AI (for example 40HC), which may differ from the Container 40FT HC name in your container-type records. Each row is paired with one of the shipment’s existing containers - by type first, then by order - and Match to shows which one. Check the pairing and the equipment against the SI.
Cargo: the columns are Match to, Description, HS Code, Quantity, Unit, Gross (KGS) and Volume (CBM). Each row is paired by order with an existing cargo line of the shipment.
Warning
A paired row overwrites the existing container (its number and seal) or cargo line (its description, quantity, unit, weight, volume, HS code and marks) when you apply. SHP/2611/00010 already carries two containers and two cargo lines, so a wrong pairing replaces correct data. Clear Match to on a row that should create a new line instead.
If a row is wrong or missing: untick Apply on that row. The Extracted Value column of the header rows is read-only - you cannot type a correction into it - so the right value has to be typed on the Shipment form after Step 5 instead. The Containers and Cargo tabs are different: you can correct those values directly inside the wizard.
Tip
Step 4 is done when: all header rows, every container row and every cargo row have been read back against the original SI - none of them left at its default without being looked at.
Decide what to do with a Low-confidence or Not-found field
Option |
Use when |
What changes |
|---|---|---|
Untick Apply, type the correct value on the Shipment form after Step 5 |
You can read the correct value on the file and the AI got it wrong |
The field is not written wrong; you fill in the right value yourself |
Untick Apply, leave the field blank |
You are not sure of the value yet and need to check with the customer |
The field keeps its current Shipment value (if any), or stays blank |
Leave Apply ticked on a Low-confidence port or partner field |
You know the missing port or partner record will be created afterwards |
Apply skips that field and shows “Applied with warnings” - no wrong value is written |
If you are not sure, untick Apply and type the correct value on the Shipment form afterwards.
Step 5: Apply the data to the shipment
This is the only step that writes anything official - before this, everything sits on the temporary wizard only.
Click Apply to Record.
After you click it: the container rows are written first, the cargo rows second, then the header fields (Shipper, Consignee, Notify Party, POL, POD, MBL No., HBL No., Incoterm, Vessel Name and Voyage No.). The wizard closes and you land back on the shipment form.
Open each container and check Container Type against the SI. The raw AI Type text in Step 4 does not guarantee that a container-type record was matched: a new container is created with a type only when the text matches one of your container types. If the field is empty, set Container 40FT HC manually before continuing with booking or cargo loading.
Note
Vessel Name and Voyage No. are written to the Shipment, but they only show on the form of an import sea shipment, in the Import Operations group. On this export shipment, check these two values through the Chatter instead (both fields track changes there).
Warning
If a value - for example a port name - does not match any existing record in the system, Apply to Record still runs, but shows a notification “Applied with warnings” together with a line such as “No port found matching ‘…’ for field ‘…’. Skipped.” That field is skipped, not written with a wrong value.
Tip
Step 5 is done when: the containers and cargo lines carry the numbers, seals and quantities of the SI, and Shipper, Consignee, POL, POD and Incoterm all match the SI - with no warning left unexplained.
Step 6: Save the original file to the shipment’s record
The wizard does not keep the file you uploaded - skip this step and you lose the original evidence for any dispute later.
On the shipment form, drag the file SI_PhuocAnWood_SHP-2611-00010.pdf into the Chatter, or use its
paperclip button. This is a separate, manual step - Apply to Record in Step 5 does not keep the file.
Tip
Step 6 is done when: SI_PhuocAnWood_SHP-2611-00010.pdf appears in the shipment’s attachments,
next to the data you filled in during Step 5.
See also
Request documents and prepare the SI and draft B/L - where an SI checked here goes next: approval and sending to the carrier.
Known limitations
Step |
What Viindoo does today |
What you do instead |
|---|---|---|
Any step |
Cannot create a new Shipment or Booking from a document, only fills one already open |
Create the Shipment first (manually or from a quotation), then run this wizard on it |
Step 2 |
The document type is detected from the text of a PDF only |
Choose the type by hand for an image or a scan |
Step 4 |
Extracted Value is read-only on the header rows - no inline correction |
Untick Apply, then type the correct value on the Shipment form after Step 5 |
Steps 3-4 |
Container and cargo row counts are not cross-checked against a second source |
Count the rows yourself against the original file before applying |
Step 4 |
“Required fields not found” only warns - it does not block Apply to Record |
Treat the banner as your own stop signal |
Step 5 |
Vessel Name and Voyage No. are written but hidden on an export shipment’s form |
Check them through the Chatter instead |
Step 6 |
The uploaded file is discarded when the wizard closes |
Drag the file into the Chatter yourself right after applying |
Troubleshooting
Analyze Document does nothing, or reports a missing file
Symptom: “Please upload a document file first.”
Cause: You clicked Analyze Document while the Upload File field was still empty.
Fix: Choose a PDF or image file first, then click Analyze Document again.
File type not supported, or PDF cannot be read
Symptom: “Unsupported file type ‘.xlsx’. Please upload a PDF or image file.” or “The file could not be read as a PDF: …”
Cause: The file is neither a PDF nor an image, or the PDF is damaged or has been renamed from another format.
Fix: Export the document to PDF (for example an Excel sheet) or upload a clean image, then analyze it again.
No AI provider or document type selected
Symptom: “Please select an AI provider.” or “Please select a document type.”
Cause: Analyze Document checks both fields before calling the AI - this happens when no provider is active, or when the document type was not detected from the file.
Fix: Pick a provider and a document type from the lists by hand, or ask your Administrator to set a Default Provider (see Set up AI providers and freight document templates).
File rejected for having too many pages
Symptom: “The document has <N> pages, over the 40-page limit for AI extraction. Please split it into smaller files.”
Cause: The uploaded PDF has more than 40 pages - rare for a 1-2 page SI, but possible if a customer sends a whole contract bundle in the same file.
Fix: Split out just the SI pages (usually the first 1-2 pages) into a new PDF file and upload that one instead.
Apply finished but a port or partner field was not written, with a warning
Symptom: “Applied with warnings” together with “No port found matching ‘…’ for field ‘…’. Skipped.”
Cause: The port name the AI read is not contained in the name of any sea port or airport record in the system.
Fix: Create or correct that port in the Freight Forwarding configuration (), then run Import from Document again, or type the value directly in the POL or POD field of the Shipment form.
A container or cargo line was overwritten, or a new line appeared next to the old one
Symptom: After applying, an existing container or cargo line carries the SI values, or the Shipment has more container lines than you expected.
Cause: The wizard pairs each container row with an existing container by type, then by order, and each cargo row with an existing cargo line by order. A paired row overwrites that line; an unpaired row creates a new one.
Fix: Before clicking Apply to Record, check the Match to column on the Containers and Cargo tabs - pick the right line by hand, or clear the cell to create a new line, then apply.
See also
Related articles