How to Setup Freight Configuration?
Requirements
This guide requires installation of the application:
Summary
Spending a few minutes in Freight Forwarder > Configuration > Settings pays off quickly:
You can toggle advanced features with friendly checkboxes instead of hunting for module names.
Shared master data (routes, ports, cargo templates) keeps everyone choosing the same values.
Accurate settings mean faster data entry, reliable reports, and fewer “where do I find this option?” questions.
Ignore configuration and the symptoms appear fast: manual typing, inconsistent labels (Cat Lai vs Cat Lai Port), broken links between bookings and orders, and extra support calls.
Review the baseline freight settings—analytic account suffix, cargo input modes, and safeguards for sales orders—before enabling advanced features.
Access Freight Forwarder > Configuration > Settings to enter the general configuration screen.
The Settings view centralizes both baseline options and feature toggles. Configure the fundamentals first so shipments, bookings, and billing behave consistently for every team.
Tip
Recommended Configuration Order
If you’re just starting, configure in this order:
General Configuration - Setup basic options
Ports and Locations - Create list of commonly used ports/warehouses
Routes - Setup fixed transport routes
Shipping Methods - Check and supplement if needed
Cargo Templates (optional) - Only needed if frequently transporting same type of cargo
Detailed Description
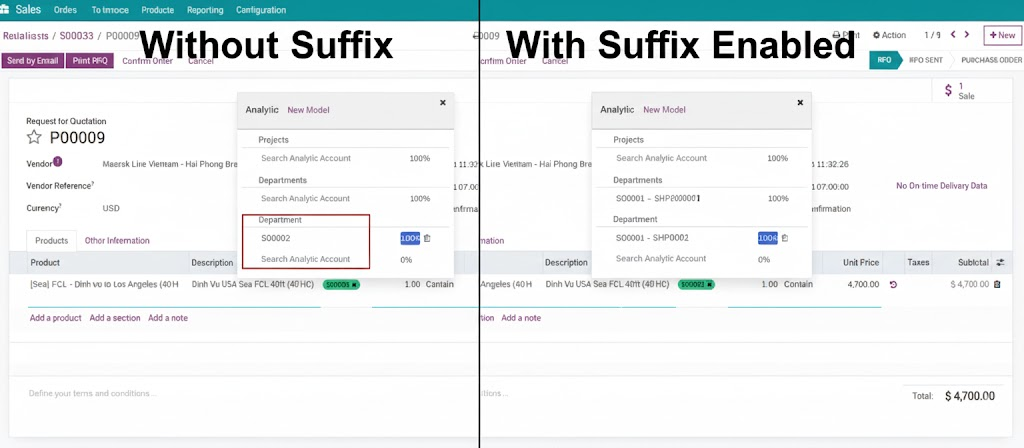
Analytic Account Suffix
Purpose: Adjust display of Analytic Account name to fit forwarder and logistics workflows.
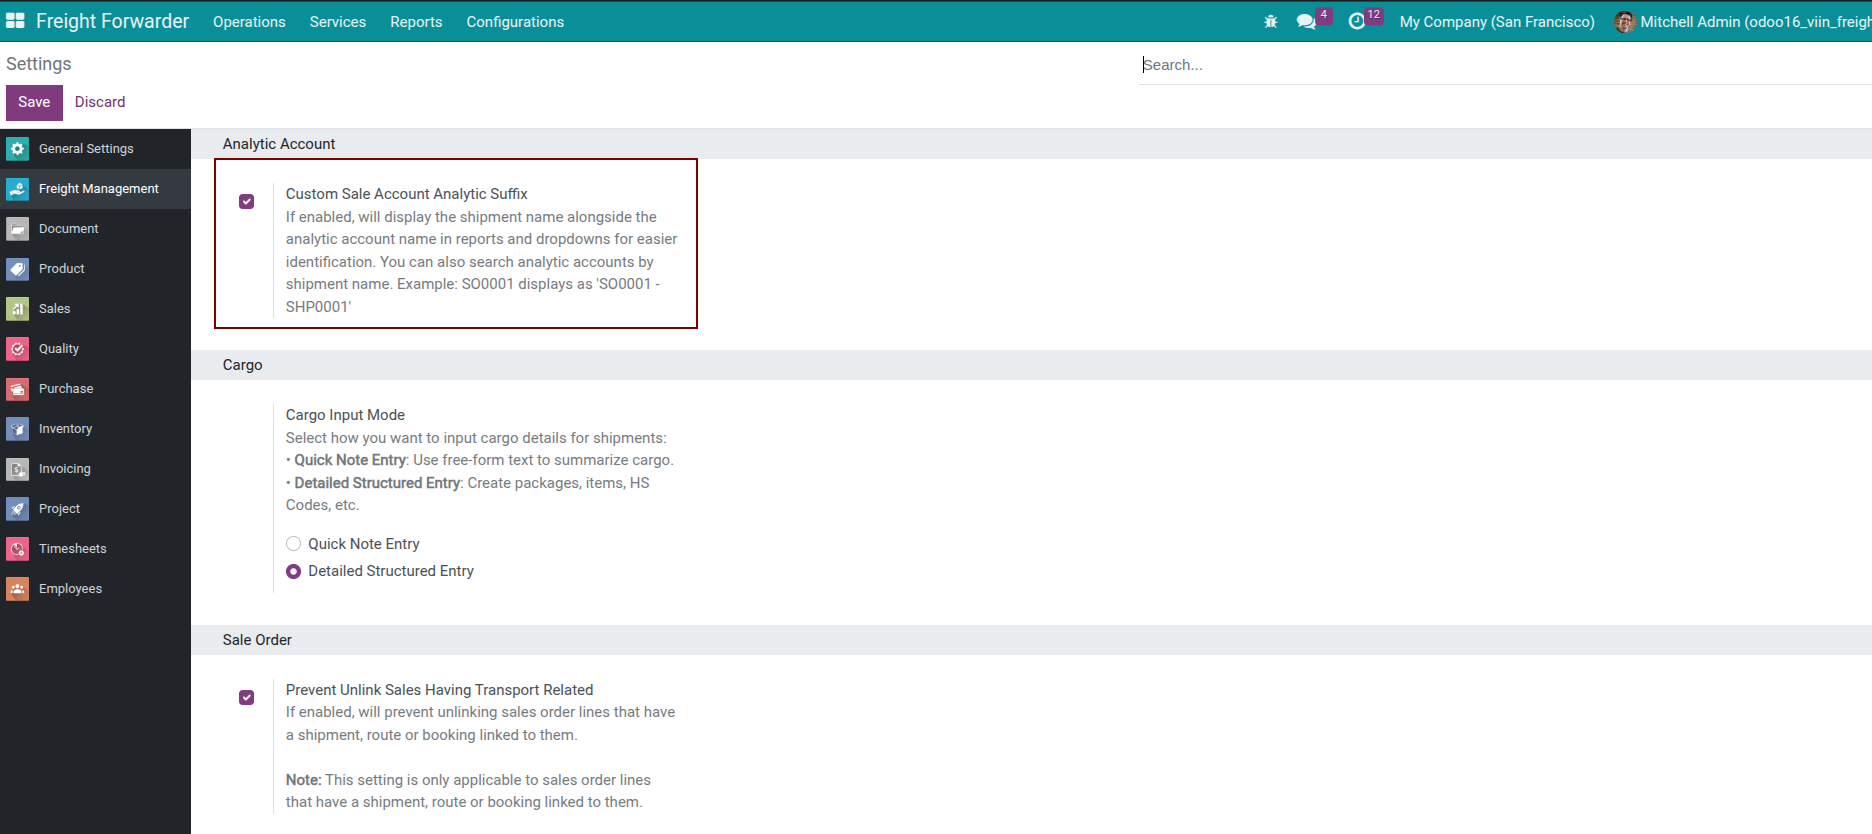
How it works:
On: Analytic account displays
SO0001 - SHP0001.Off: Analytic account only displays
SO0001.
Enable this option when you:
Allocate subcontractor costs from Purchase Orders to the correct shipment.
Need shipment-level profitability.
Handle many concurrent shipments per sales order.
Note
Each shipment deserves its own analytic account. The suffix simply makes the link obvious inside every purchasing or accounting screen.
Cargo Input Mode
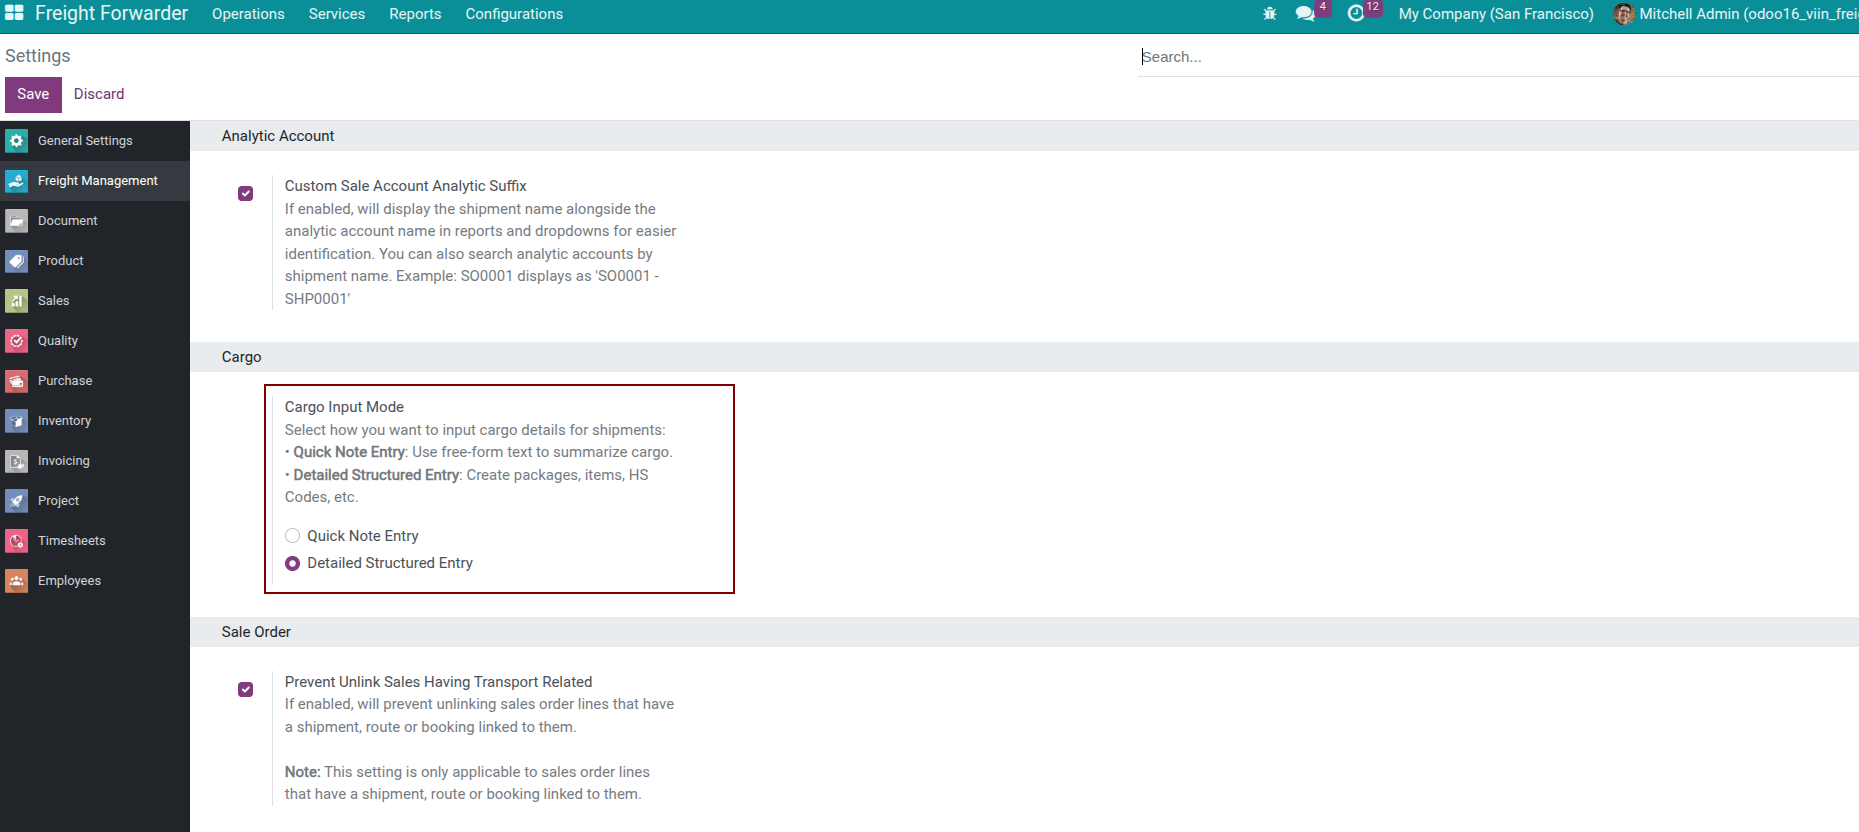
Choose how operations teams log cargo details:
Quick Note Entry – Fast, freeform text (ideal for experienced agents or ad hoc jobs).
Detailed Structured Entry – Guided lines with quantities, weights, HS codes (ideal for documentation, compliance, and new staff).
Tip
Roll out with Detailed Structured Entry during onboarding so teams learn the required data points, then switch to Quick Note Entry once everyone is confident.
Lock Sales Orders with Shipments
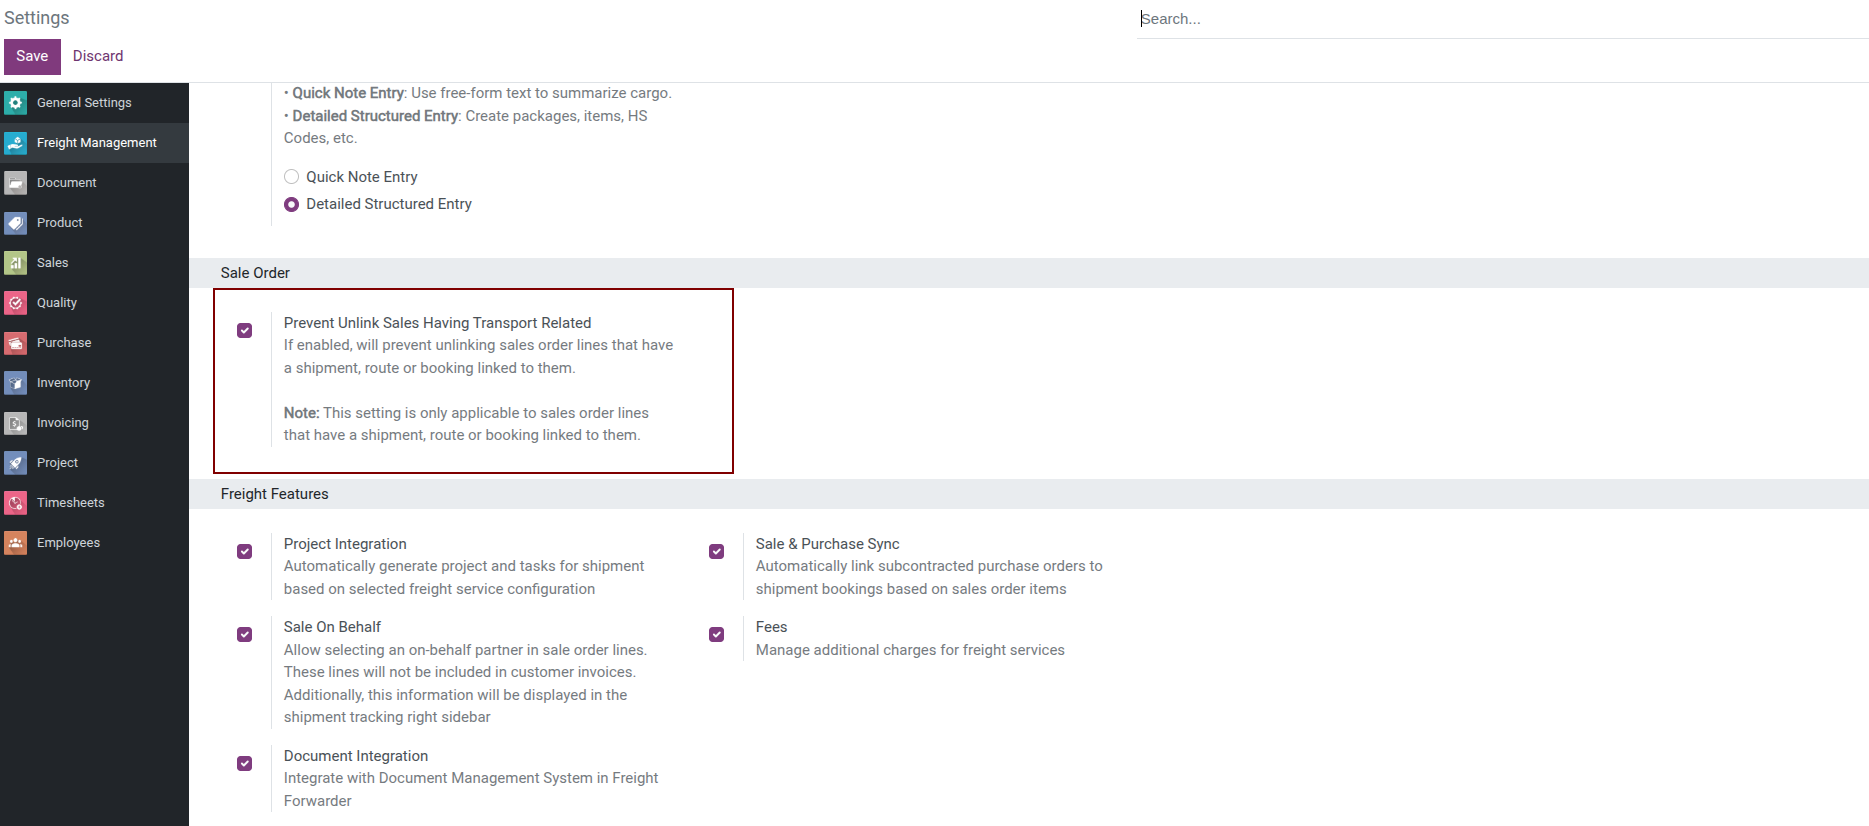
Turn on this safeguard to stop users from deleting sales-order lines that already spawned shipments, routes, or bookings. Without it, accidental deletions break revenue links and distort reports.
When the feature is enabled, The system blocks risky deletions with a clear message so operators resolve shipments first.
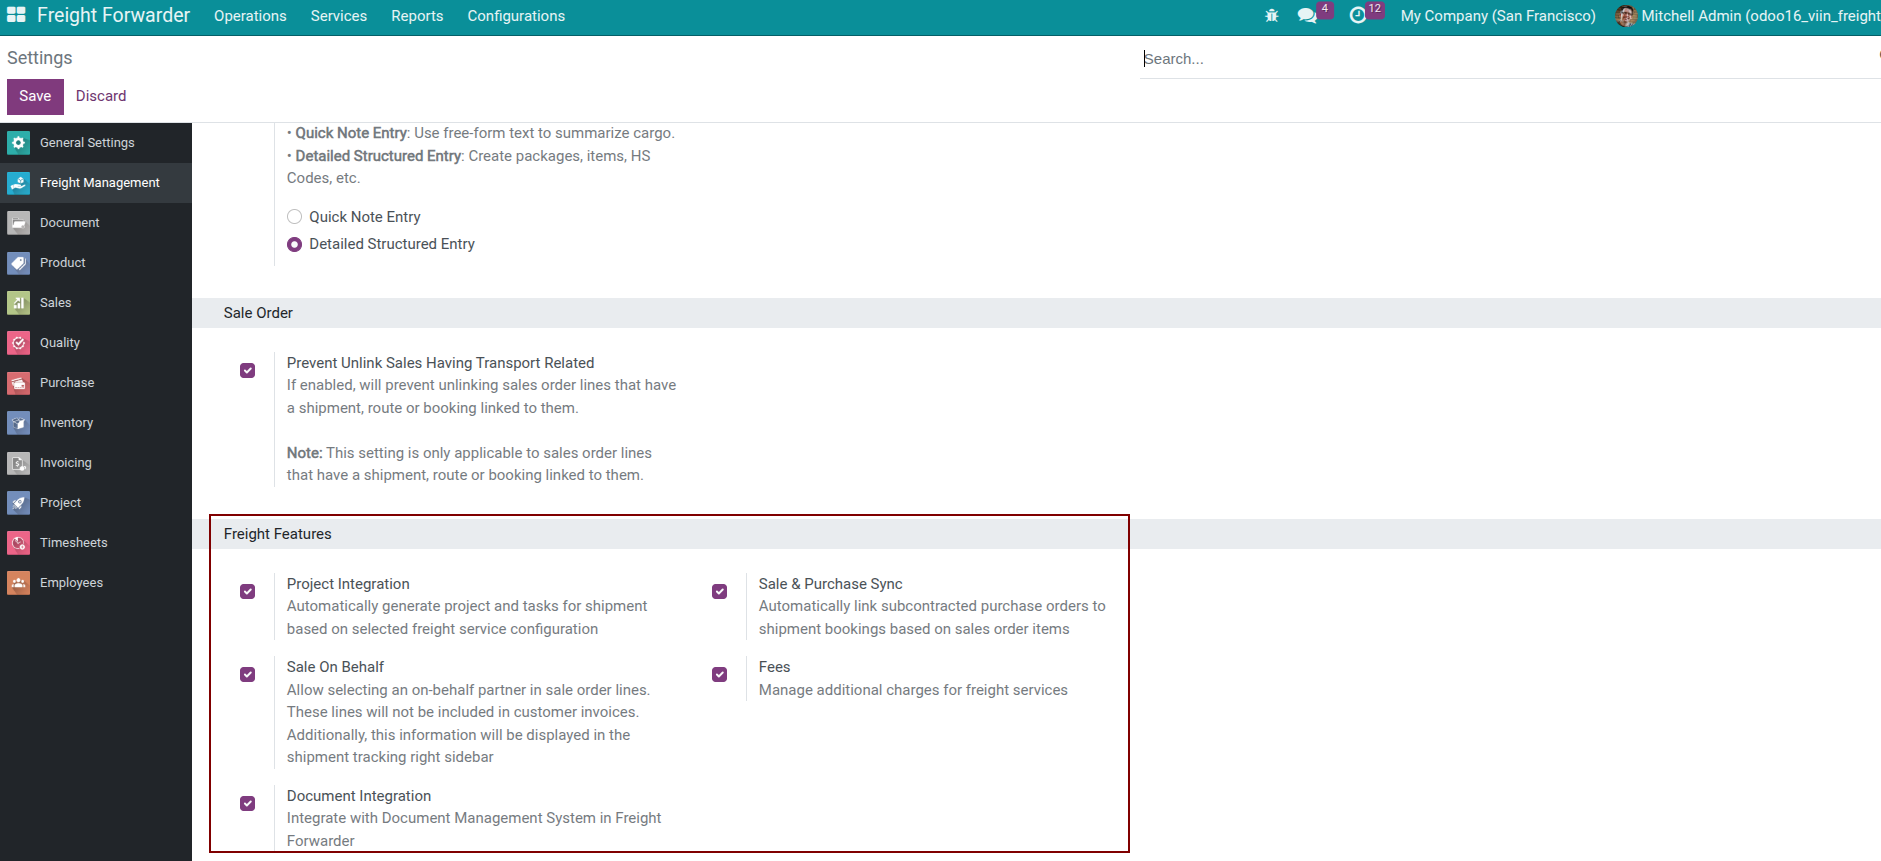
Manage Shipments with Projects and Tasks
Turn on the Freight Project & Timesheet feature to connect shipments with dedicated projects and task lists so operations can plan workload, record timesheets, and capture labor costs automatically.
How to manage and assign tasks in Freight Forwarder
When you enable Freight Project & Timesheet, every confirmed shipment gets its own project with task templates, letting operations schedule work, record timesheets, and capture labor costs automatically.
Enable the Feature
Go to Freight Forwarder > Configuration > Settings.
In Freight Features, tick Freight Project & Timesheet.
Click Save, then Install when prompted.
(Optional) Define project templates and default task lists in the Project app.
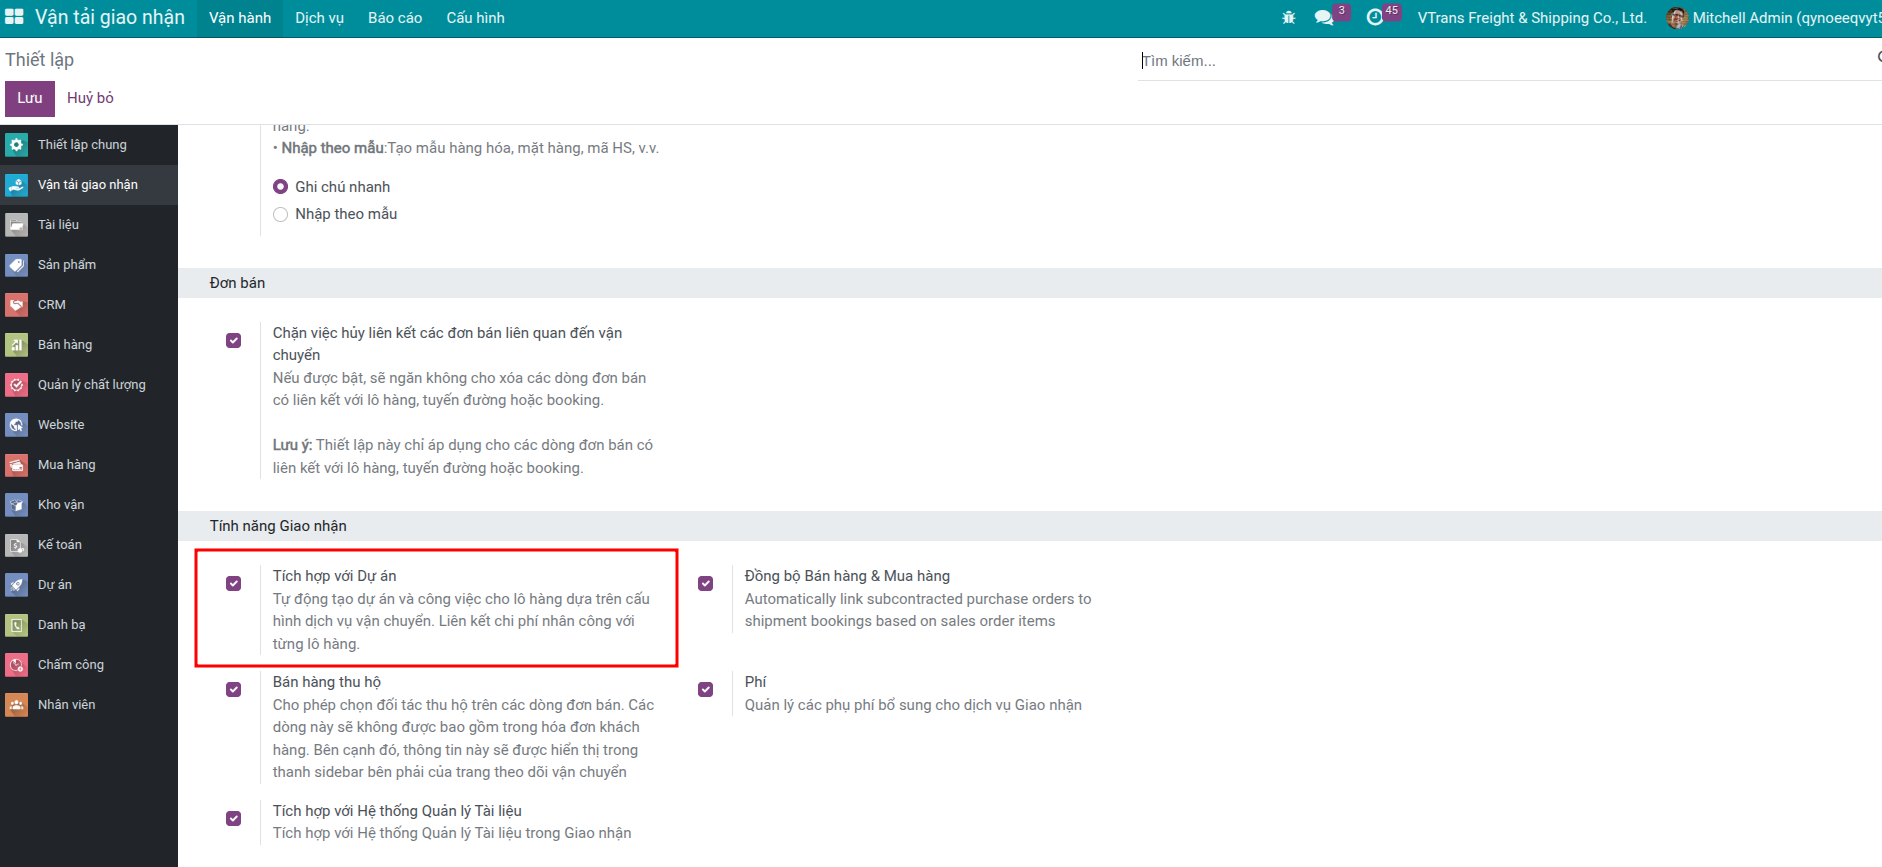
Key Benefits
Automatic project/task creation per shipment.
Timesheet capture for accurate labor costing.
Centralized progress tracking across departments.
Link Bookings with Purchase Orders
Activate Link Bookings & Purchase Orders to automate subcontract purchase orders or trigger them on demand whenever you outsource transport legs.
Sync bookings with purchase orders
Activate Link Bookings & Purchase Orders to automate or manually generate purchase orders for outsourced transport legs. This keeps subcontractor costs tied to the shipment analytic account.
Enable the Feature
Go to Freight Forwarder > Configuration > Settings.
In Freight Features, tick Link Bookings & Purchase Orders.
Click Save, then Install when prompted (the system installs required dependency modules).
Mark outsourced freight products as Subcontract Service if you want purchase orders to appear automatically at sales-order confirmation.
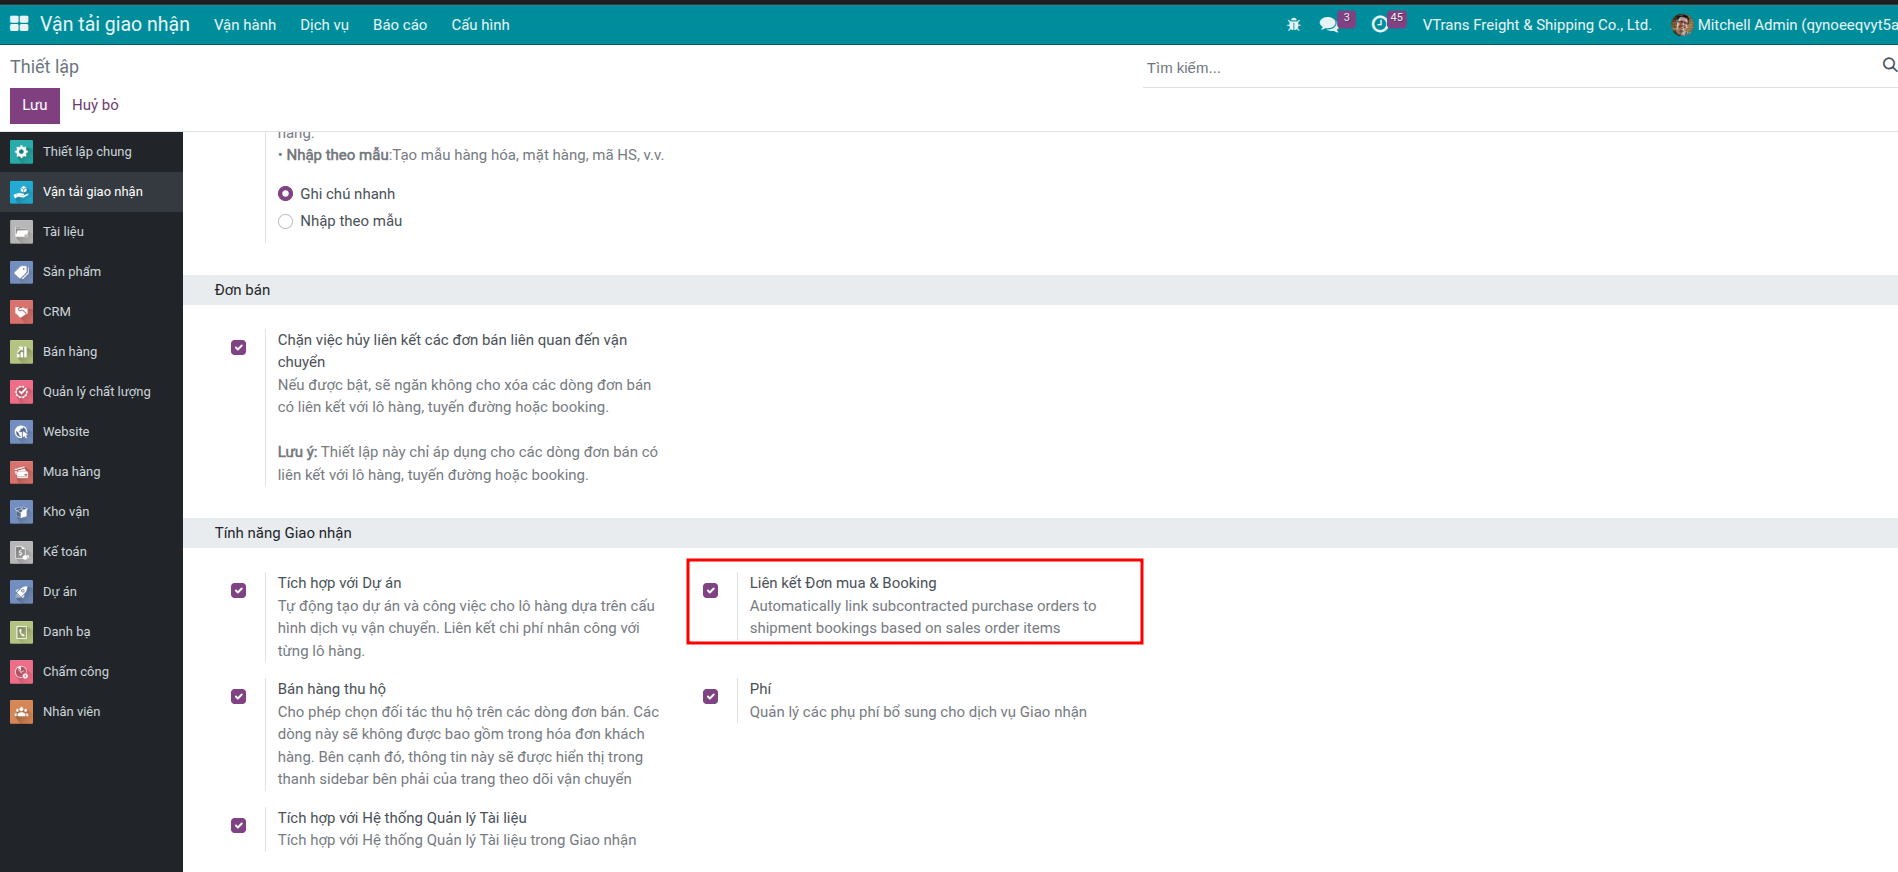
Operating Models
Pure forwarder – Always outsource; purchase orders can be generated automatically during sales confirmation.
Mixed fleet – Outsource on demand; operations trigger purchase orders from bookings or route legs when needed.
Track Collections and Disbursements
Use Freight Collect & Disbursements to manage on-behalf charges such as COD, customs, or agent fees while keeping shipment profitability accurate.
Enable Freight Collect & Disbursements when you need to bill customers for third-party services (customs, agents, COD) and forward those amounts without skewing shipment profit.
Enable the Feature
Go to Freight Forwarder > Configuration > Settings.
In Freight Features, tick Freight Collect & Disbursements.
Click Save, then Install when prompted (dependent modules install automatically).
Configure collection/disbursement products and workflow according to your agency agreements.
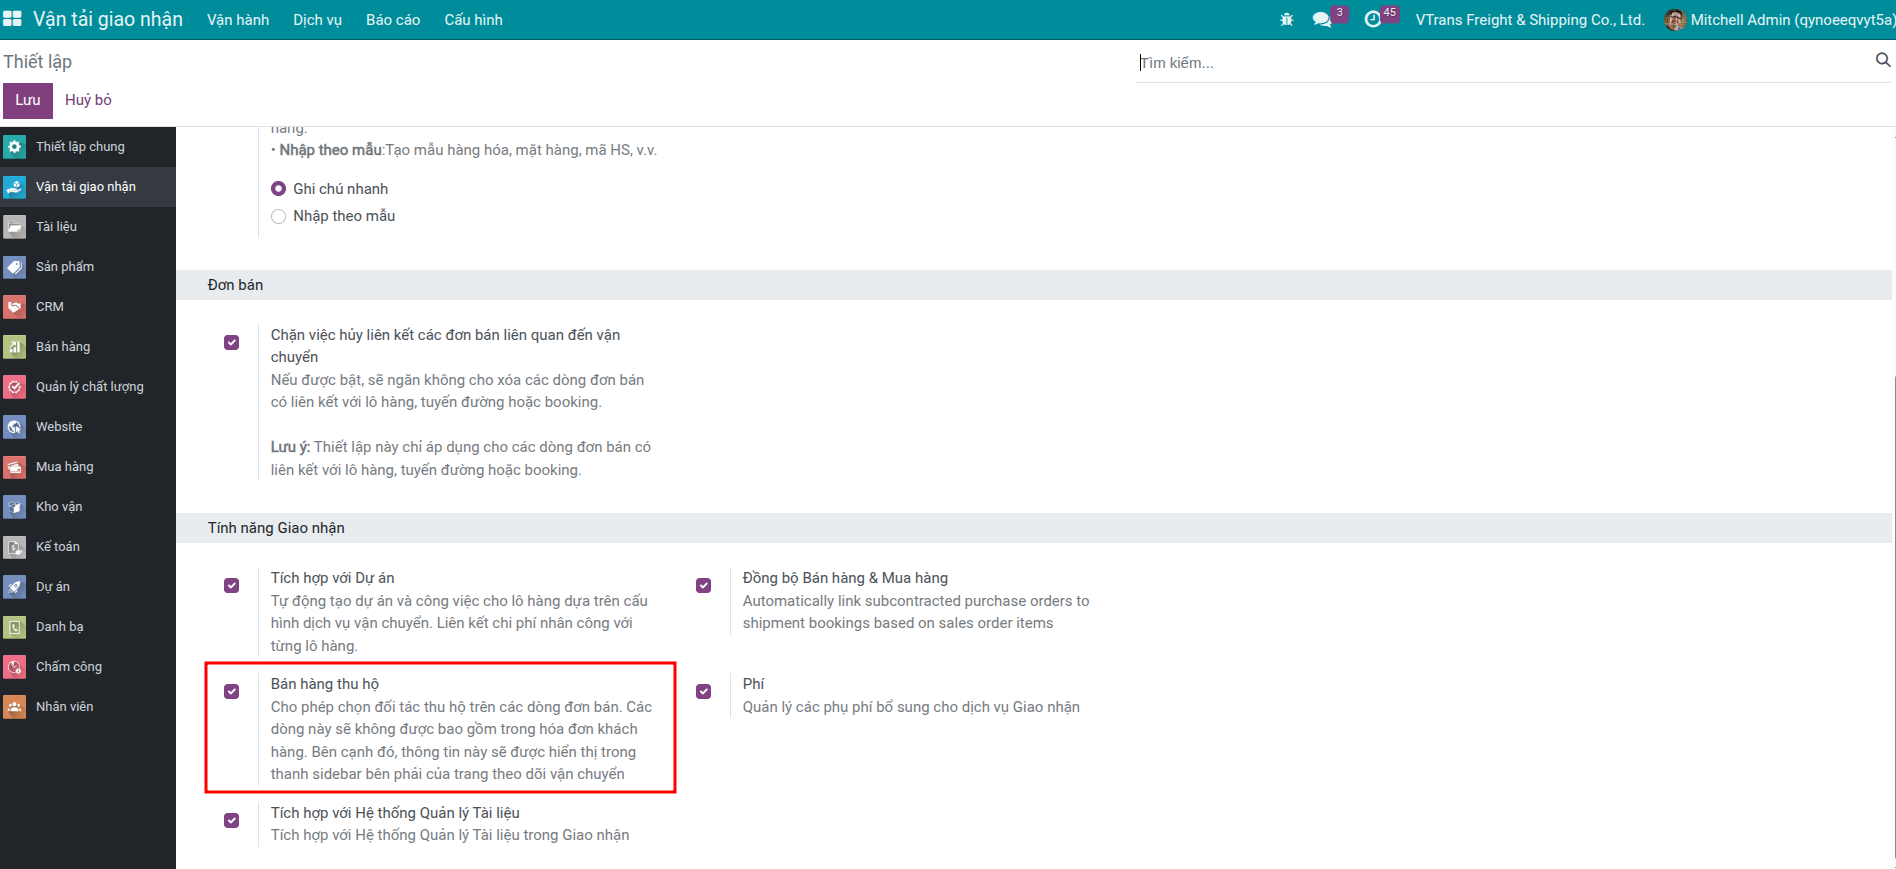
What You Gain
Separate “on behalf” charges from core freight revenue.
Automate reconciliation between collected amounts and partner payouts.
Provide customers with consolidated invoices while maintaining accurate profitability.
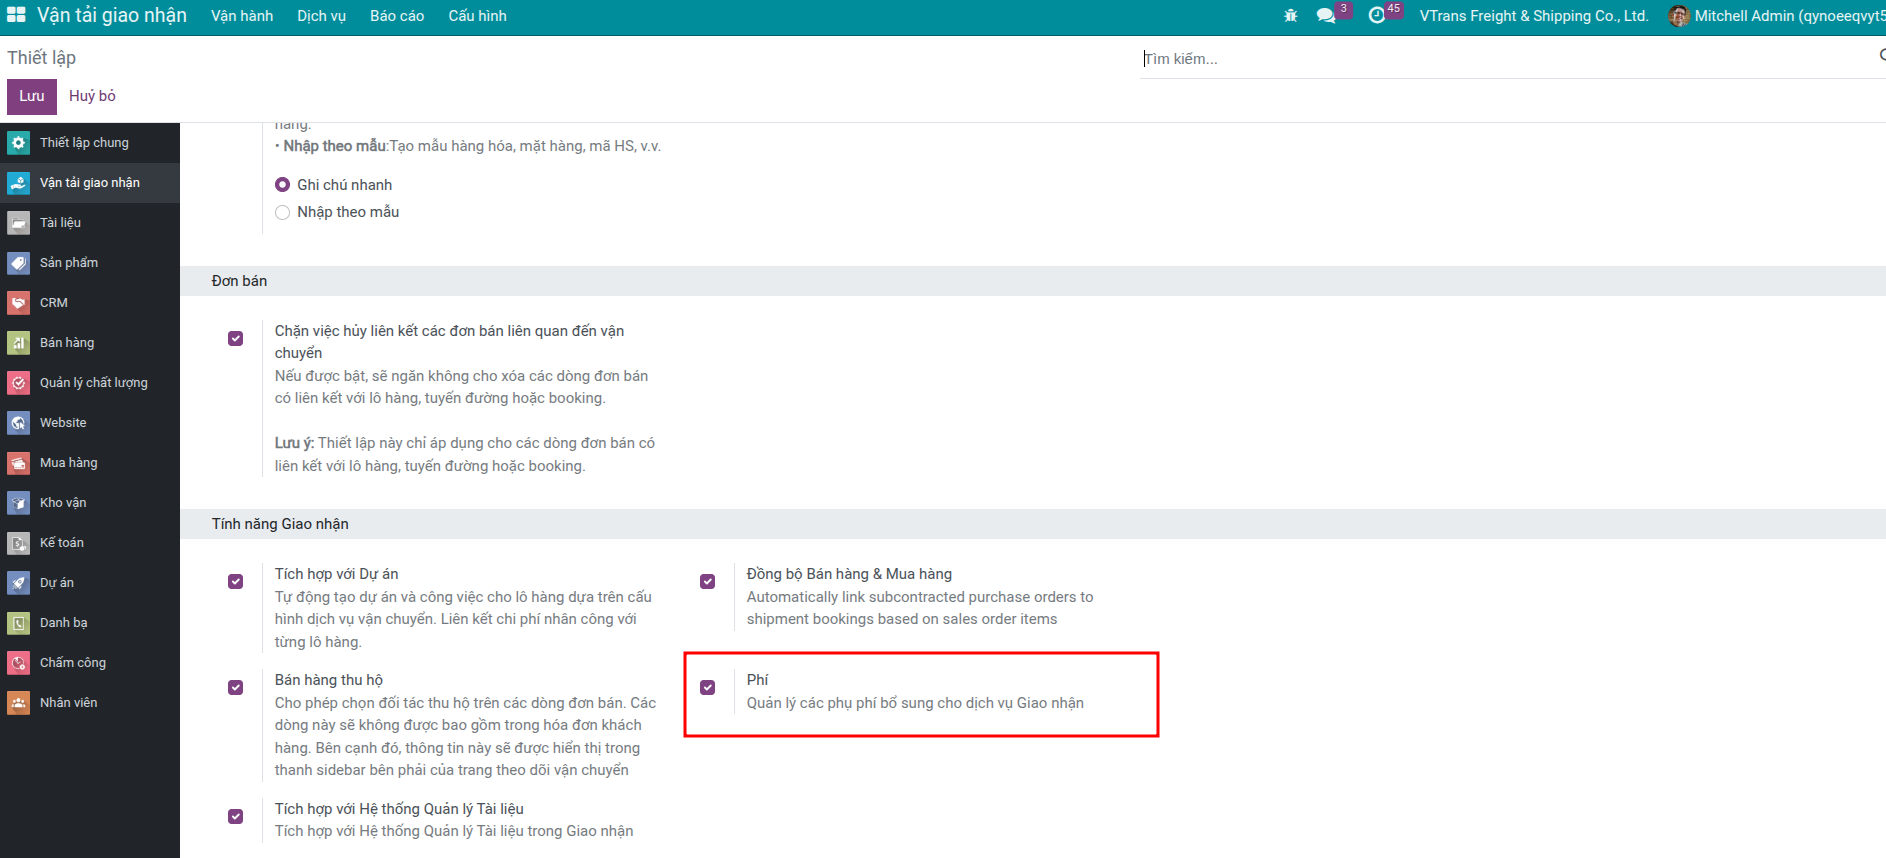
Extend Fees
Enhance freight operations with surcharge templates and the freight Document workspace for booking confirmations, BLs, and compliance files.
Activate Freight Fee to maintain surcharge templates (fuel, congestion, local charges) that flow through quotations, bookings, and customer invoices.
Enable the Feature
Go to Freight Forwarder > Configuration > Settings.
In Freight Features, tick Freight Fee.
Click Save and follow the installation prompt.
Maintain surcharge definitions under Freight Forwarder > Configuration > Fees.
Centralize Shipment Documents
Store booking confirmations, BLs, invoices, and compliance paperwork directly within the freight workspace.
Enable freight document management
Enable Documents - Freight to store booking confirmations, bills of lading, invoices, and compliance paperwork directly beside each shipment.
Enable the Feature
Go to Freight Forwarder > Configuration > Settings.
In Freight Features, tick Documents - Freight.
Click Save and finish the installation prompt (the system installs the Document workspace if needed).
Organize templates, approval flows, and access rights in the Documents app.
