Install IoT box from raspbian OS
In order for the IoT box to be able to connect to peripheral devices and connect to software Viindoo, we need to set up the environment settings for the IoT box.
Requirements
This guide requires the following equipment:
Raspberry Pi4 Model B and microSD card from 8Gb-Class-A1 or higher.
Power source 5V-3Ampere type C.
The monitor has an HDMI port and a micro HDMI to HDMI cable.
MicroSD card reader.
Computer using the operating system Ubuntu 22 or higher.
Main items in this article:
Install Raspberry Pi Imager
To be able to build the Raspbian operating system onto a memory card, we need to install the software Raspberry Pi Imager.
Here are the steps to download and install Raspberry Pi Imager.
Open Terminal and access the folder to be stored, for example:
cd /home/user/Downloads/Use the following command to download the Raspberry Pi Imager software.
wget 'https://downloads.raspberrypi.org/imager/imager_latest_amd64.deb' -O Raspberry_Pi_Imager.debUse the following command to install Raspberry Pi Imager.
sudo dpkg -i Raspberry_Pi_Imager.deb
Note
Replace the path /user/ with your computer’s username.
Download the Raspbian operating system
Select the folder to save the operating system files, then open the Terminal on that folder.
Then, run the following command:
sudo wget 'https://downloads.raspberrypi.org/raspios_lite_armhf/images/raspios_lite_armhf-2024-03-15/2024-03-15-raspios-bookworm-armhf-lite.img.xz'
Build Raspbian OS on micro SD card
Open the imager (Raspberry Pi Imager) software you just installed above.
Insert the micro SD card into the computer.
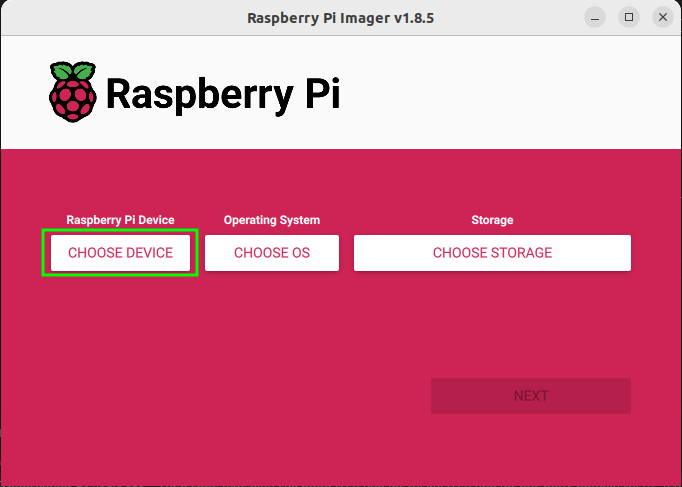
On Raspberry Pi Imager software, select CHOOSE DEVICE as shown below.
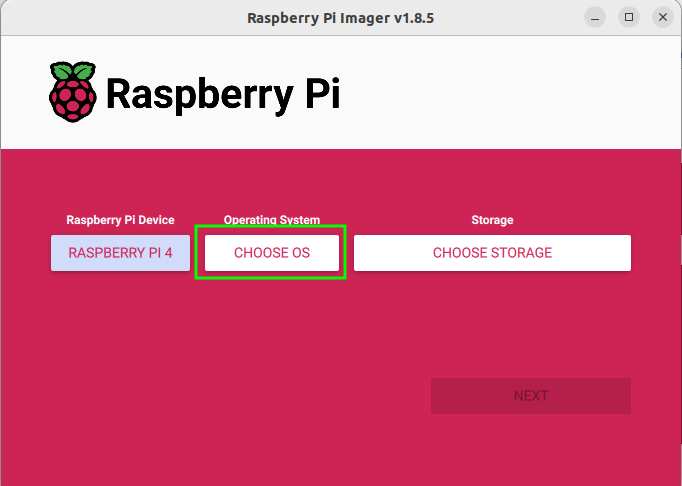
Select Raspberry Pi 4 as shown below.

Select CHOOSE OS as shown below.
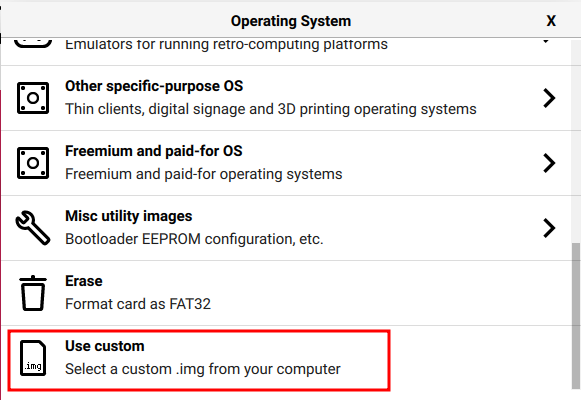
Select User Custom as shown below.
Select the Raspbian operating system just downloaded above.
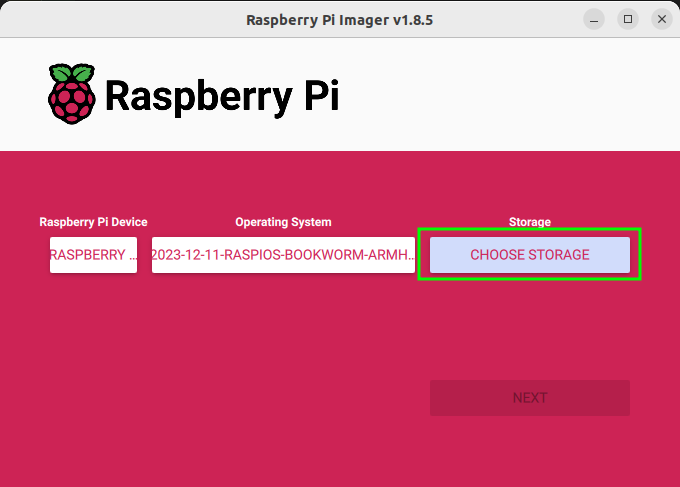
Select CHOOSE STORAGE as shown below.
Select the memory card to build the Raspbian operating system.
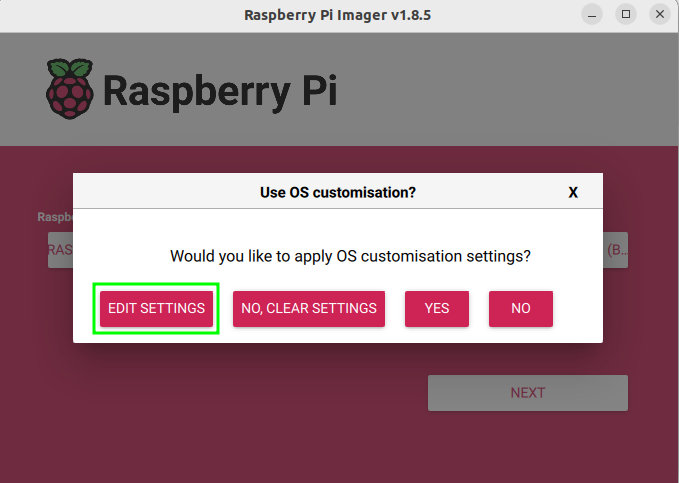
Then select NEXT to continue to the next step. Then select EDIT SETTINGS to configure the initial parameters for Raspberry Pi.
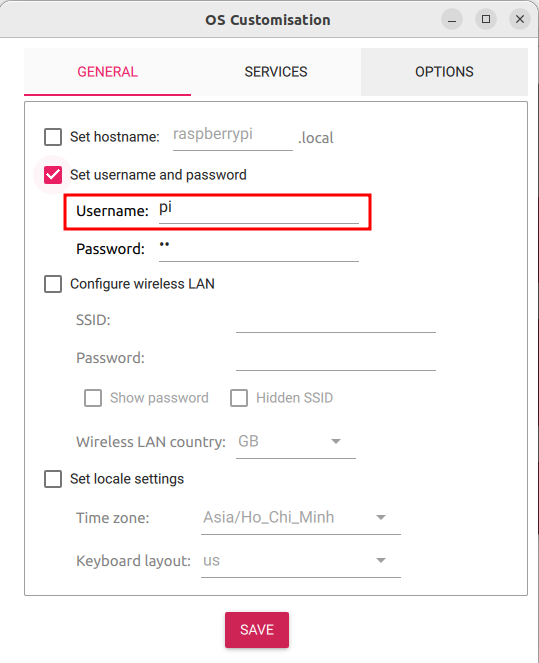
The parameters are set as shown.
Note
Note that the marked areas must be installed as shown.
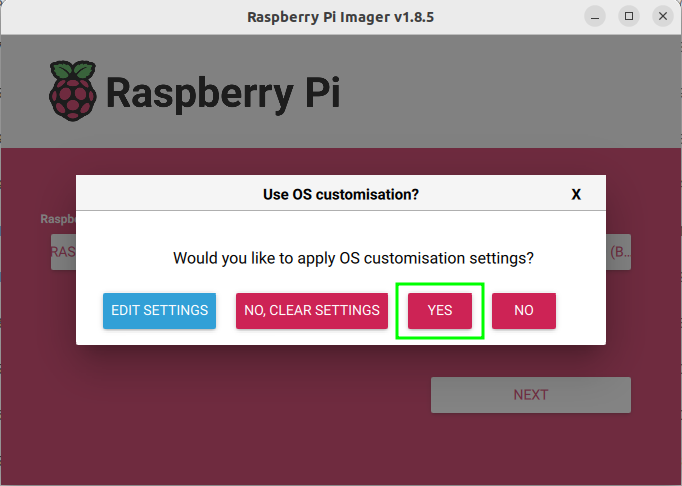
Select YES to select the optional configuration above
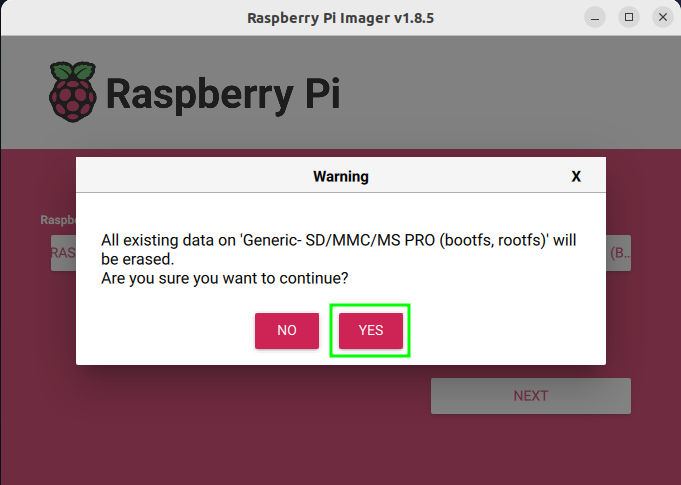
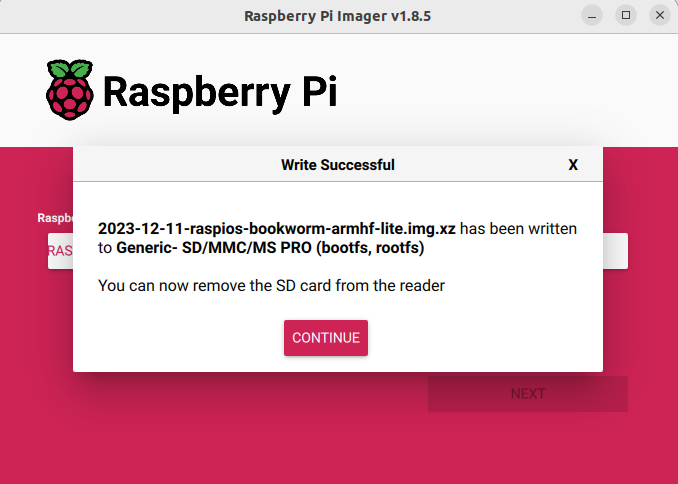
Select YES to start the operating system build process.
After the build process is completed, the following message will appear.
Install the IoT box
Note
After the build is complete, take out the memory card and plug it back in.
Open Terminal and execute the following commands to edit the Raspberry Pi boot file.
sudo -E nano /media/user/rootfs/etc/rc.localReplace the path /user/ with your computer’s username.
Add the following command line to the rc.local file.
/etc/auto_install_iot_box.sh 2>&1 | tee /home/pi/init_posbox_image.log
We get a file like the following image.

Run the following command to create the IoT box auto-installation file.
sudo nano /media/user/rootfs/etc/auto_install_iot_box.shReplace the path /user/ with your computer’s username.
Copy all of the following commands into the file auto_install_iot_box.sh.
#!/usr/bin/env bash
set -o errexit
set -o nounset
set -o pipefail
# set -o xtrace

__dir="$(cd "$(dirname "${BASH_SOURCE[0]}")" && pwd)"
__file="${__dir}/$(basename "${BASH_SOURCE[0]}")"
__base="$(basename ${__file} .sh)"

VERSION=16.0
REPO=https://github.com/Viindoo/odoo.git
VERSION_IOTBOX=23.11
CLONE_DIR="/home/pi/odoo"
OVERWRITE_FILES_BEFORE_INIT_DIR="${CLONE_DIR}/addons/point_of_sale/tools/posbox/overwrite_before_init"
OVERWRITE_FILES_AFTER_INIT_DIR="${CLONE_DIR}/addons/point_of_sale/tools/posbox/overwrite_after_init"
MOUNT_POINT="$(dirname "$__dir")"

# set locale to en_US
echo "set locale to en_US"
echo "export LANGUAGE=en_US.UTF-8" >> ~/.bashrc
echo "export LANG=en_US.UTF-8" >> ~/.bashrc
echo "export LC_ALL=en_US.UTF-8" >> ~/.bashrc
locale-gen
source ~/.bashrc

# Install git
apt-get -y install git

if [ ! -d "$CLONE_DIR" ]; then
    echo "Clone Github repo"
    mkdir -pv "$CLONE_DIR"
    git clone -b "$VERSION" --no-local --no-checkout --depth 1 "$REPO" "$CLONE_DIR"
    cd "$CLONE_DIR"
    git config core.sparsecheckout true
    echo "addons/web
addons/hw_*
addons/point_of_sale/tools/posbox/configuration
addons/point_of_sale/tools/posbox/overwrite_after_init
addons/point_of_sale/tools/posbox/overwrite_before_init
odoo/
odoo-bin" | tee --append .git/info/sparse-checkout > /dev/null
    git read-tree -mu HEAD
fi

# copy iotbox version
mkdir -pv /var/odoo
echo "${VERSION_IOTBOX}" | tee /var/odoo/iotbox_version /home/pi/iotbox_version

# Delete some files that cause errors
rm -rf "${OVERWRITE_FILES_BEFORE_INIT_DIR}/etc/fstab"
rm -rf "${OVERWRITE_FILES_AFTER_INIT_DIR}/etc/fstab"

# copy files overwrite_before_init
cp -av "${OVERWRITE_FILES_BEFORE_INIT_DIR}"/* "${MOUNT_POINT}"
rm -rf "${OVERWRITE_FILES_BEFORE_INIT_DIR}"

# Recommends: antiword, graphviz, ghostscript, python-gevent, poppler-utils
export DEBIAN_FRONTEND=noninteractive

# upgrade firmware-brcm80211 broke access point on rpi4
apt-mark hold firmware-brcm80211
apt-get update && apt-get -y upgrade
# Do not be too fast to upgrade to more recent firmware and kernel than 4.38
# Firmware 4.44 seems to prevent the LED mechanism from working

# At the first start it is necessary to configure a password
# This will be modified by a unique password on the first start of Odoo
# password="$(openssl rand -base64 12)"
# echo "pi:${password}" | chpasswd

PKGS_TO_INSTALL="
    console-data \
    cups \
    cups-ipp-utils \
    dbus \
    dbus-x11 \
    dnsmasq \
    firefox-esr \
    fswebcam \
    git \
    hostapd \
    iw \
    kpartx \
    libcups2-dev \
    libpq-dev \
    lightdm \
    localepurge \
    nginx-full \
    openbox \
    printer-driver-all \
    python3 \
    python3-cups \
    python3-babel \
    python3-dateutil \
    python3-dbus \
    python3-decorator \
    python3-dev \
    python3-docutils \
    python3-geoip2 \
    python3-jinja2 \
    python3-ldap \
    python3-libsass \
    python3-lxml \
    python3-mako \
    python3-mock \
    python3-netifaces \
    python3-passlib \
    python3-pil \
    python3-pip \
    python3-psutil \
    python3-psycopg2 \
    python3-pydot \
    python3-pypdf2 \
    python3-qrcode \
    python3-reportlab \
    python3-requests \
    python3-serial \
    python3-tz \
    python3-urllib3 \
    python3-werkzeug \
    python3-venv \
    rsync \
    screen \
    swig \
    unclutter \
    vim \
    x11-utils \
    xdotool \
    xserver-xorg-input-evdev \
    xserver-xorg-video-dummy \
    xserver-xorg-video-fbdev \
    nmap \
    avahi-utils"

echo "Acquire::Retries "16";" > /etc/apt/apt.conf.d/99acquire-retries
# KEEP OWN CONFIG FILES DURING PACKAGE CONFIGURATION
# http://serverfault.com/questions/259226/automatically-keep-current-version-of-config-files-when-apt-get-install
apt-get -y -o Dpkg::Options::="--force-confdef" -o Dpkg::Options::="--force-confold" install ${PKGS_TO_INSTALL}

apt-get clean
localepurge
rm -rfv /usr/share/doc

# python-usb in wheezy is too old
# the latest pyusb from pip does not work either, usb.core.find() never returns
# this may be fixed with libusb>2:1.0.11-1, but that's the most recent one in raspios
# so we install the latest pyusb that works with this libusb.
# Even in stretch, we had an error with langid (but worked otherwise)
# We fixe the version of evdev to 1.2.0 because in 1.3.0 we have a RuntimeError in 'get_event_loop()'
PIP_TO_INSTALL="
    evdev==1.6.0 \
    gatt \
    polib \
    pycups \
    pyusb \
    v4l2 \
    pysmb==1.2.9.1 \
    cryptocode==0.1 \
    PyKCS11 \
    vcgencmd \
    RPi.GPIO \
    rjsmin==1.1.0 \
    num2words==0.5.9 \
    ipaddress \
    ngrok \
    bluepy"

cd /
mkdir venv
python3 -m venv venv
venv/bin/pip3 install ${PIP_TO_INSTALL}
rsync -avrhp /venv/lib/python3.11/site-packages/* /usr/lib/python3/dist-packages/

# Dowload MPD server and library for Six terminals
wget 'https://nightly.odoo.com/master/iotbox/eftdvs' -P /usr/local/bin/
chmod +x /usr/local/bin/eftdvs
wget 'https://nightly.odoo.com/master/iotbox/eftapi.so' -P /usr/lib/

groupadd usbusers
usermod -a -G usbusers pi
usermod -a -G lp pi
usermod -a -G input lightdm
mkdir -v /var/log/odoo
chown pi:pi /var/log/odoo
chown pi:pi -R /home/pi/odoo/
chown pi:pi -R /etc/ssl/certs/
chown pi:pi -R /etc/ssl/private/
chown pi:pi -R /etc/avahi/services/

# logrotate is very picky when it comes to file permissions
chown -R root:root /etc/logrotate.d/
chmod -R 644 /etc/logrotate.d/
chown root:root /etc/logrotate.conf
chmod 644 /etc/logrotate.conf

echo "* * * * * rm /var/run/odoo/sessions/*" | crontab -

update-rc.d -f hostapd remove
update-rc.d -f nginx remove
update-rc.d -f dnsmasq remove

systemctl enable ramdisks.service
systemctl enable led-status.service
systemctl disable dphys-swapfile.service
systemctl enable ssh
systemctl set-default graphical.target
systemctl disable getty@tty1.service
systemctl enable systemd-timesyncd.service
systemctl unmask hostapd.service
systemctl disable hostapd.service
systemctl disable cups-browsed.service

# disable overscan in /boot/config.txt, we can't use
# overwrite_after_init because it's on a different device
# (/dev/mmcblk0p1) and we don't mount that afterwards.
# This option disables any black strips around the screen
# cf: https://www.raspberrypi.org/documentation/configuration/raspi-config.md
echo "disable_overscan=1" >> /boot/config.txt

# Separate framebuffers for both screens on RPI4
sed -i '/dtoverlay/d' /boot/config.txt

sed -i '/dtoverlay=vc4-kms-v3d/d' /boot/firmware/config.txt

sed -i 's/^#host-name=foo.*/host-name=viindoo-iot/' /etc/avahi/avahi-daemon.conf

sed -i 's/^#SystemMaxUse=.*/SystemMaxUse=1M/' /etc/systemd/journald.conf

sed -i 's/^#RuntimeMaxUse=.*/RuntimeMaxUse=10/' /etc/systemd/journald.conf

# Create file ngnix viindoo-iot
cat <<EOF > /etc/nginx/sites-enabled/viindoo-iot
server{
  listen 80;      # for IPv4
  listen [::]:80; # for IPv6

  server_name viindoo-iot.local;
  access_log /var/log/nginx/node-red.access.log;

  location / {
    proxy_pass http://127.0.0.1:8069;

    proxy_set_header Host            \$host;
    proxy_set_header X-Real-IP       \$remote_addr;
    proxy_set_header X-Forwarded-For \$remote_addr;
    proxy_http_version 1.1;

    proxy_set_header Upgrade \$http_upgrade;
    proxy_set_header Connection "upgrade";
    proxy_cache_bypass 1;
    proxy_no_cache 1;

    port_in_redirect on;
  }
}
EOF

# Override and edit the code of the odoo/addons/hw_drivers/main.py function
file_path="/home/pi/odoo/addons/hw_drivers/main.py"
sed -i '/def run(self):/a\
        \# additional delay is needed to be able to override new functions\
        time.sleep(1)' "$file_path"

# exclude /drivers folder from git info to be able to load specific drivers
echo "addons/hw_drivers/iot_devices/" > /home/pi/odoo/.git/info/exclude

# create dirs for ramdisks
create_ramdisk_dir () {
    mkdir -v "${1}_ram"
}

create_ramdisk_dir "/var"
create_ramdisk_dir "/etc"
create_ramdisk_dir "/tmp"
mkdir -v /root_bypass_ramdisks
chown pi:pi -R /root_bypass_ramdisks
chown pi:pi -R /root_bypass_ramdisks

# copy files in overwrite_after_init
cp -av "${OVERWRITE_FILES_AFTER_INIT_DIR}"/* "${MOUNT_POINT}"
rm -rf "${OVERWRITE_FILES_AFTER_INIT_DIR}"

shutdown now
Then save and run the following code.
sudo chmod 755 /media/user/rootfs/etc/auto_install_iot_box.shReplace the path /user/ with your computer’s username.
Take the memory card and plug it into the Raspberry Pi, then start the Raspberry Pi.
Installation can take 30 to 45 minutes.
After installation, the IoT box will automatically shutdown. Take out the memory card then copy the expansion modules in the iot-hw repositorie to the memory card’s home/pi/odoo/addons/ folder.
See also
Related Article
Optional Module