Sales Quotation Workflow
Requirements
This guide requires the following applications: All-in-One Freight Forwarder Management (viin_freight_management)
You can also read more detailed instructions about the Sales Management application of Viindoo at: Sales Management in Viindoo
Introduction
This guide targets freight sales administrators and operations leads who configure Viindoo Freight Forwarder before sending customer quotations. In the freight forwarding industry, the quotation process is a critical step helping businesses negotiate and close contracts with customers. A professional quotation should:
Capture every transport charge, local service, and ancillary fee in one document.
Convert supplier rates into selling prices with consistent markup logic.
Flag on-behalf collections so pass-through amounts stay out of revenue.
Deliver clear commercial terms to the customer without delays.
Presales Workflow Overview
Freight forwarder presales combines pricing, product configuration, and operational preparation. To keep the workflow consistent, this guide groups tasks into the following sections:
Preparation & Master Data – build freight, local charge, and service products that fuel every quotation.
Pricing Assets – configure supplier-based pricelists and reusable quotation templates so margins stay accurate.
Create & Complete Quotation – assemble order lines, compare supplier references, and capture on-behalf collections.
Send, Approve, and Invoice – deliver the quotation, confirm the order, and generate invoices once the customer agrees.
Special Scenarios & Maintenance – handle exceptional operational cases and keep supplier prices aligned with market changes.
Preparation & Master Data
Lay the foundation by reviewing the presales flow and preparing products and related configurations. Use this section as a checklist; detailed product setup remains in the dedicated Master Data guides.
Create Freight, Local Charge, and Service Products
Transport services need to be set up as products in the system so they can be quoted, tracked, and converted to shipments.
Management Service Products in Freight Forwarder: Management Service Products
Link Freight Products with Projects
If you use the Freight Project & Timesheet (viin_freight_project) extension, link freight products with project templates so every confirmed sales order automatically generates a dedicated project and tasks.
Configure Service Tracking on Products
Go to Sales > Products > Products or Freight Forwarder > Services > Freight Charges > Freights
Open the freight product (e.g.,
Sea Freight FCL 40ft - Export).In the Sales tab:
Set Service Tracking to
Project & Task(or another suitable option).Choose Project Template to copy standard tasks.
Leave Project empty so a new project is created per order.
After confirming a sales order that includes this product, the system automatically creates a shipment plus a project populated with the template tasks. Operations teams can start tracking work immediately.
See also
Detailed configuration steps: Tasks Management in Freight Forwarder
Pricing Assets
Set up the pricing references and templates that accelerate quotation creation.
Configure Supplier-Based Pricelists
Supplier-based pricelists let the system convert purchase prices from carriers, agents, or subcontractors into selling prices with your desired markup.
Create Pricelist Based on Supplier Prices
Access Sales > Products > Pricelists, create new and configure:
Pricelist Name: Descriptive name for this pricelist.
Price Rules: Click Add a line to add rule.
Apply On: Select product application scope.
Based On: Select Supplier Pricelist.
Markup Percentage: Profit margin percentage to add.

When using this pricelist, system will automatically take purchase price from supplier and add profit margin to calculate sales price.
Assign Pricelist to Customer
Open customer card, in Sales & Purchase tab, select appropriate pricelist in Pricelist field. All quotations created for that customer will inherit the supplier-based pricing logic.
See also
See more: Manage your pricing
Prepare Quotation Templates
Quotation templates help create quotations quickly for frequently provided services.
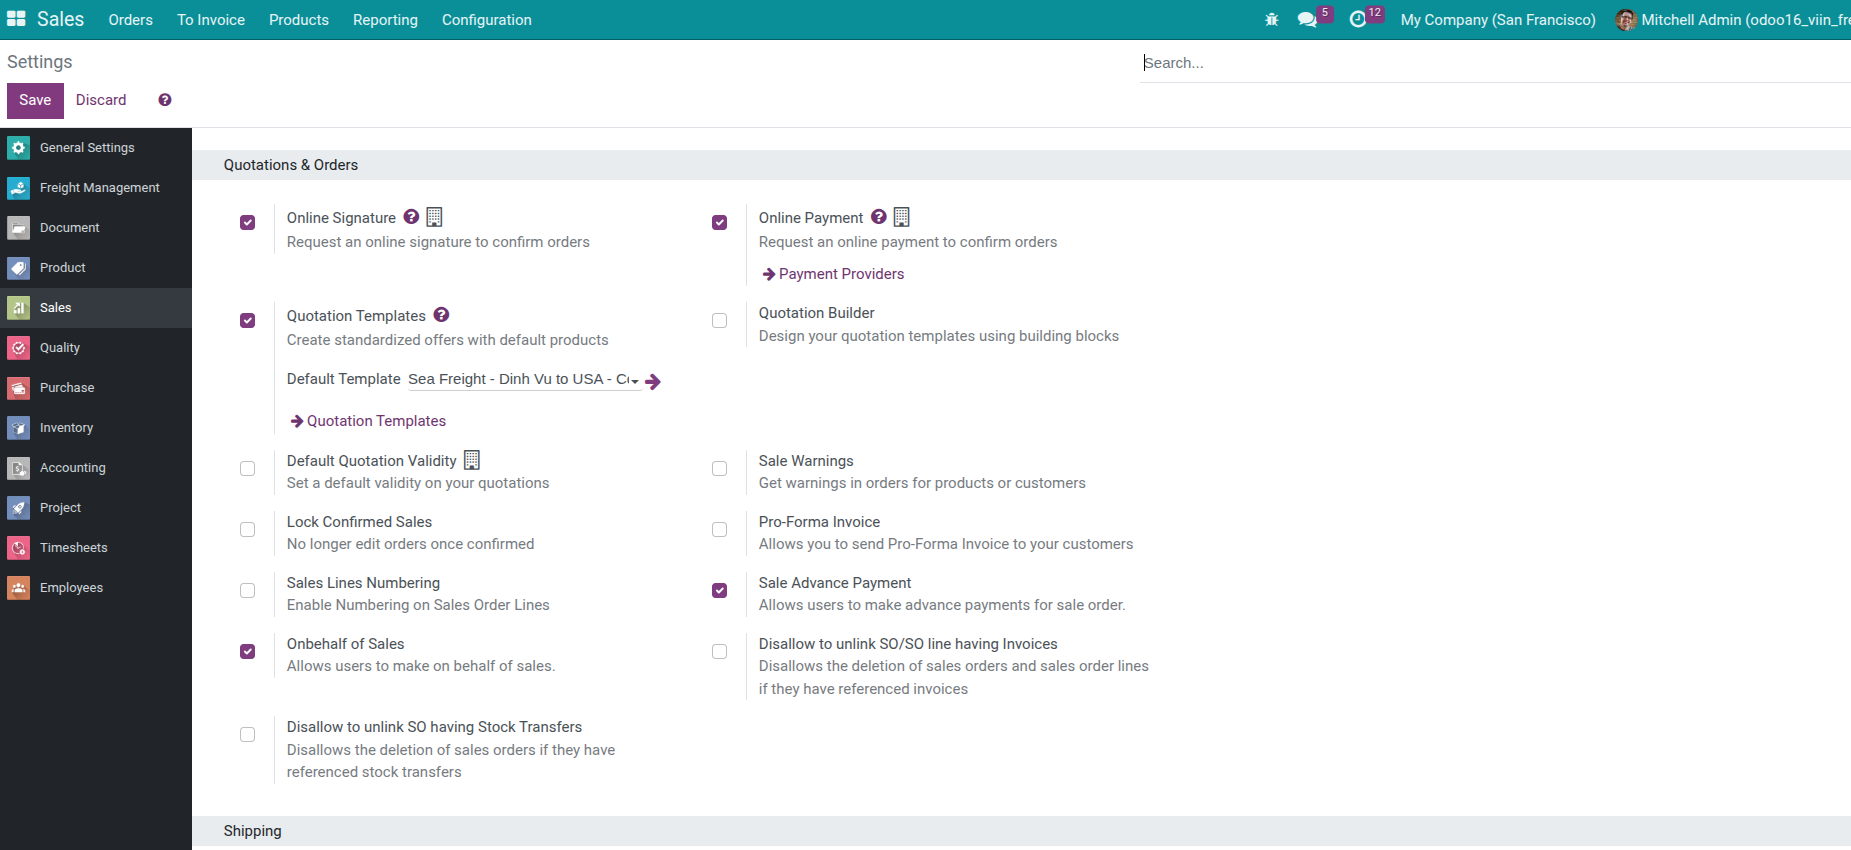
Activate Quotation Template Feature
Access Sales > Configuration > Settings
Find Quotations and Orders section
Enable Quotation Templates option
Optionally select default quotation template for company
Create New Quotation Template
Access Sales > Configuration > Quotation Templates
Click Create and fill in information:
Template Name: Descriptive name for quotation template
Validity: Number of days quotation is valid
Terms and Conditions: Standard terms
Lines: Pre-add commonly used service products
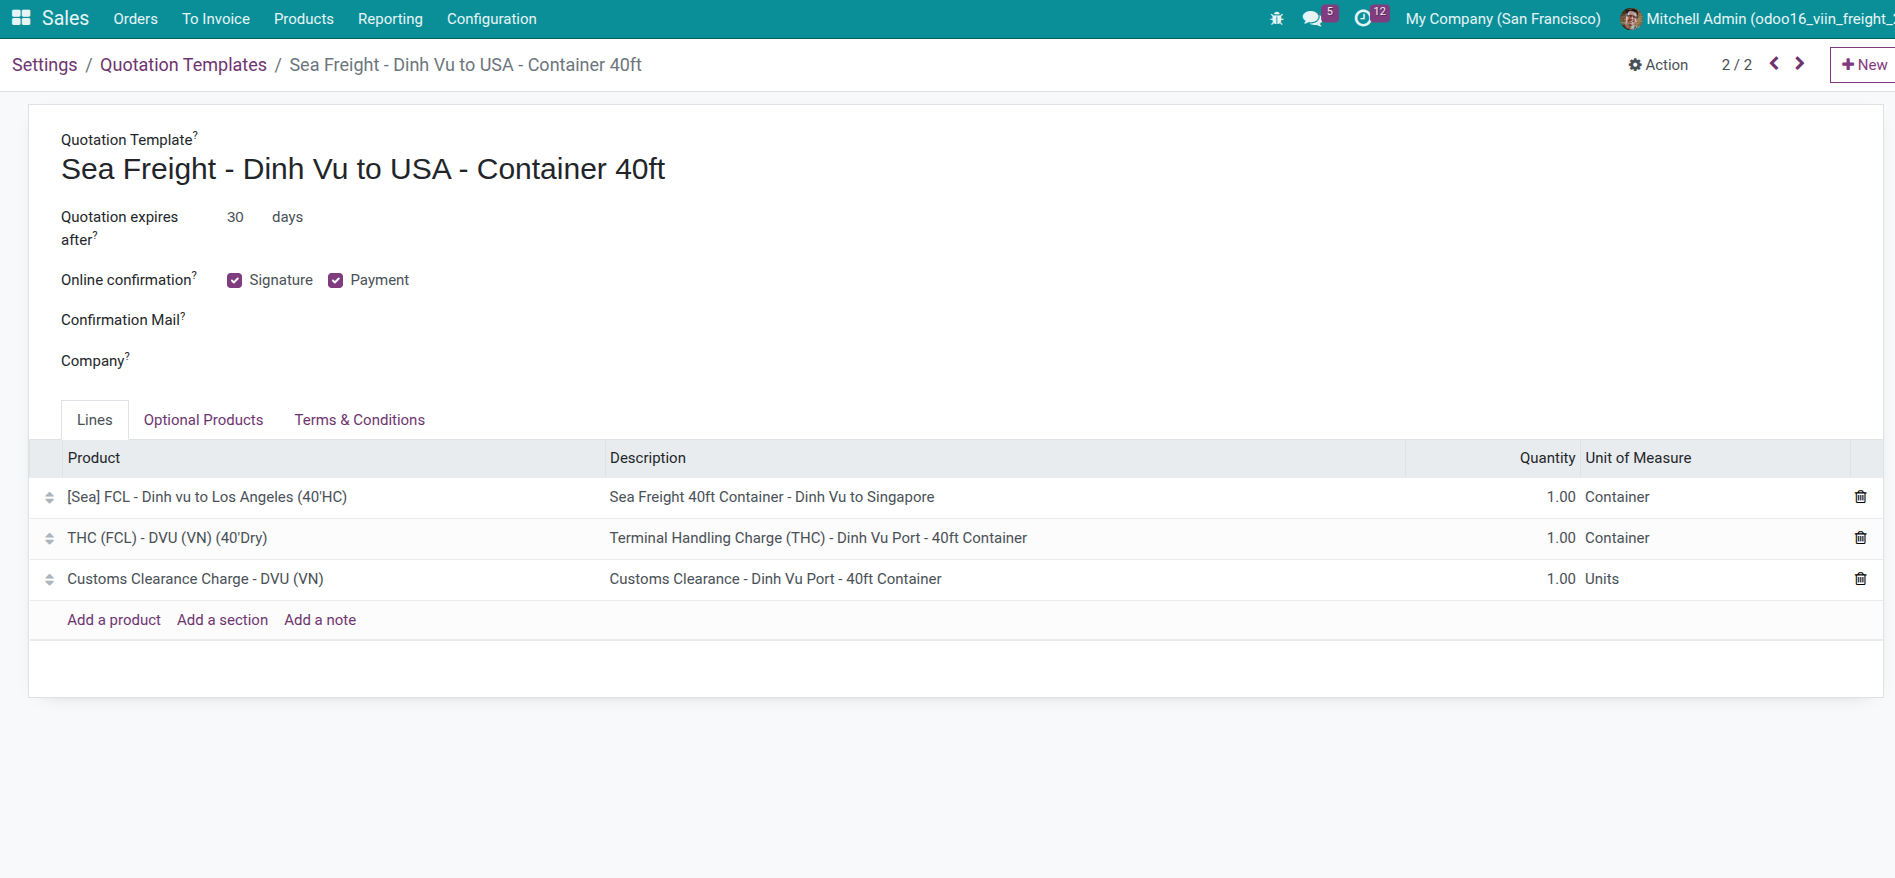
When creating new quotation, just select template and system will automatically fill in pre-configured services.
See also
See more: Designing Quotation Template
Create & Complete Quotation
Once the groundwork above is complete, sales teams can create accurate quotations in minutes.
Create a New Quotation
Access Sales > Orders > Quotations, click Create button.
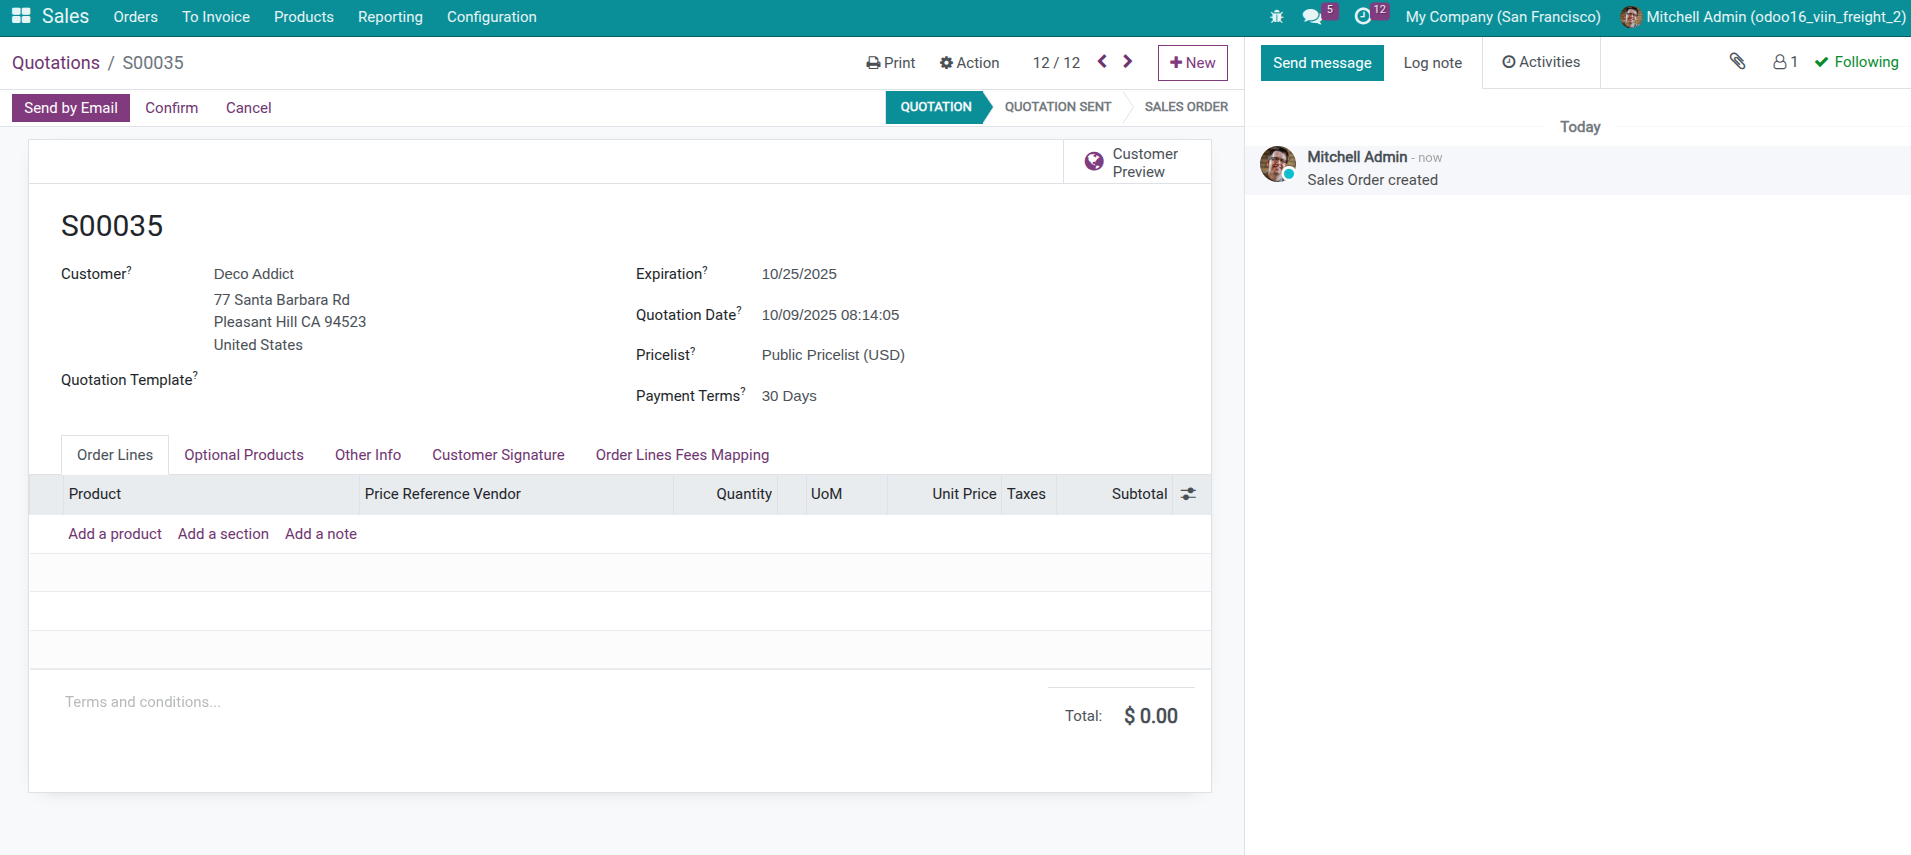
Fill in basic information:
Customer: Select customer needing quotation
Quotation Date: Quotation creation date, defaults to current date
Expiration Date: Quotation expiration date
Pricelist: System automatically selects customer’s supplier-based pricelist
Quotation Template: If available, select appropriate template
Tip
If selecting quotation template, system will automatically fill service lines from template. You can edit these lines if needed.
Add Freight and Local Service Lines
Add Main Freight Charge
In Order Lines tab, click Add a line
Select freight charge product
Fill in quantity and unit price
System will automatically calculate price based on pricelist assigned to customer.
Add Local Charges and Other Services
Continue clicking Add a line to add local charges, documentation services, insurance and other costs.
Note
If fee definition configured for product, when selecting main product, system will display notification suggesting adding accompanying fees when confirming SO or Calculate Fees button on form interface.
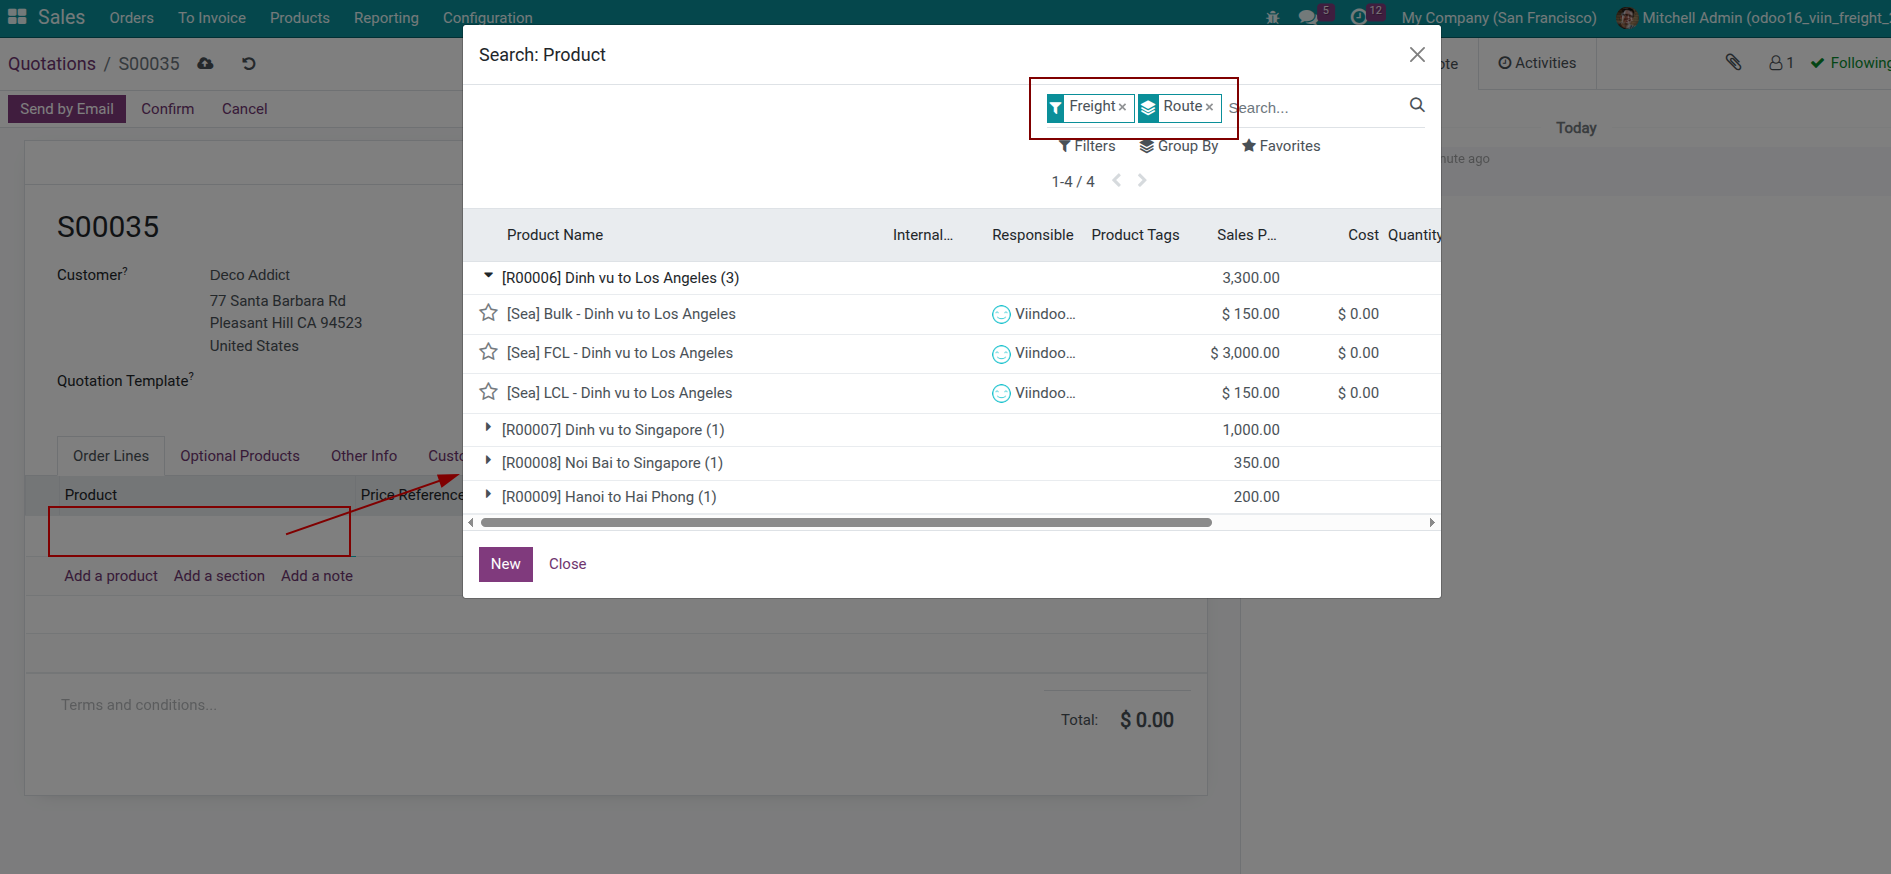
Compare Supplier Costs
For each service line, select a supplier so the system can present reference costs and margins.
Select Supplier
On each order line, locate the Price Reference Vendor field and pick the supplier you want to use.
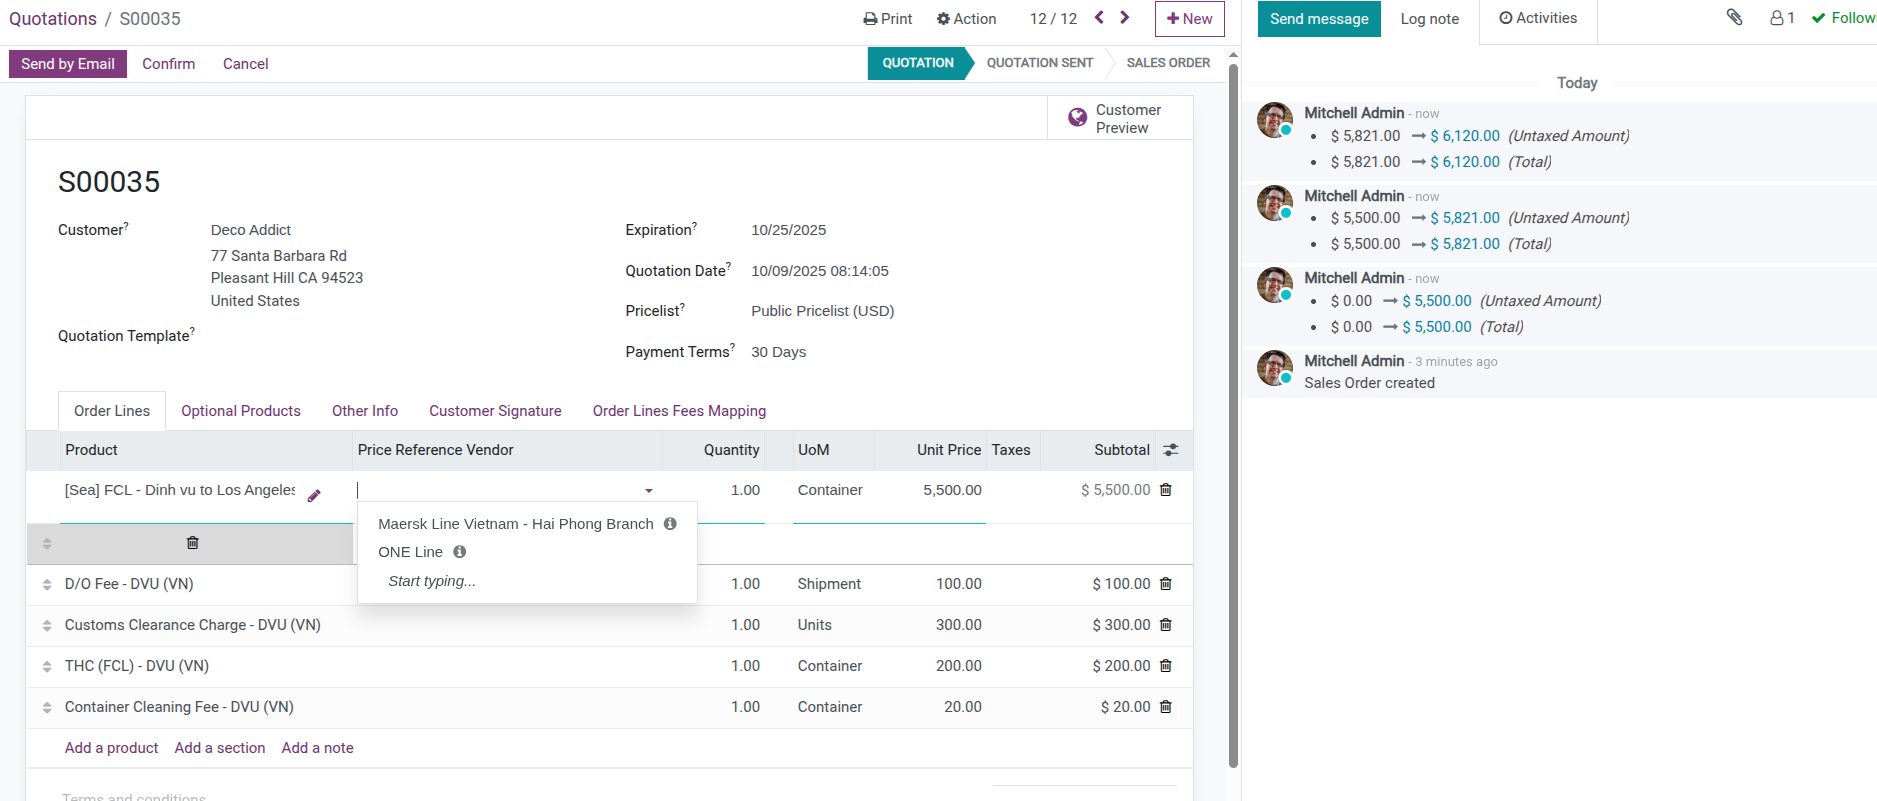
View Supplier Fee List
When selecting a supplier, the system displays the supplier list window along with the info icon <i class="fa fa-info-circle"></i> in Price Reference Vendor field showing:
Main product price
Accompanying fees and price of each fee
Expected total cost
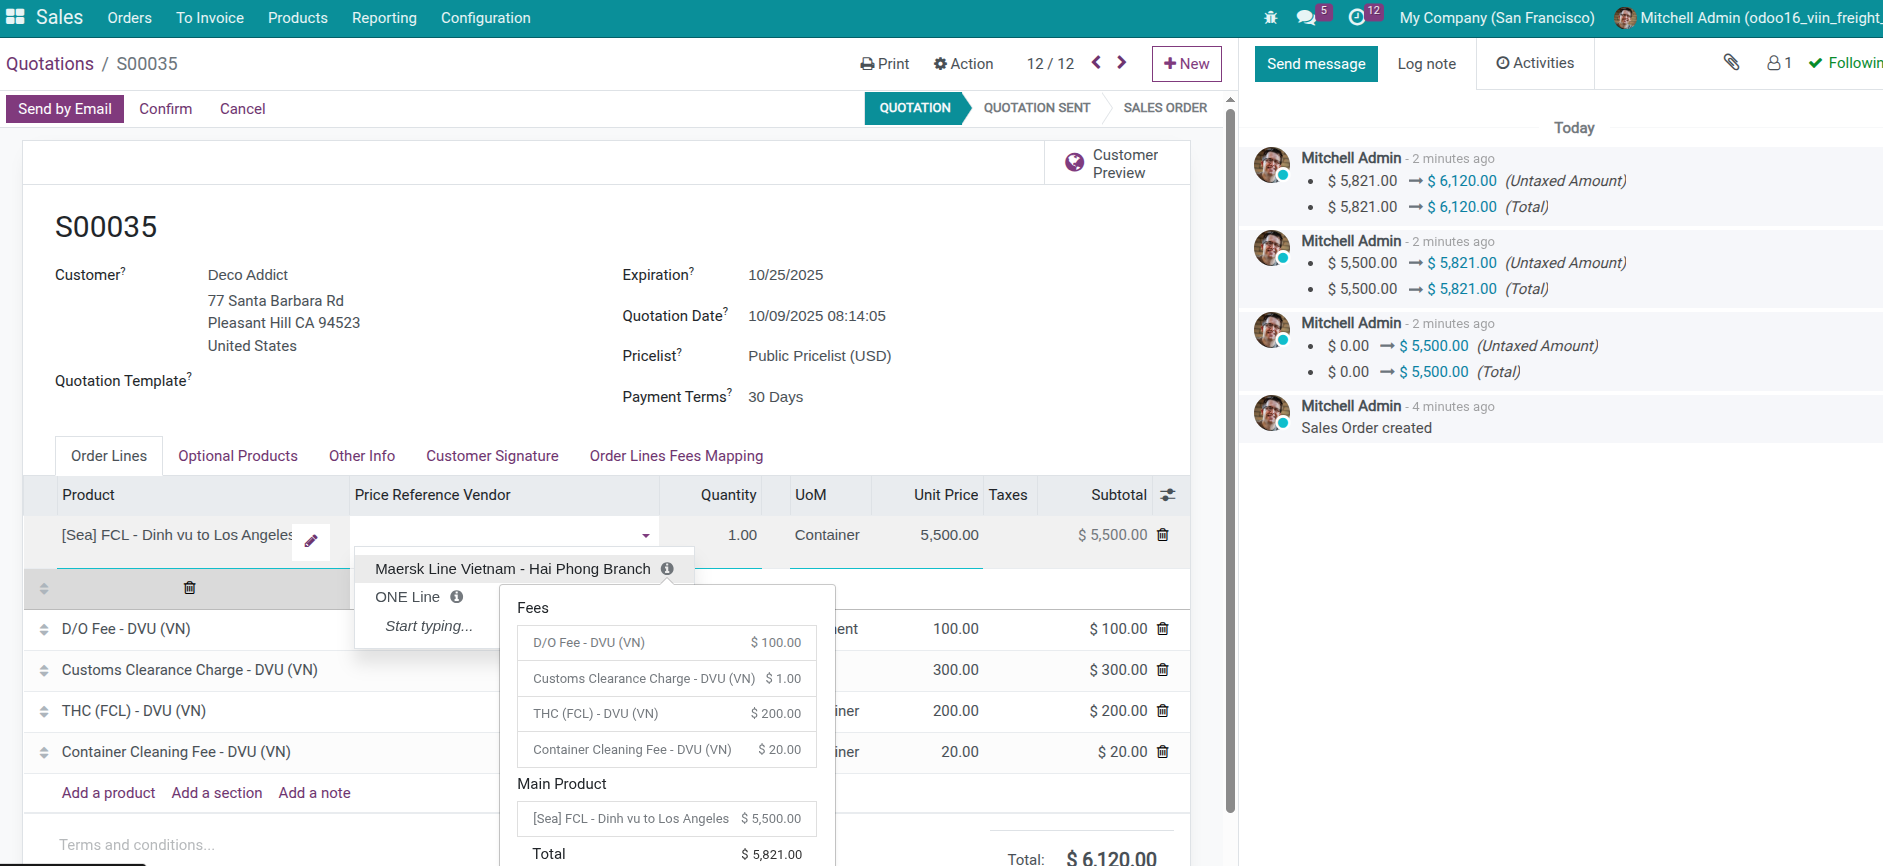
This helps sales staff easily compare prices between suppliers and select the most suitable one.
Note
Supplier fee display feature requires installing Supplier Fees - Sales module.
Automatic Margin Calculation
After selecting supplier:
If pricelist configured to calculate based on supplier price, sales price will automatically update.
Sales price calculated as purchase price from supplier plus configured profit margin.
Mark On-Behalf Collections
In freight forwarding, businesses often collect money from customers to pay third parties like customs, ports. These amounts are not actual business revenue and need to be marked separately.
When to Mark Collection/Disbursement on Behalf
Mark collection/disbursement on behalf when:
Collecting customs fees to pay customs office
Collecting port fees to pay port
Collecting other costs where business only acts as intermediary
These amounts will:
Not be included in sales invoice
Not counted as revenue
Recorded separately in collection/disbursement accounting
How to Mark Collection/Disbursement on Behalf
On order line needing marking:
Enable Mark On-Behalf option
Select Collection Partner if already know partner needing payment
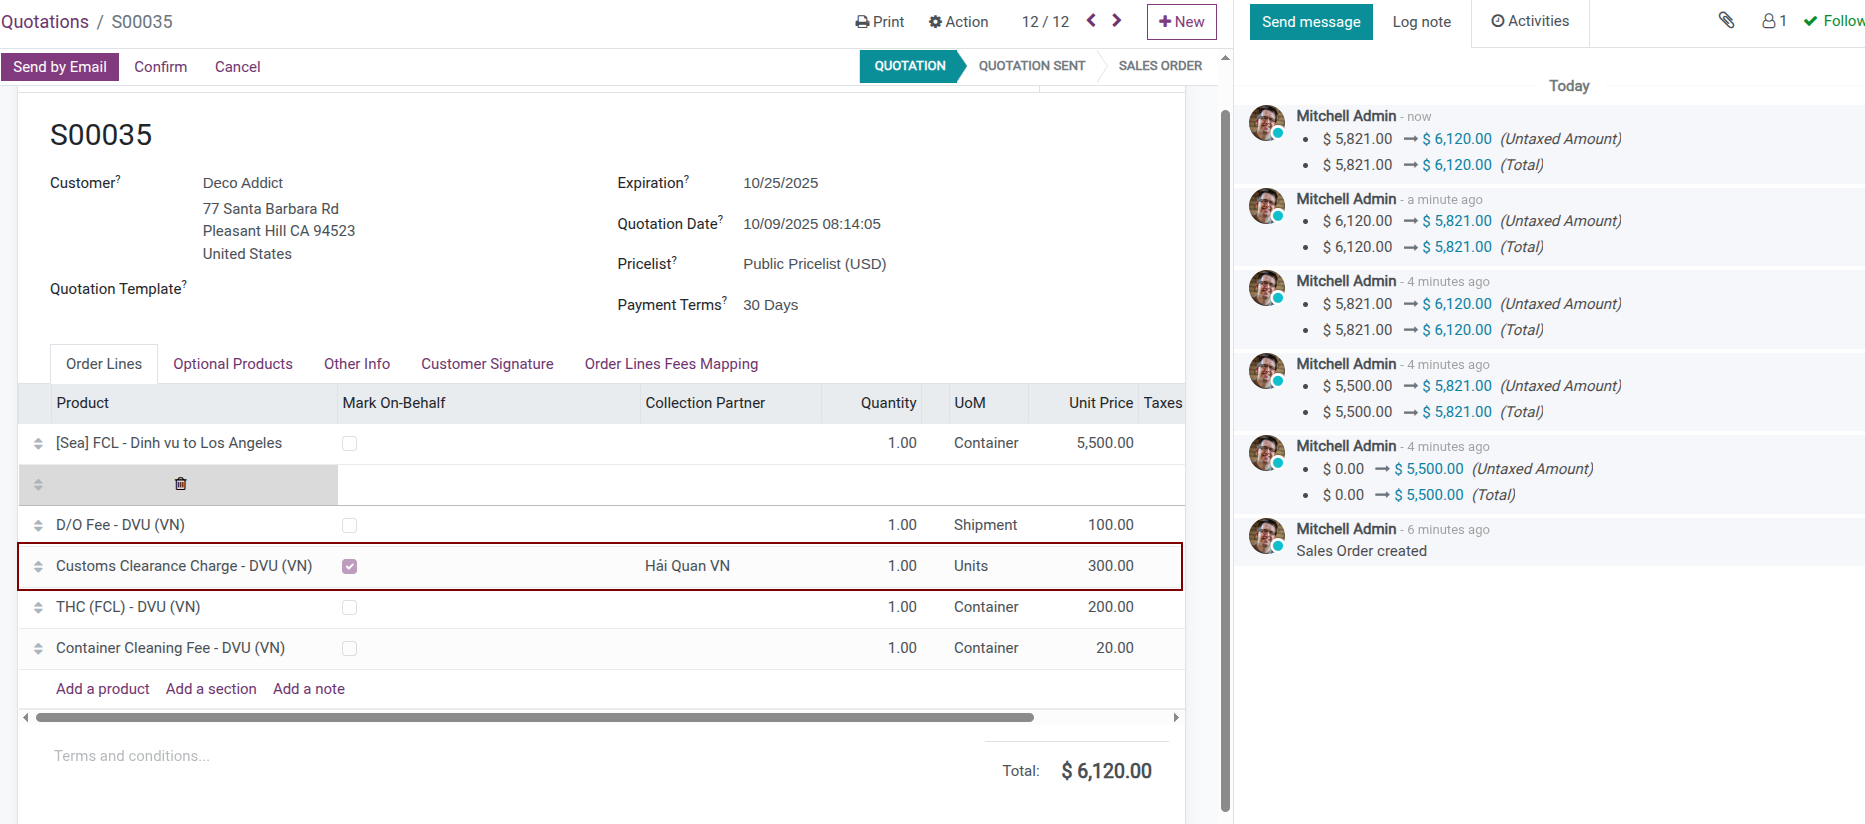
If you do not know the partner needing payment at quotation time, you can leave Collection Partner field empty and select after receiving information.
See also
See details: Shipment Receivable and Payable Management
Review Totals and Terms
Review Total Value
Check following information:
Does total quotation value include all necessary services
Are service prices appropriate with costs and desired profit
Are collection on behalf amounts marked correctly
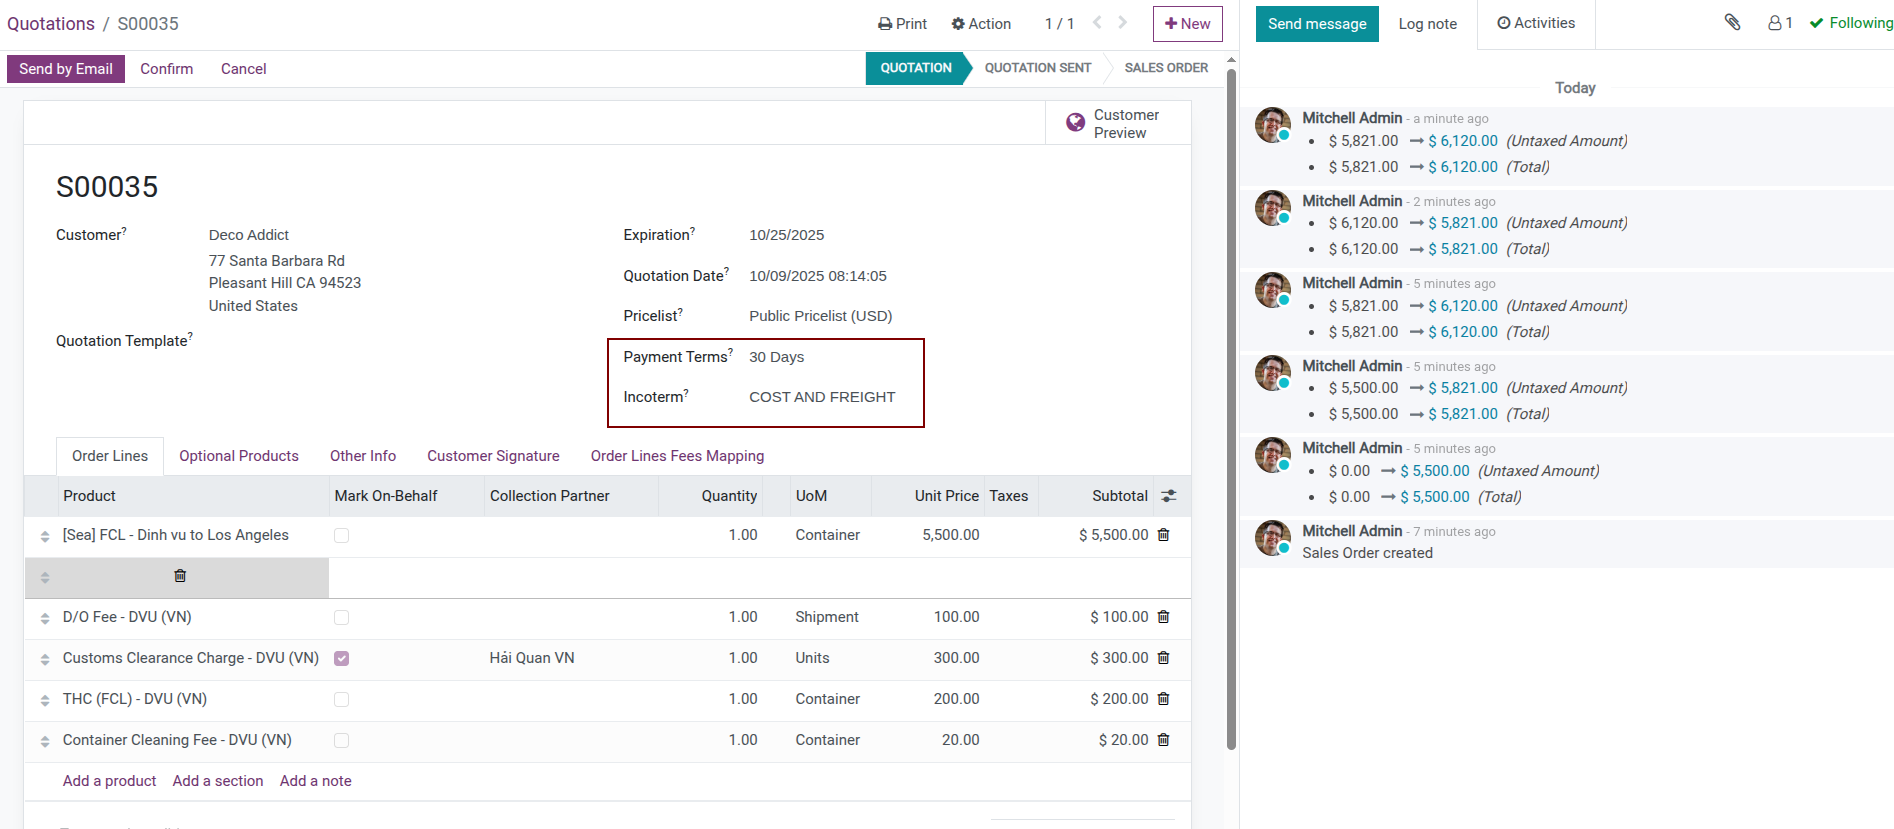
Add Terms and Conditions
Switch to Terms and Conditions area, fill in important terms like:
Payment terms
Incoterms
Add Internal Notes
If there’s information needing attention internally, add to Other Information tab or use notes function.
See also
See more: Send quotations
Send, Approve, and Invoice
After drafting the quotation, complete the customer communication cycle and move the deal toward revenue.
Send Quotation to Customer
Send via Email
On quotation screen, click Send by Email button
System opens email compose window with template content
Review and edit email content if needed
Click Send
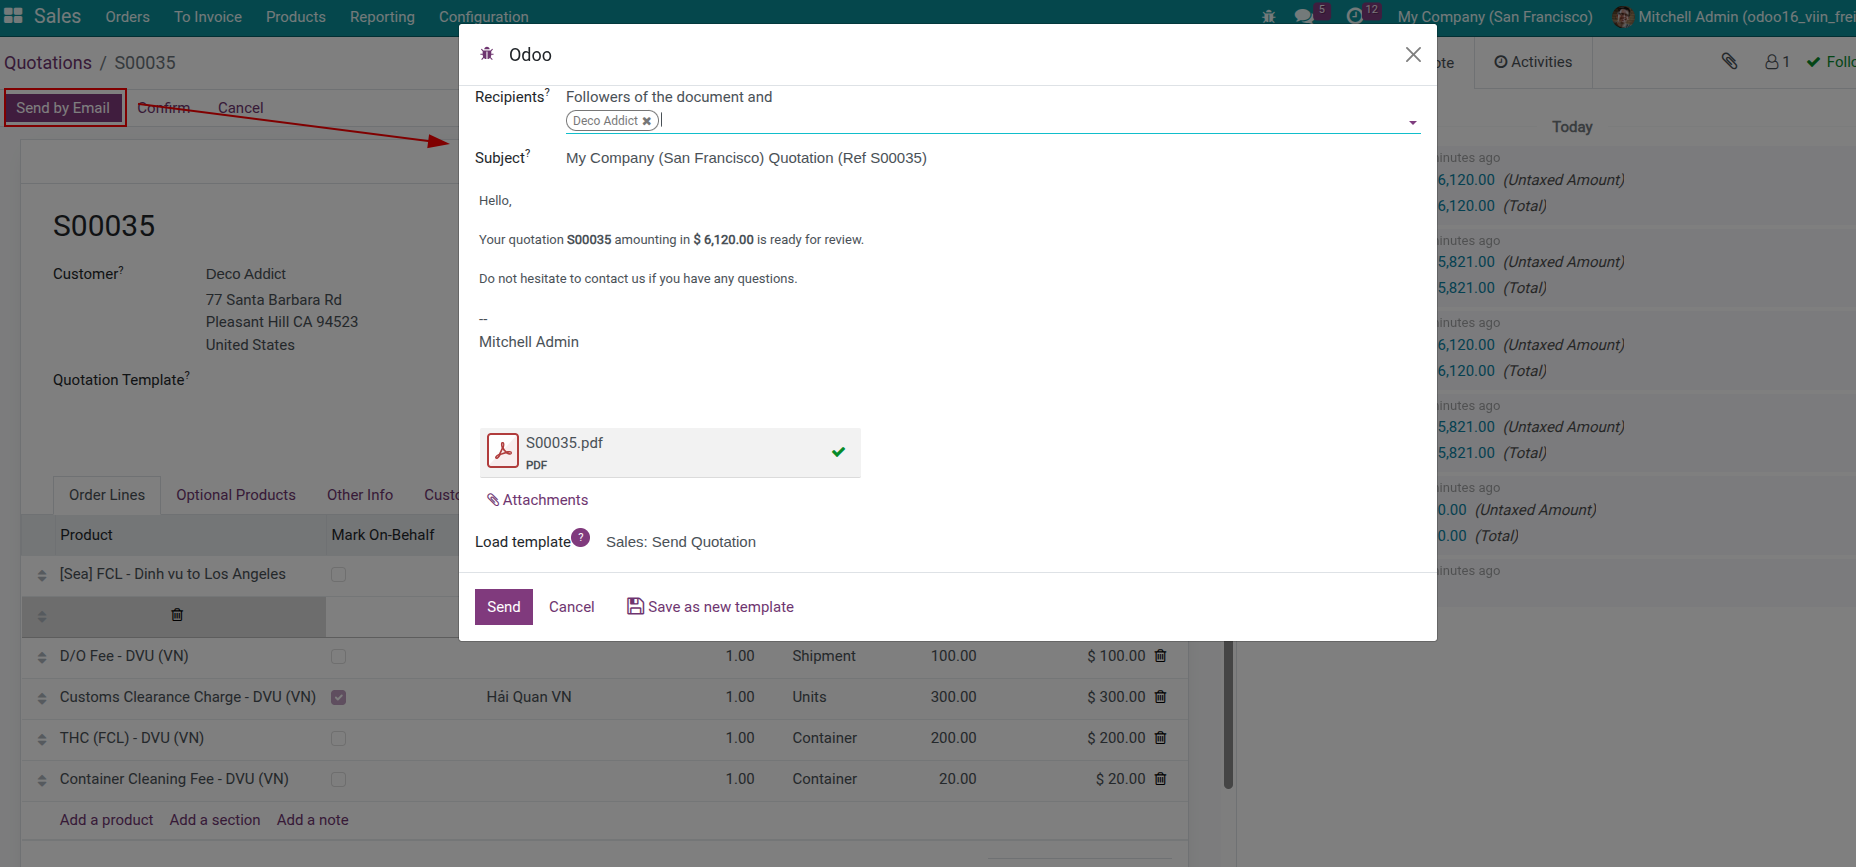
Quotation will be attached as file for customer to easily view and store.
Print Quotation
If need to print on paper, click Print button and select Quotation to export file.
Send via Customer Portal
If customer portal installed, quotation can be shared online. Customer can:
View quotation directly on browser
Accept quotation online
Electronic signature
Online payment if configured
Track Customer Feedback
After sending quotation, system records quotation status as Quotation Sent.
Check if Email Opened
If email sent through system, can track whether customer opened email in communication history.
Handle Customer Feedback
When customer has change requests:
Reopen quotation
Edit service lines or prices
Save and resend to customer
System automatically saves history of all quotation sends.
Confirm Quotation and Continue Workflow
When customer accepts quotation, confirm quotation to sales order.
Confirm Order
On quotation screen, click Confirm button
Quotation becomes sales order with status Sales Order
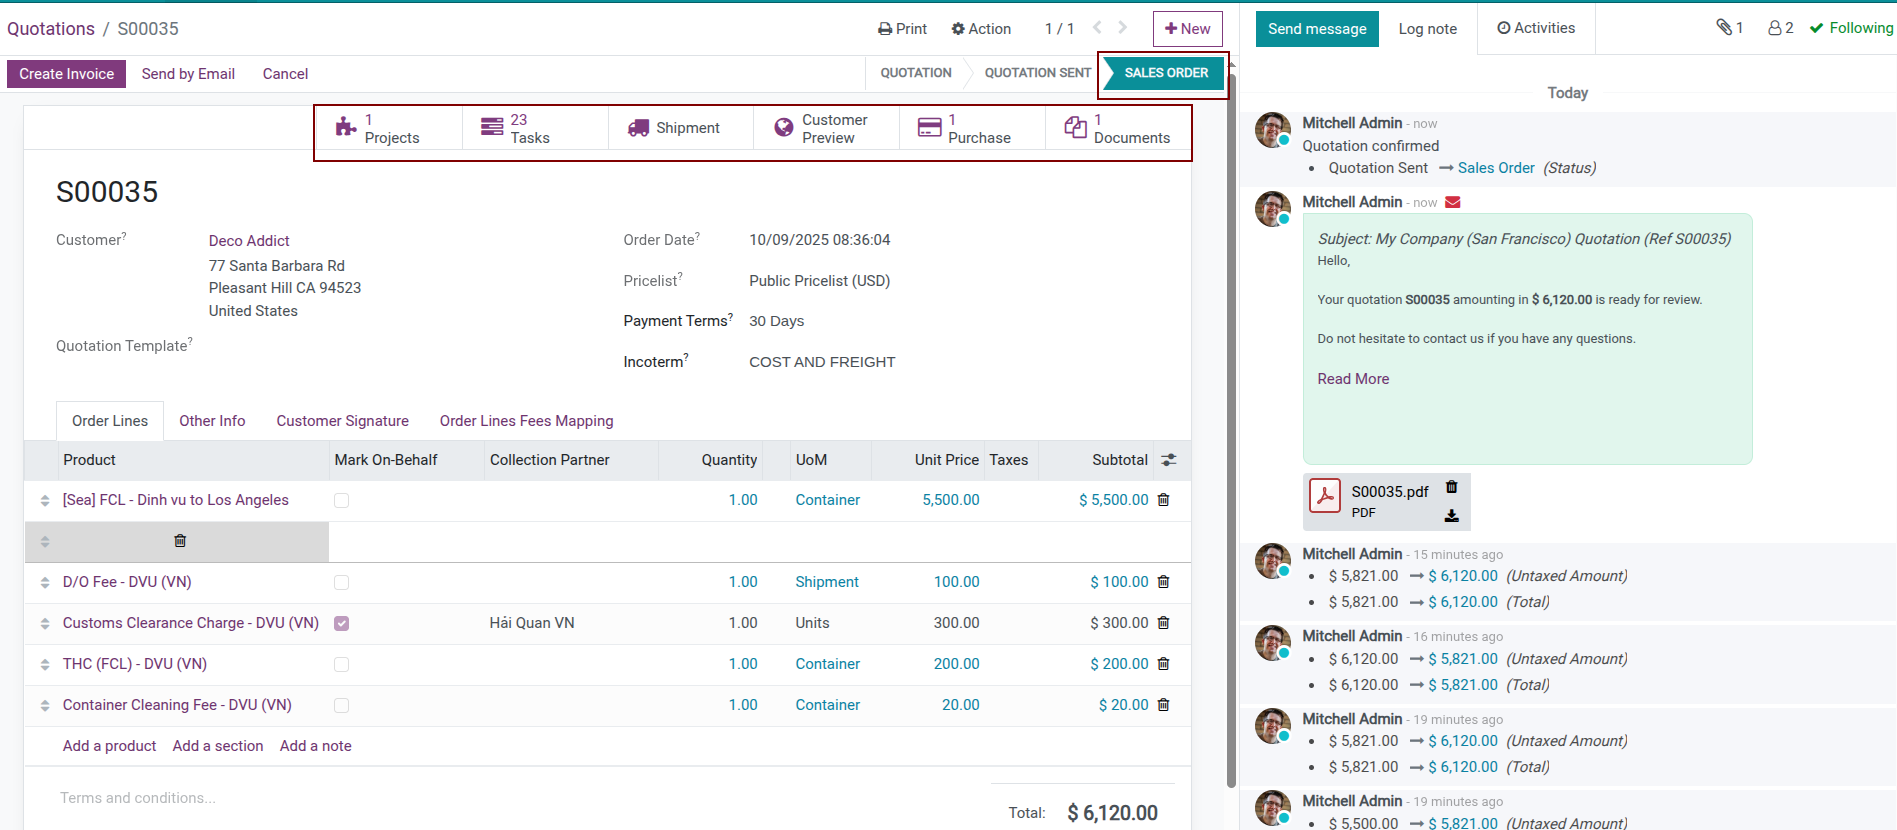
What Happens When Confirming
When confirming sales order, system automatically:
Creates transport shipment from freight charge lines
Creates project and tasks if project management module installed
Creates purchase orders for outsourced services if configured
From here, you can move to shipment operations stage to start transport work.
Issue Invoice and Record Payment
Create Sales Invoice
After completing service or according to payment agreement:
Open sales order
Click Create Invoice button
Select appropriate invoicing method
Confirm and send invoice to customer
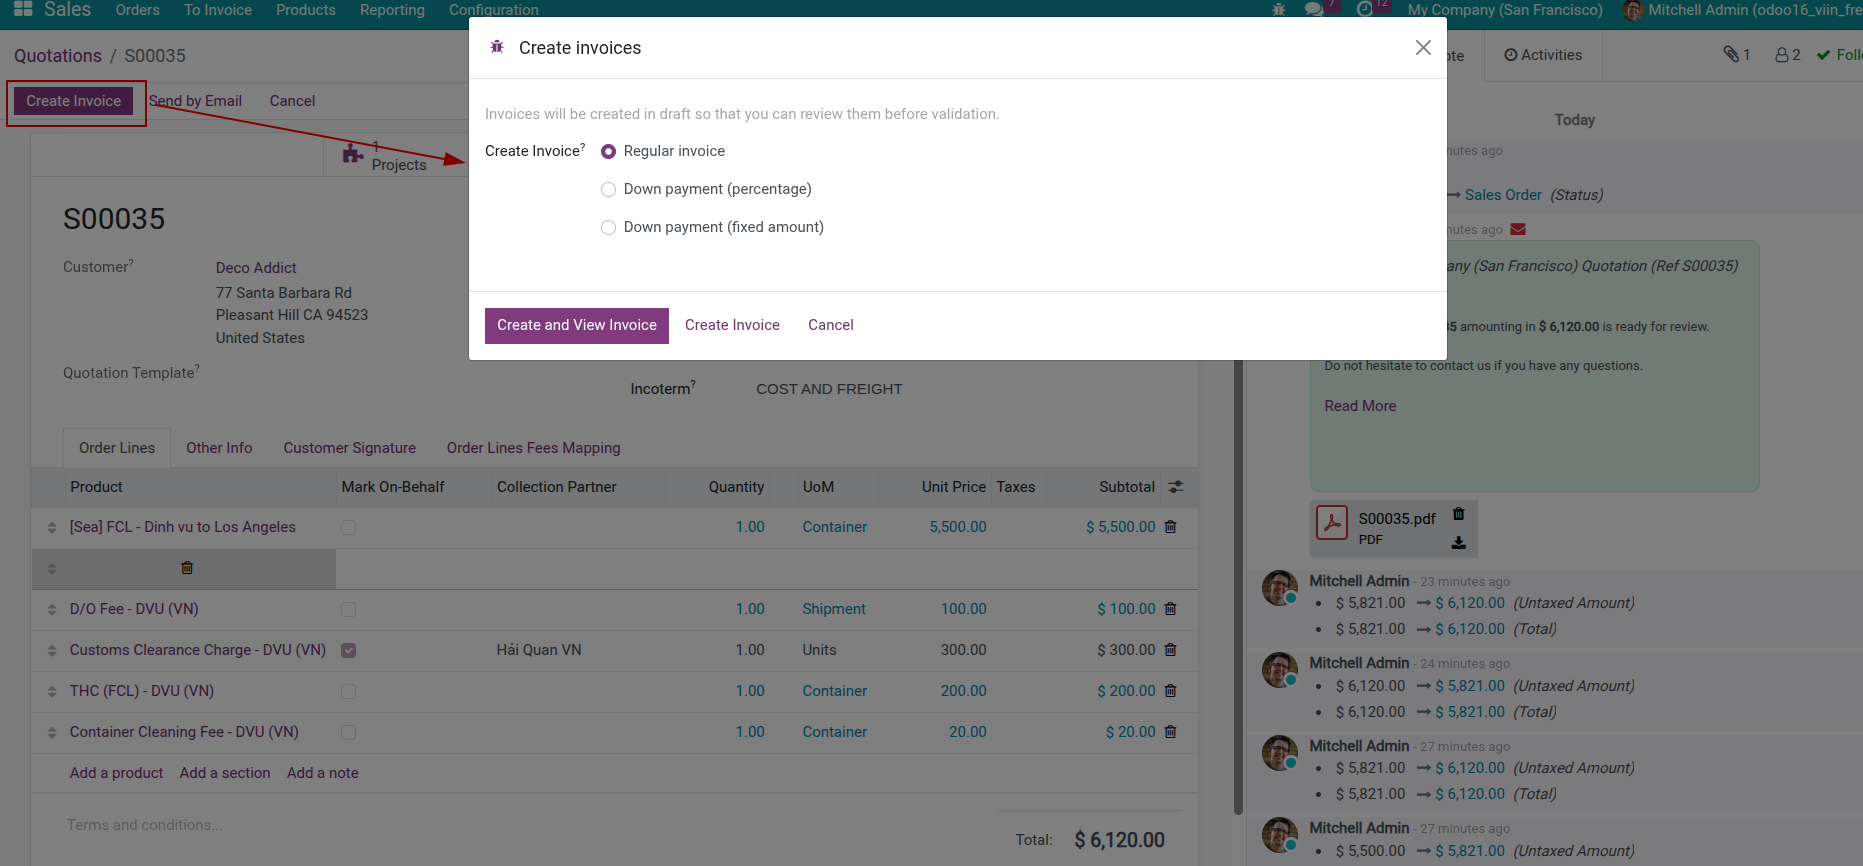
Lines marked as collection/disbursement on behalf will not appear in invoice.
Record Payment
When receiving payment from customer:
Open invoice needing payment recording
Click Register Payment button
Fill in payment information and confirm
Special Scenarios & Maintenance
Handle atypical operational cases and keep pricing data aligned with market changes.
Create Quotation After Receiving Cargo for Transport
In some cases, business already received cargo and started transport before having official quotation. For example:
Trusted customer delivers cargo first, agrees on price later
Urgent cargo needs immediate transport
Cannot determine exact costs before receiving cargo
Handling Process
Create transport shipment immediately upon receiving cargo
Start operations work
After costs are clear, create quotation for customer
Link quotation with previously created shipment
Two Ways to Create Quotation and Link Shipment
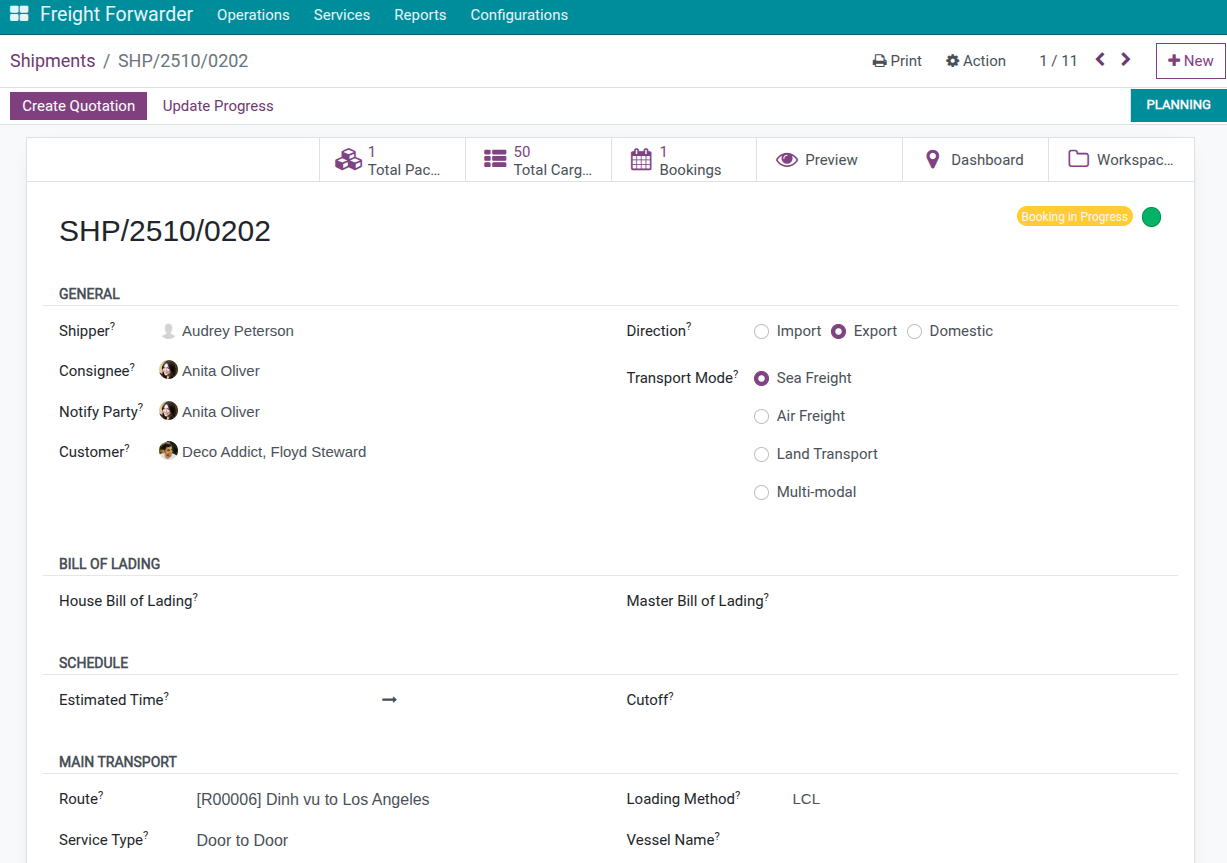
Method 1: Create Quotation Automatically from Shipment
Open created shipment
Click Create Quotation button
System automatically creates quotation with information from shipment
Review and adjust sales prices
Send to customer
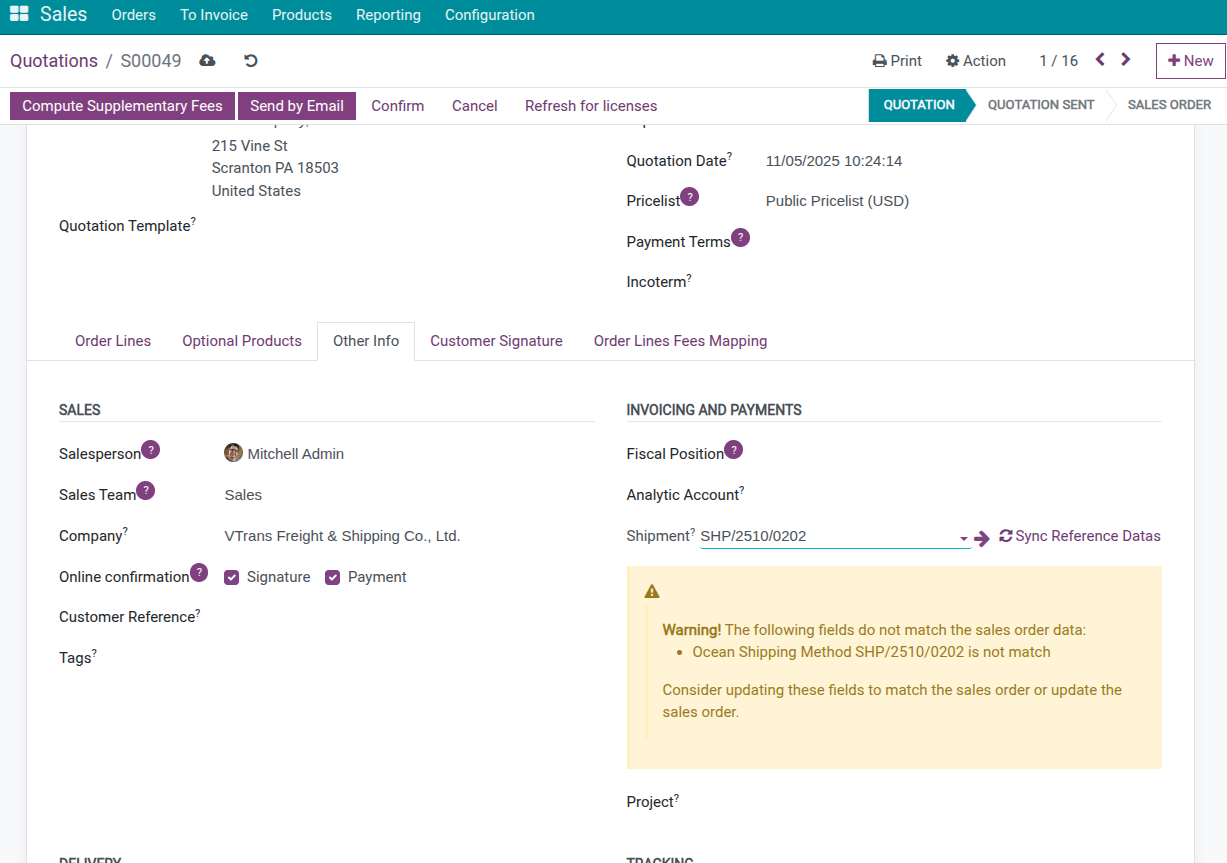
Method 2: Create Independent Quotation and Manually Link
Create new quotation as normal
In Other Information tab, find Transport Information section
Select previously created shipment
System will check and warn if information doesn’t match
Adjust appropriately and send to customer
Important
When confirming quotation in this case, system will not create new shipment but link with existing shipment.
Use Different Pricelists for Different Customers
Different customers may have different pricelists depending on:
Committed transport volume
Long-term relationship
Types of services frequently used
Set Up Separate Pricelists
Create different pricelists with clear descriptive names
Configure appropriate price rules for each pricelist
Assign pricelist to each customer in customer card
When creating quotation, system automatically applies that customer’s pricelist.
Handle When Supplier Prices Change
Prices from suppliers can change over time. To ensure sales prices always accurate:
Update Supplier Prices Regularly
Open product needing update
Go to Purchase tab
Edit price in supplier list
Or add new line with effective start date
System will automatically select appropriate price for quotation creation date.
Add Multiple Price Ranges by Quantity
Some suppliers have different prices by quantity. Add multiple price lines with different minimum quantities so system automatically selects correct price.
Frequently Asked Questions
Can configuration be edited after use?
Yes! Most configurations can be changed later:
Edit freely: Shipping Method, Stage, Cargo Template
Should be careful: Route (if already used in many shipments)
Doesn’t affect old shipments: Cargo Input Mode only applies to newly created shipments. Existing shipments are not affected.
Can used configuration be deleted?
Depends on type:
Route/Port: System will report error if being used - Safe
Shipping Method: Can delete, but old shipments will lose this information
Stage: Shipments at that stage will not display correctly
Recommendation: Instead of deleting, should Archive to keep old data.
Who uses Route and Shipping Method? Where used?
- Users:
Operations staff (Operations / Docs)
Customer Service staff
- When used:
Creating new shipment (from sales order or direct creation)
Changing transport plan (example: change from LCL to FCL)
- Where used:
Shipment Form - select Route and Shipping Method
Route Leg Form (if shipment has multiple legs)
- If employees often select wrong:
Train: Help employees distinguish FCL/LCL, Door-to-Door/Port-to-Port…
Create product templates: Each service (FCL, LCL…) has separate product with pre-set route/method
Permissions: Only Managers can create/edit route configuration
Can Route/Port be bulk imported?
Yes! You can use Odoo’s Import feature:
Create 1 sample record
Export to Excel file
Fill in bulk data into file
Import back into system
See also
Related Articles