
Let customers track shipments on the portal
Guide information
Requirements
This tutorial requires the installation of the following applications/modules:
Freight Forwarder Management (installs Logistics Shipment and Logistics Routes Integration automatically)
Every Documentation officer knows the pattern: the same customer calls or emails three times a week asking whether the cargo has sailed or whether the ETA has changed. Each of those questions interrupts a booking or a document task that has nothing to do with them. The customer portal lets the customer answer those questions itself, in real time, from data Operations already enters on the shipment - Documentation only steps in for what the portal cannot show, such as a written confirmation or a reason for a delay. If a term below is new to you, see the Industry Glossary.
Running scenario: the customer Joel Willis has three shipments with your company. Documentation grants him a portal account, and he then follows shipment SHP/2611/00002, a sea shipment that is In Transit with a pre-carriage truck leg, four sea legs and an on-carriage truck leg. Documentation remains the contact for anything the portal does not cover.
Before you start
The customer’s contact record exists with a valid email address (the contact of a customer such as Joel Willis in ).
The shipment’s Customer field is set to that customer - this is what the portal filters on (see Carrier Booking (Sea) for how the shipment is created and confirmed).
Granting portal access is a standard contact action, not a freight permission: any internal user who can edit a contact record can do it, whether or not they belong to a freight group.
Decide who gets a portal account
Option |
Use when |
What changes |
|---|---|---|
One contact |
The customer has a single logistics contact, as with most small customers |
One portal account to manage; simplest to track |
Several contacts |
The customer is a larger organization where more than one department needs to see the same shipments |
Every account sees the same set of shipments - the portal filters on the company, not on which contact you granted access to, so adding more contacts needs no extra setup |
Grant access only to contacts the customer has authorized to use the portal. Because access is scoped to the company rather than an individual contact’s shipments, confirm the company and contact before creating the account; add another contact only after the customer requests or approves it.
Step 1: Grant the customer a portal account
Without a portal account, every “where is my shipment” question still has to go through Documentation by phone or email.
Open the customer’s contact record, for example , then Joel Willis. Click the gear icon Action, then Grant portal access. The Portal Access Management dialog lists the contact with its Email and Latest Authentication, and the buttons for the contact’s current state.
For a contact without a portal account:
Check the Email; fix it directly in the row when needed.
Click Grant Access on the contact’s row, then Close.
After you click Grant Access:
A portal user is created and an invitation email is sent to set a password.
The row’s buttons change to Revoke Access and Re-Invite.

Warning
A portal user sees every shipment where their own company is the Customer, or where that company was added as a follower - not only shipments naming this one contact. If the customer was ever added as a follower on a shipment for a different customer, granting access also gives that contact a link into the other customer’s shipment; remove the follower first. There is no way to scope a portal account to a single shipment or a single department.
Tip
Step 1 is done when: reopening Grant portal access shows Revoke Access on the contact’s row, and the customer confirms they received the invitation email.
Step 2: Customer opens the shipment list
This is the one address the customer needs to remember, instead of a separate link for every shipment.
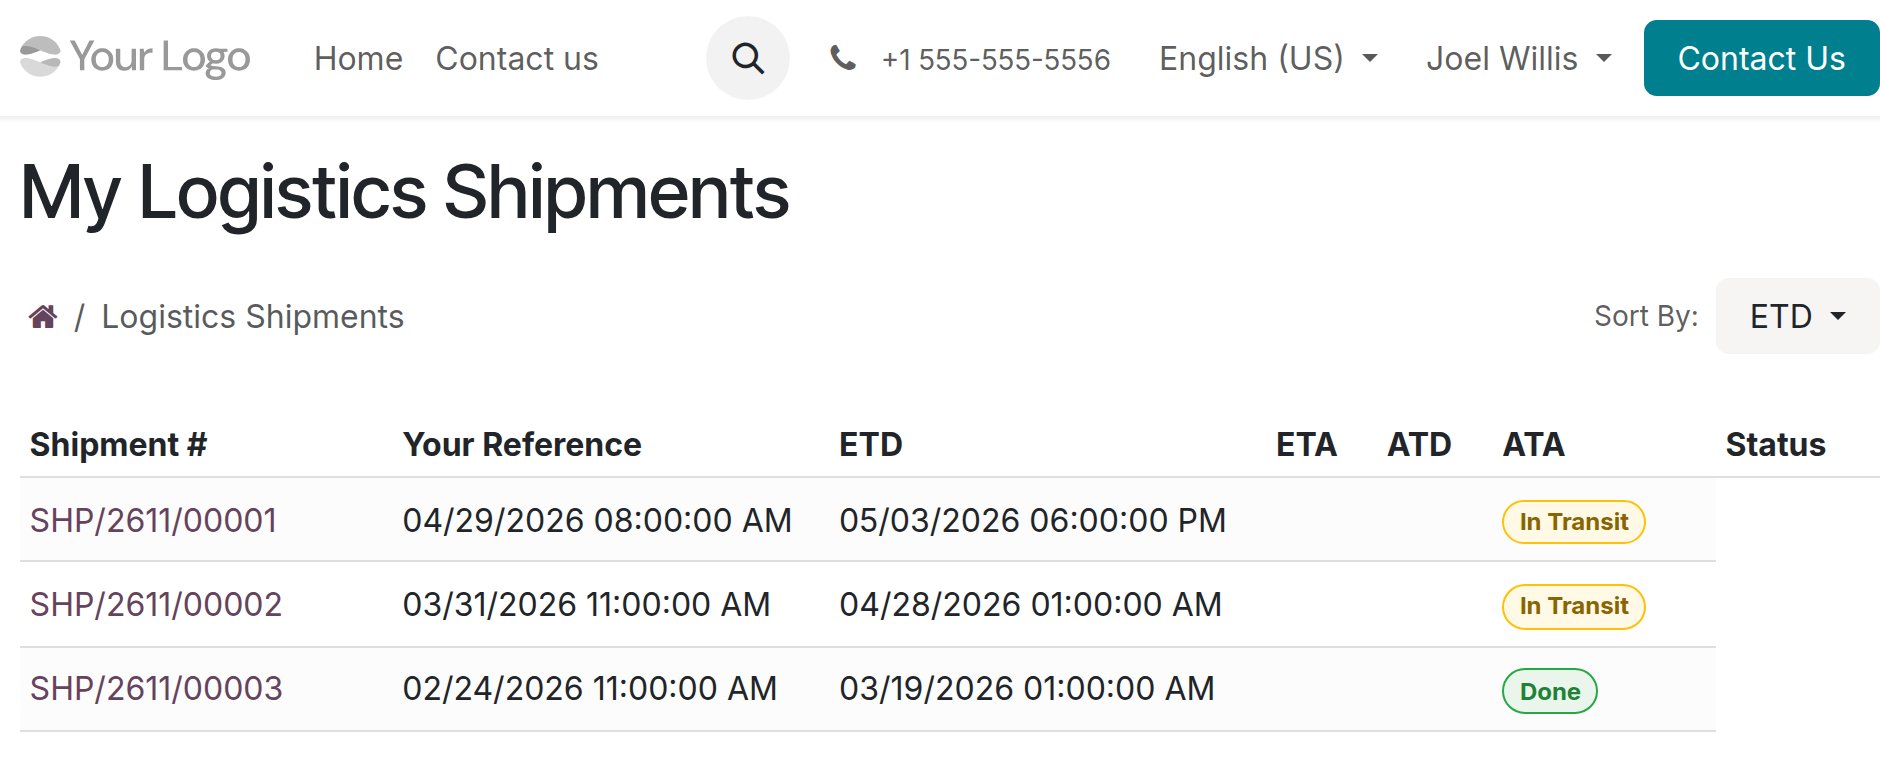
The customer signs in and goes to /my/logistics/shipments (or the My Logistics Shipments
tile on /my). The list shows every shipment where the customer’s company is the Customer, sorted by
ETD, newest first. Use Sort By to sort by Name instead.
Warning
The list has an extra Your Reference column heading, so dates and status sit one column to the left of their headings: the ETD value appears under Your Reference and the status badge under ATA. Use the list to find the Shipment #, then open the detail page to read the dates and status correctly.
Note
The list only sorts by ETD or Name - there is no free-text search box, so the customer cannot type a container or booking number to filter (see Known limitations below).
Tip
Step 2 is done when: the customer finds SHP/2611/00002 among their company’s shipments, with no shipment belonging to another company.
Step 3: Read the shipment detail page
The list is only for finding the right shipment - the detail page is where the customer gets data accurate enough to act on without calling Documentation.
The customer clicks the Shipment # to open the detail page.
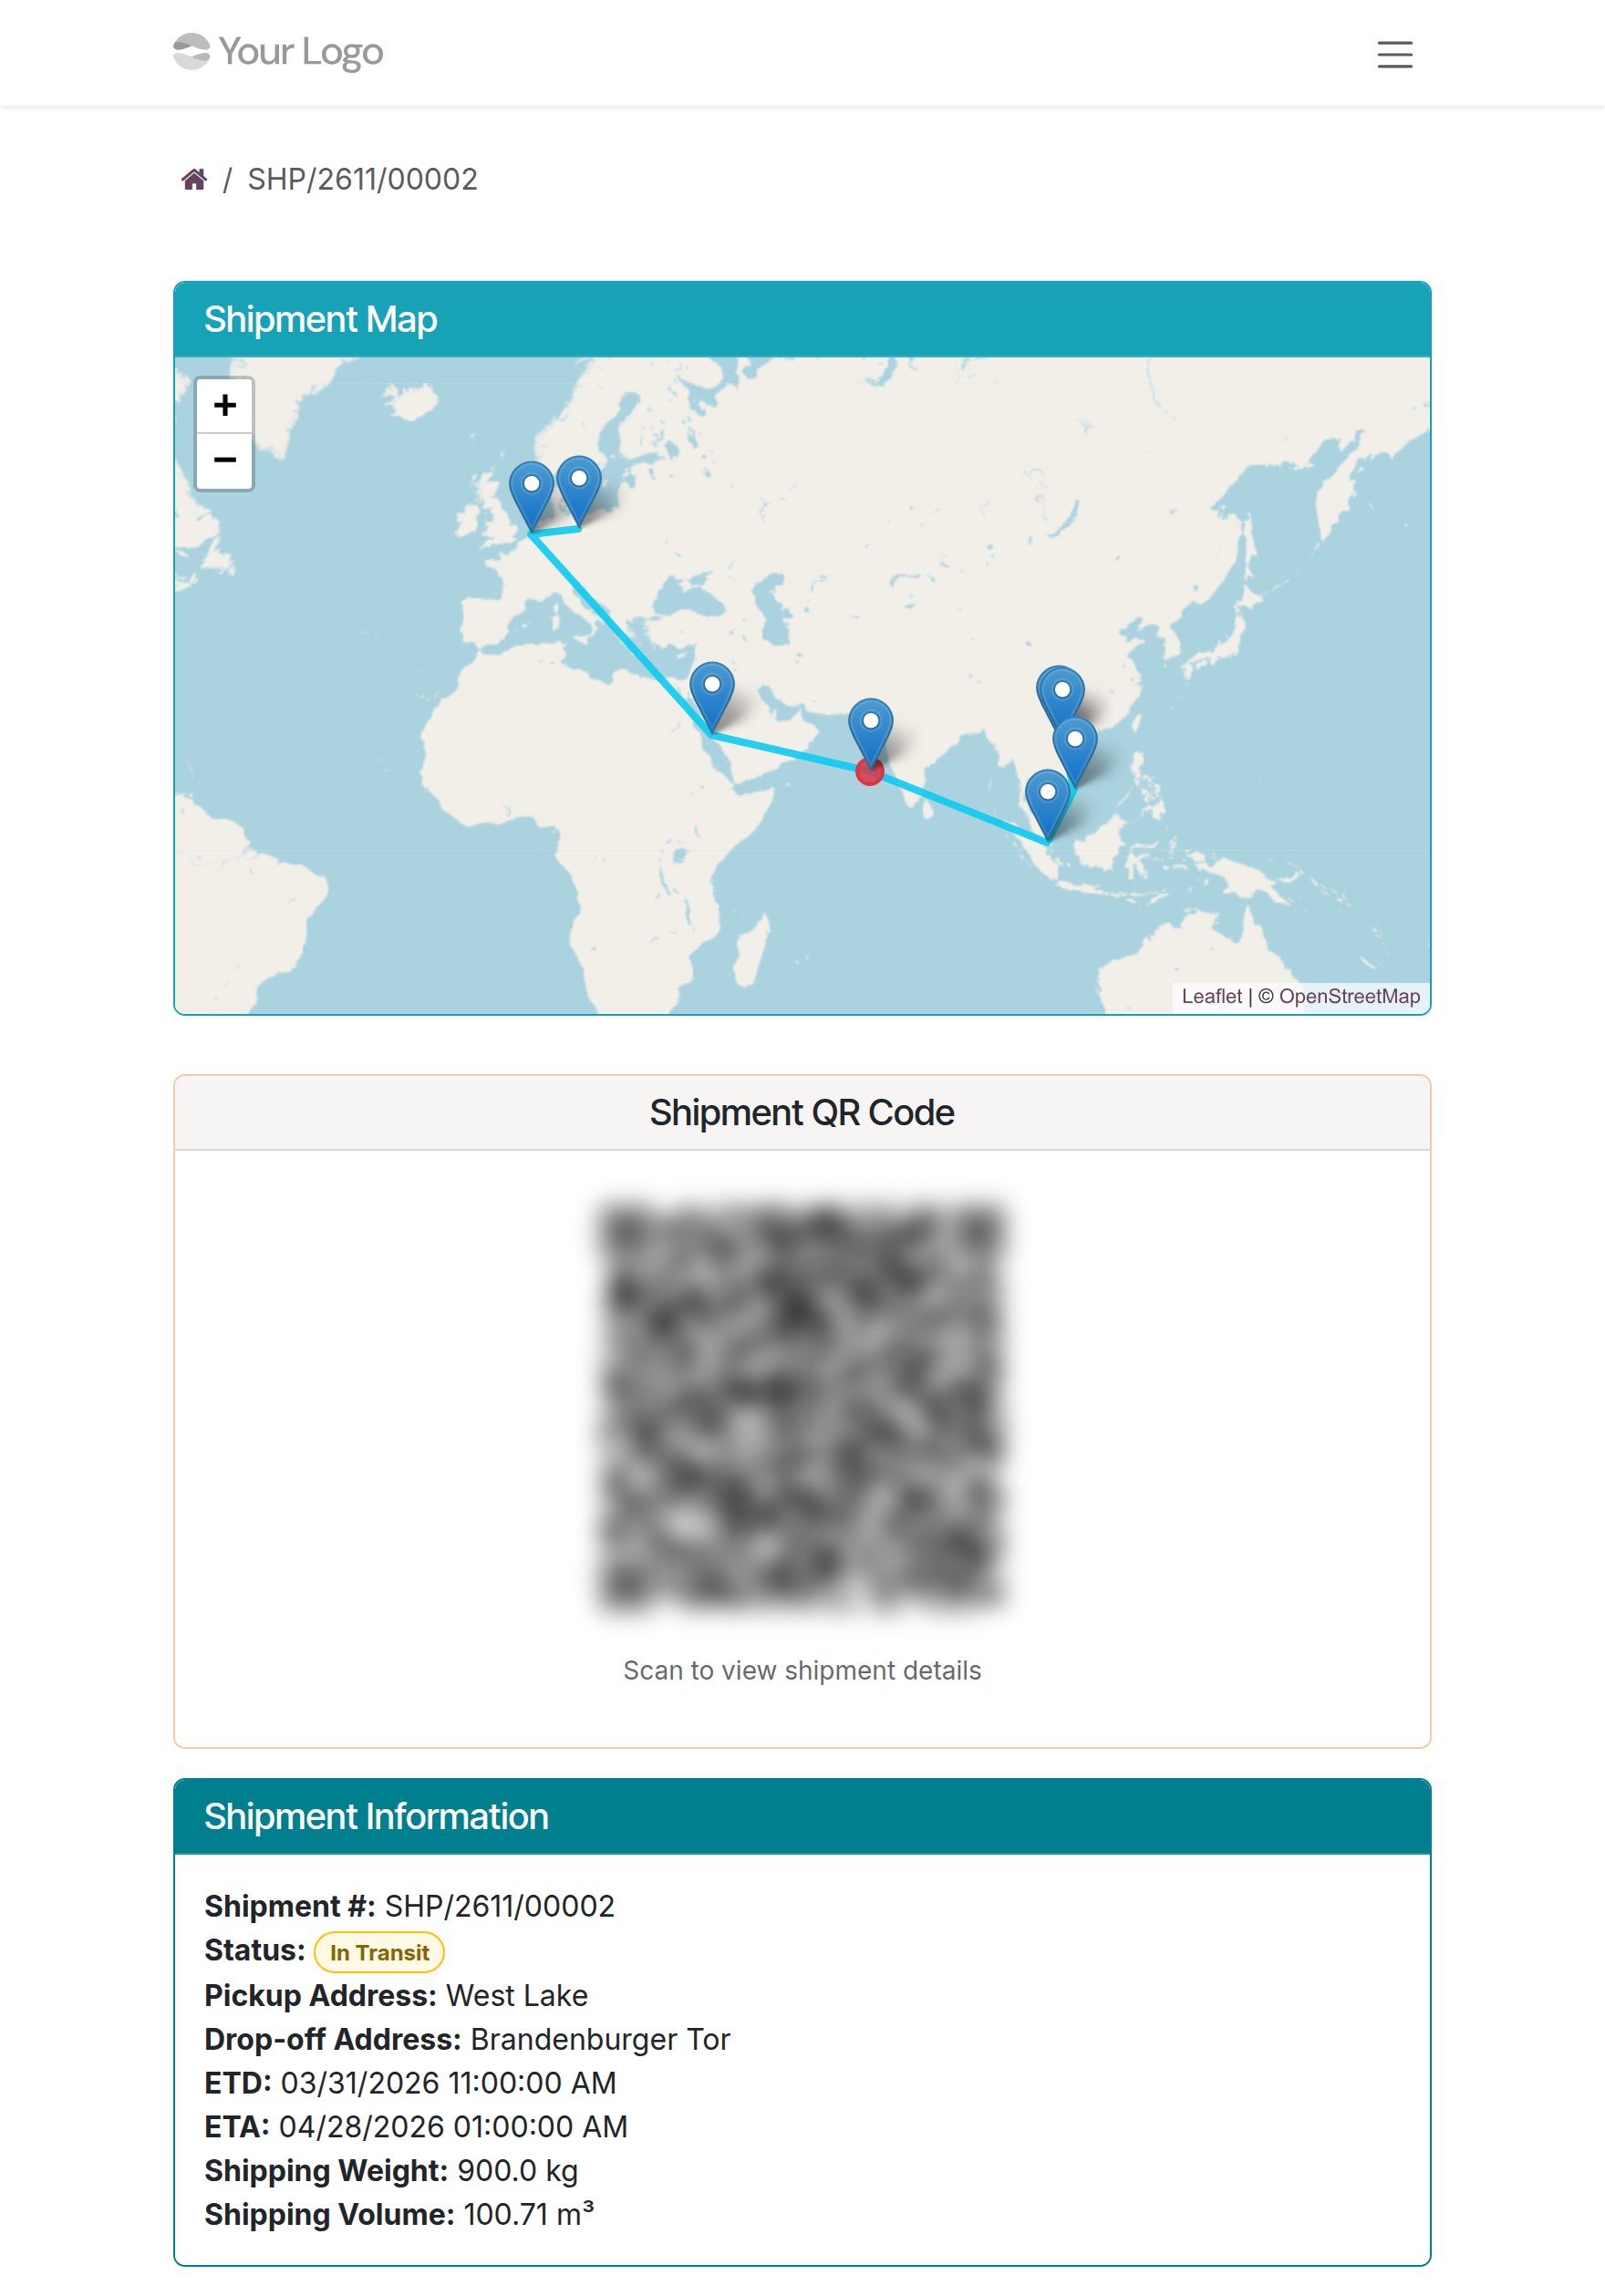
Shipment Map, Shipment QR Code and Shipment Information sit at the top. Shipment Information lists Shipment #, Status, Pickup Address, Drop-off Address, ETD, ETA, Shipping Weight and Shipping Volume - it does not show ATD or ATA, so this block alone cannot tell the customer whether the vessel has actually sailed.
See also
The map pins depend on the ports having coordinates configured; add any missing location records in the Freight Forwarding configuration first.
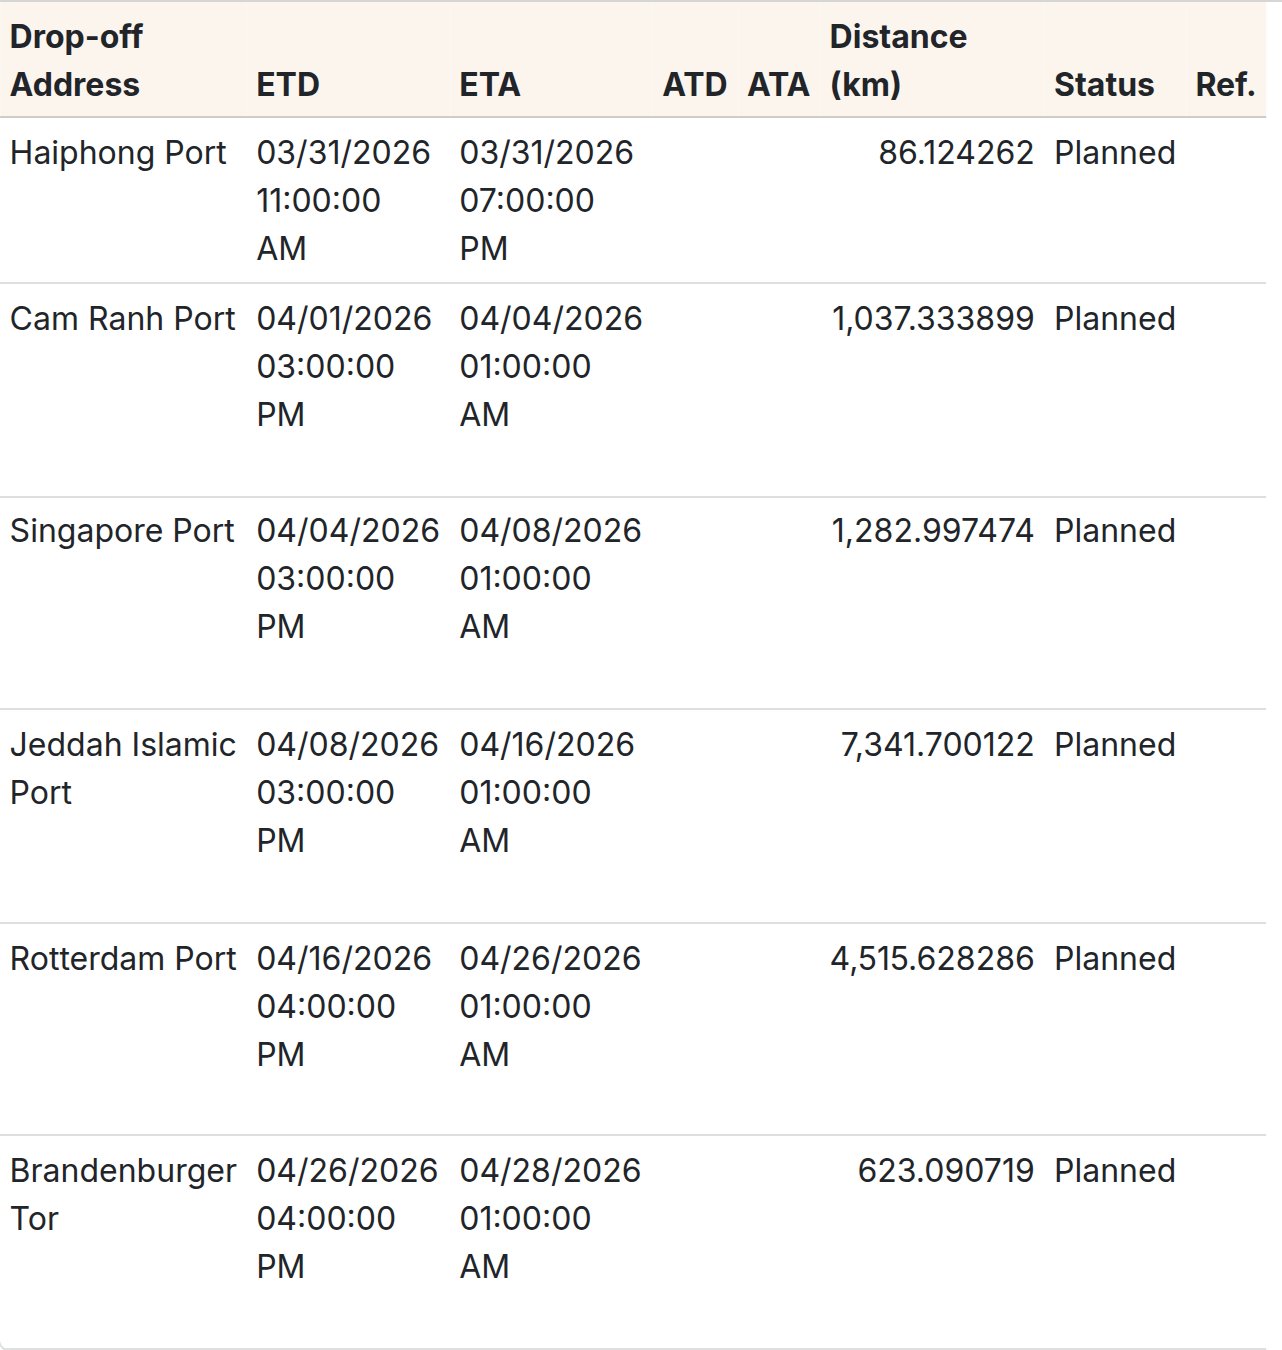
Leg Details is where ETD/ETA (planned) and ATD/ATA (actual) are told apart, one row per transport leg. A leg that has not started yet shows ATD and ATA blank, as every leg of this shipment does; once the leg departs, ATD is filled in, and ATA is filled in when it arrives.
Containers lists each container that has a container number, with its seal, type, quantity, weight and volume, except on LCL shipments, which have no container card; when none is recorded the card reads No containers recorded for this shipment. Packages and Cargo Information follow. This shipment has no containers or packages recorded and one cargo line.
Note
The Qty column of Containers shows the quantity of the whole cargo line packed in the container, not the part packed in that container: a cargo line split across two containers shows its full quantity on both rows (see Known limitations).
Tracking Timeline only shows milestones Documentation has published, grouped by shipment stage: for this shipment, Booking Confirmed under Planning. Internal notes are never published here.
Tip
Step 3 is done when: the customer can tell the planned ETD and ETA from the actual ATD and ATA of a leg, and understands a blank ATA as “not arrived yet”.
Step 4: Ask Documentation when the portal is not enough
The portal does not replace the relationship with Documentation, especially when the customer needs something in writing or a reason for a specific delay.
At the bottom of the detail page, the customer can scroll to Communication History and post a comment directly, in addition to calling or messaging Documentation as before.
Tip
Step 4 is done when: the customer gets an answer - through the portal comment or through the usual channel - for whatever the portal itself could not tell them.
Known limitations
Step |
What Viindoo does today |
What you do instead |
|---|---|---|
Step 2 (shipment list) |
The column headings are shifted by one against the values, and there is no free-text search
box on |
Use the list only to locate the right Shipment #, then open the detail page to read dates, status, container and booking numbers |
Step 3 (Containers card) |
Qty on each container row shows the quantity of the whole cargo line, so a cargo line split across two containers shows its full quantity on both rows |
Tell the customer to read the per-container weight, or the Packing List, for the split - not Qty |
Troubleshooting
The customer sees “No shipments found for your account.”
Symptom: /my/logistics/shipments shows exactly that message, even though Documentation
already granted portal access.
Cause: the shipment’s Customer field is not the customer’s company (or one of its contacts), and the company is not a follower of the shipment - the access rule then returns no records.
Fix:
Open the shipment internally and confirm Customer reads the customer’s company or contact.
Confirm the contact granted portal access is that company itself, or a contact under it.
An old shipment link redirects to “My Account” with no message
Symptom: clicking an /my/logistics/shipment/<id> link from an earlier email sends the
customer straight to /my with no error shown.
Cause: an access or missing-record error is caught silently and the customer is redirected without a message - usually because the shipment has since been archived, or the access token in the old link is no longer valid.
Fix: send the customer a fresh link from /my/logistics/shipments; if the problem
persists, check whether the shipment is still active.