Website Helpdesk Integration
by Viindoo
| Lines of Code | 1239 |
| Technical name | viin_website_helpdesk |
| License | OPL-1 |
| Website | https://viindoo.com/apps/modules/19.0/viin_website_helpdesk |
| Read description for | v 13.0 v 14.0 v 15.0 v 16.0 v 17.0 v 18.0 |
| Required Apps | Discuss (mail) Website (website) |
| Included Dependencies | Helpdesk Viindoo Base |

Customers reach your support team from your website, no account needed
For support teams that serve customers through a company website
Integrate Helpdesk with your website, allowing users to create and submit tickets easily, even without logging in.
Odoo 19.0 · Community and Enterprise · OPL-1
Extends Helpdesk: website tickets land in its teams and follow the same stages and rules as every other ticket.
What changes for your team
Requests arrive complete, in the right team
Requests come in through a generic contact form or a mailbox; someone retypes them as tickets and writes back for what is missing.
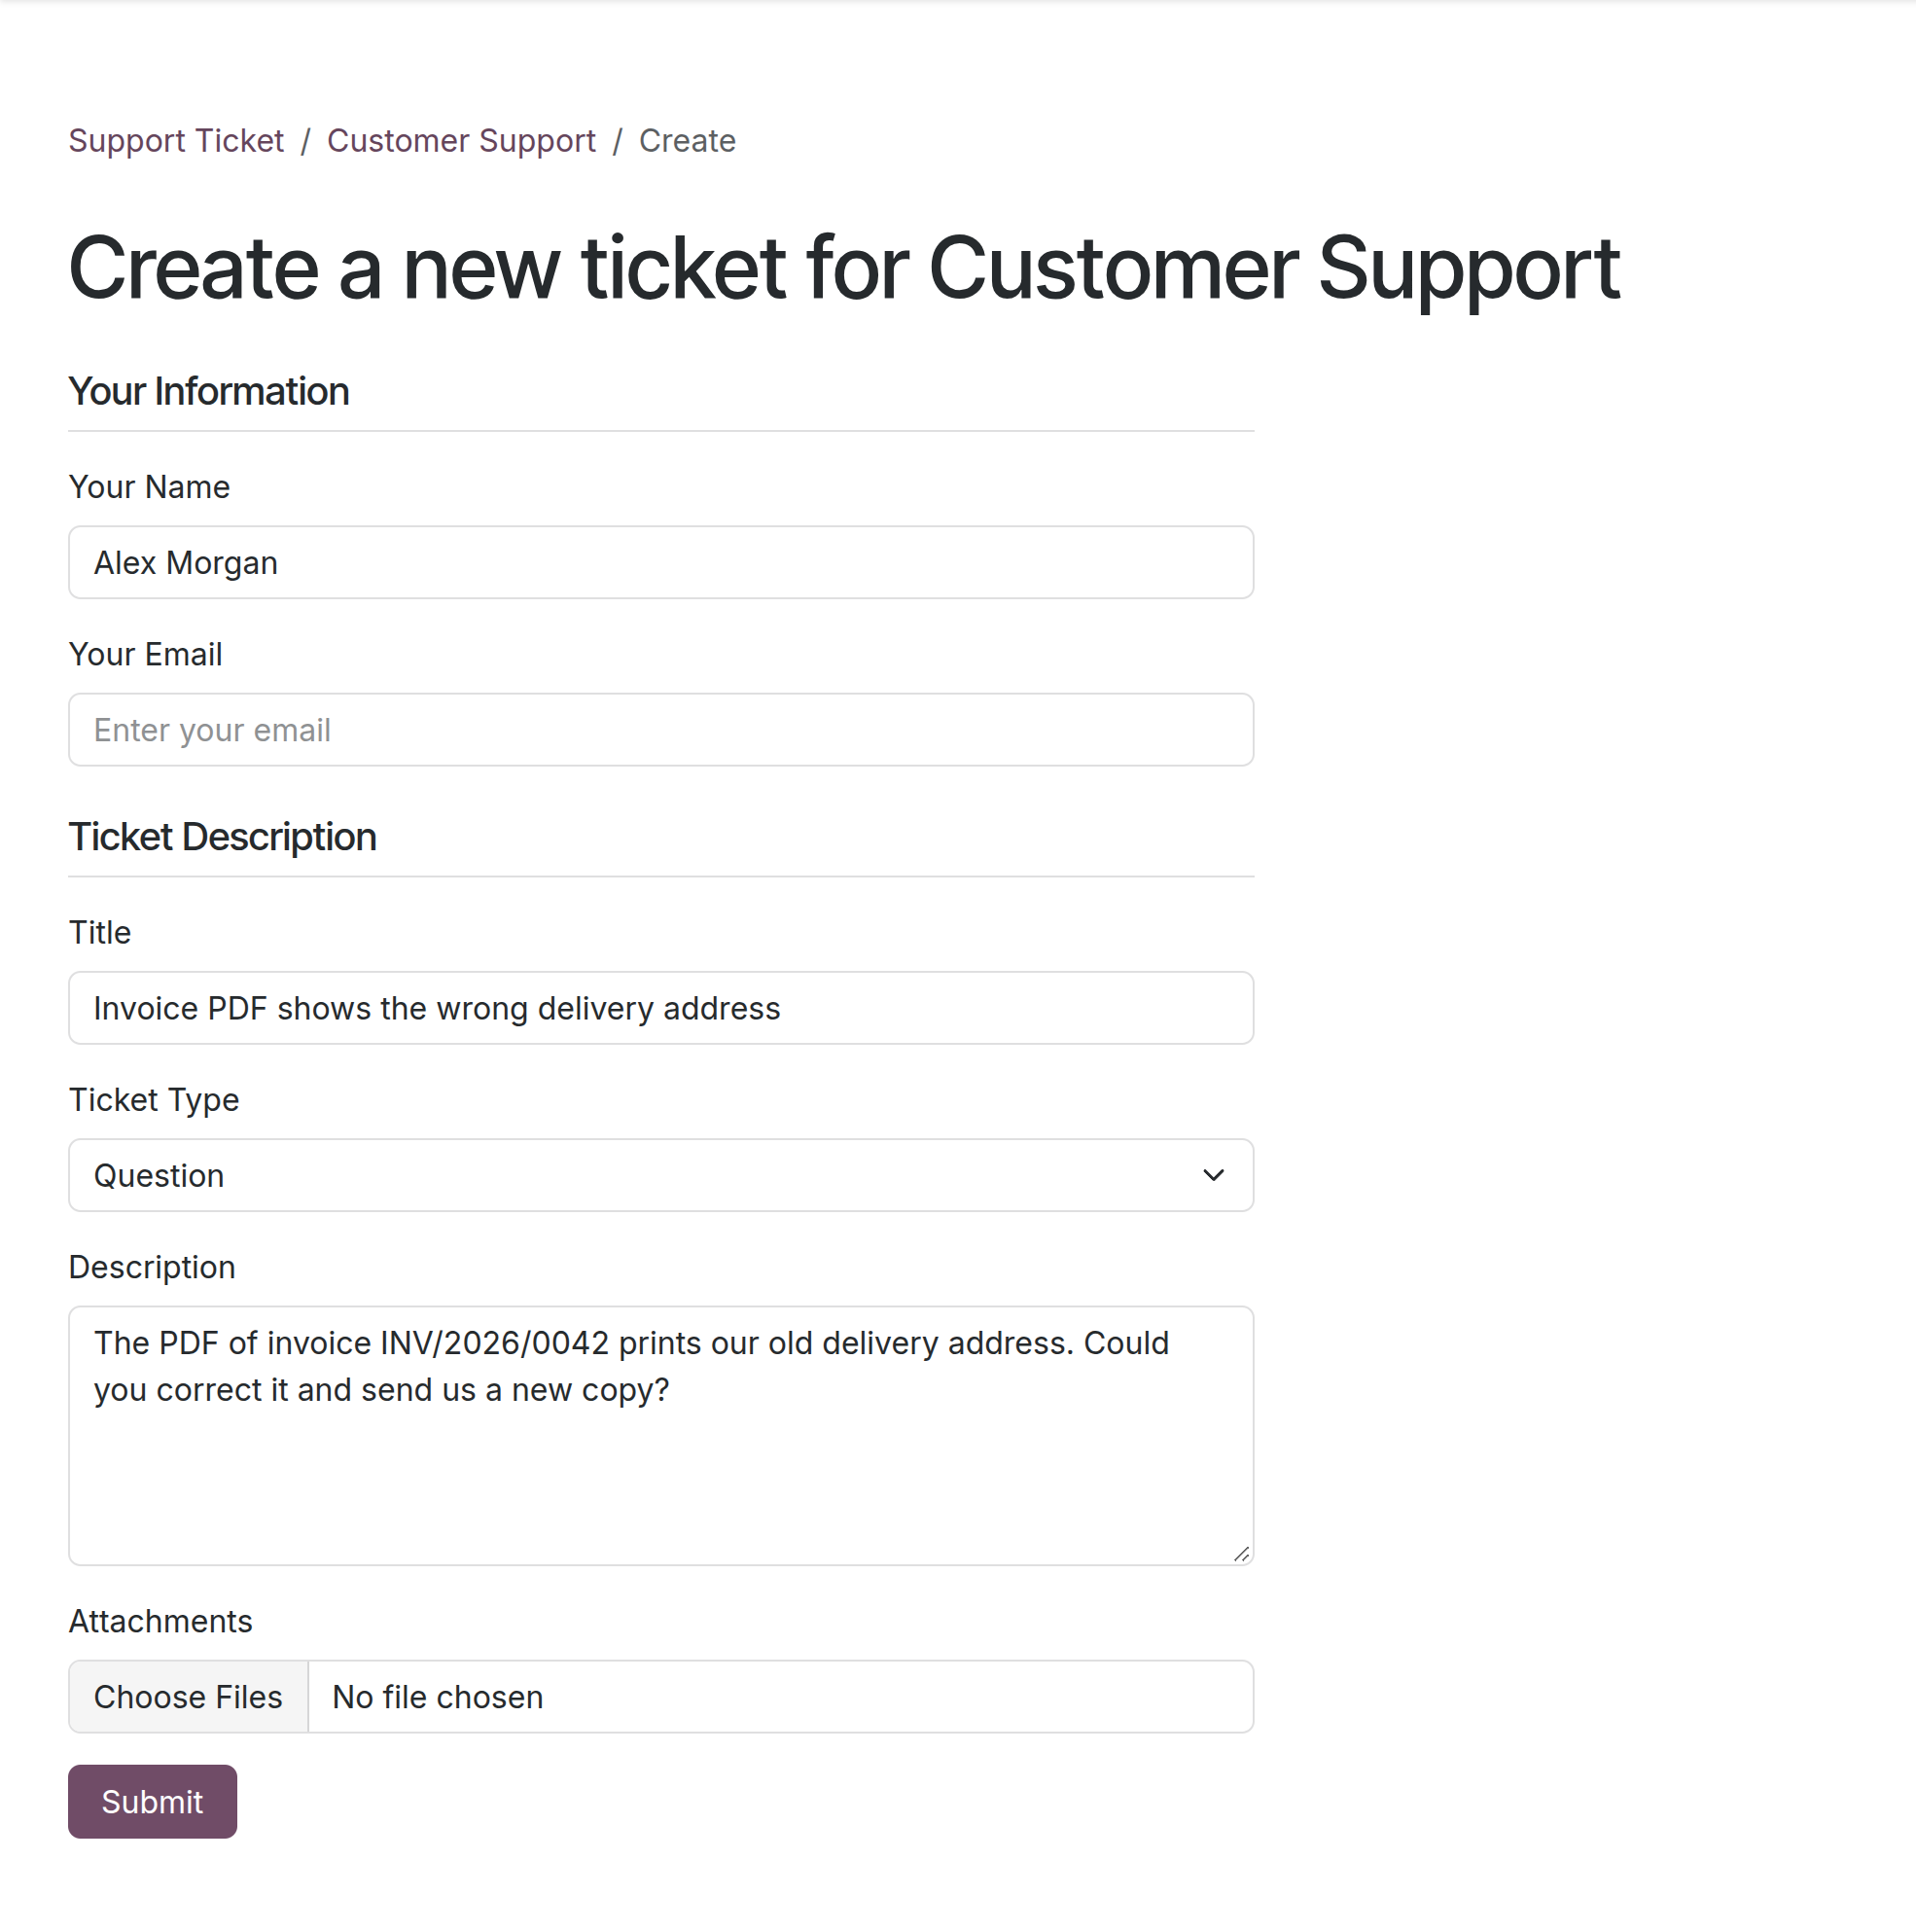
→ Visitors file a ticket on your website with a title, the ticket type and its details, a description and attachments. It lands in the team of that website, ready to work on.
Customers know their request arrived, and follow it
Customers are not sure their message got through, so they write again or call.
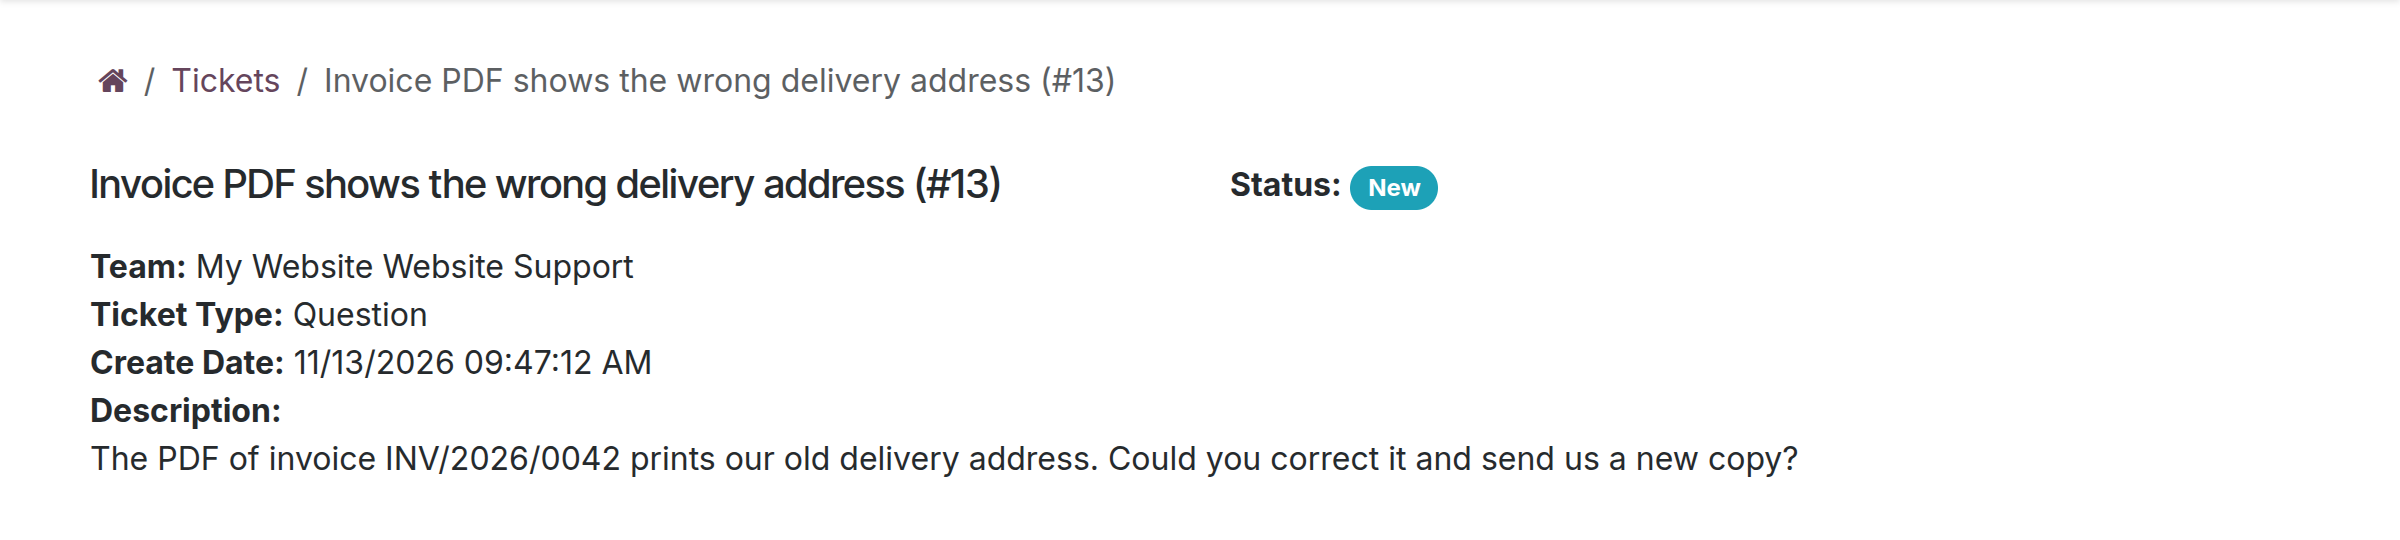
→ The confirmation page shows the ticket number. An email in the customer's language links to the ticket, where they see its stage and reply, without signing in.
A ticket form on any page you choose
A form on a product or service page needs a developer, and its messages end up in a shared inbox.
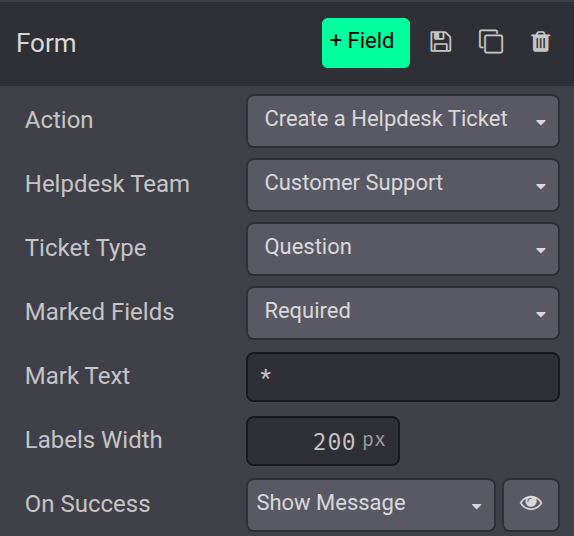
→ In the website editor, any form can create a helpdesk ticket, aimed at a published team and ticket type. The sender gets the same confirmation email.
Ready on day one
A support page on every website
A Helpdesk entry in the website menu opens a page with your published teams and a button to file a ticket.
A team for each website
Each website, including one created later, gets its own support team, open to portal customers and set to receive its tickets.
A confirmation email
Each ticket from the website is confirmed by email, with its number and a View Ticket link.
What you set up first
The teams and ticket types to publish, the team that receives each website's tickets, reCAPTCHA keys for spam checks, and an outgoing mail server for the confirmations.
What is included
The support page and team pages, the ticket form for visitors and signed-in customers, the confirmation page and email, the ticket action of the website editor, and the publishing controls behind them. Teams, stages, SLA policies and reports come from Helpdesk; the module installs itself once Website and Helpdesk are both installed.
Before you decide
Do customers need an account?
No. A name and a valid email are enough. A signed-in customer finds both filled in and sees the ticket among their tickets on the portal.
How is spam kept out?
Each submission is checked with reCAPTCHA once the website has reCAPTCHA keys; without keys, no check runs. The form offers only published teams and ticket types, and a refused submission stays on the form, with what was typed and a message saying why.
We run several websites. Who gets which tickets?
Each website has its own receiving team, and its support page lists only the teams assigned to it or to no website.
Where does our data go?
Tickets, attachments and replies stay in your database. With reCAPTCHA keys set, each submission is verified by Google's reCAPTCHA service; confirmations leave through your outgoing mail server.
Which languages does it ship?
English and Vietnamese. A visitor's confirmation follows the language of the page; a signed-in customer's, their own language.
Try it, then ask us
The Documentation tab walks through the setup and the work of each role on the website, screen by screen.
Pre-sales & partnership
viindoo.com/contactusTechnical support
viindoo.com/ticketTechnical requirements
- Odoo version: 19.0
- Editions: Community, Enterprise
- Required modules: Website, Helpdesk
- License: OPL-1
- Languages: English, Vietnamese
Website Helpdesk Integration
Who this guide is for: administrators and helpdesk managers who set up the support page of a website, website editors and designers who place a ticket form on a page, and the visitors and portal customers who file tickets.
Note
Extends Helpdesk - see its documentation: viin_helpdesk. Tickets, stages, teams and the work of the support agents are described there.
Overview
Customers should be able to ask for help from the company website, without calling or writing a separate email. This module adds a Helpdesk page to every website: visitors see the support teams, fill in one form and get a confirmation email with a link to follow the ticket. The ticket lands in the Helpdesk team of that website.
The process, stage by stage:
- The administrator checks which team receives the tickets of each website, and a helpdesk manager publishes the teams and ticket types customers may choose.
- A visitor or a portal customer files a ticket from the Helpdesk page or from a form placed on any page.
- The website shows a "ticket received" page and sends one confirmation email with a link to the ticket.
- The support team handles the ticket in Helpdesk; the customer follows it and replies from the website.
| Role | What they do | Access right to assign |
|---|---|---|
| System Administrator | Installs the module, chooses the Helpdesk Team of each website. | Administration / Settings |
| Helpdesk Manager | Publishes teams and ticket types on the website, handles the tickets received. | Helpdesk / Administrator |
| Website Editor / Designer | Places a ticket form on a page and aims it at a team and a ticket type. | Website / Restricted Editor (Website / Editor and Designer also edits pages) |
| Portal Customer | Files a ticket while signed in and follows it from the account. | Portal (given by inviting the contact to the portal) |
| Website Visitor | Files a ticket without an account and follows it from the confirmation email. | None - anyone who is not signed in |
Setup (for the Administrator)
Installation
The module needs the Website and Helpdesk apps. It installs by itself once both are installed. To install it by hand:
- Open Apps.
- Search for Website Helpdesk Integration.
- Press Install.
Check the team that receives the tickets
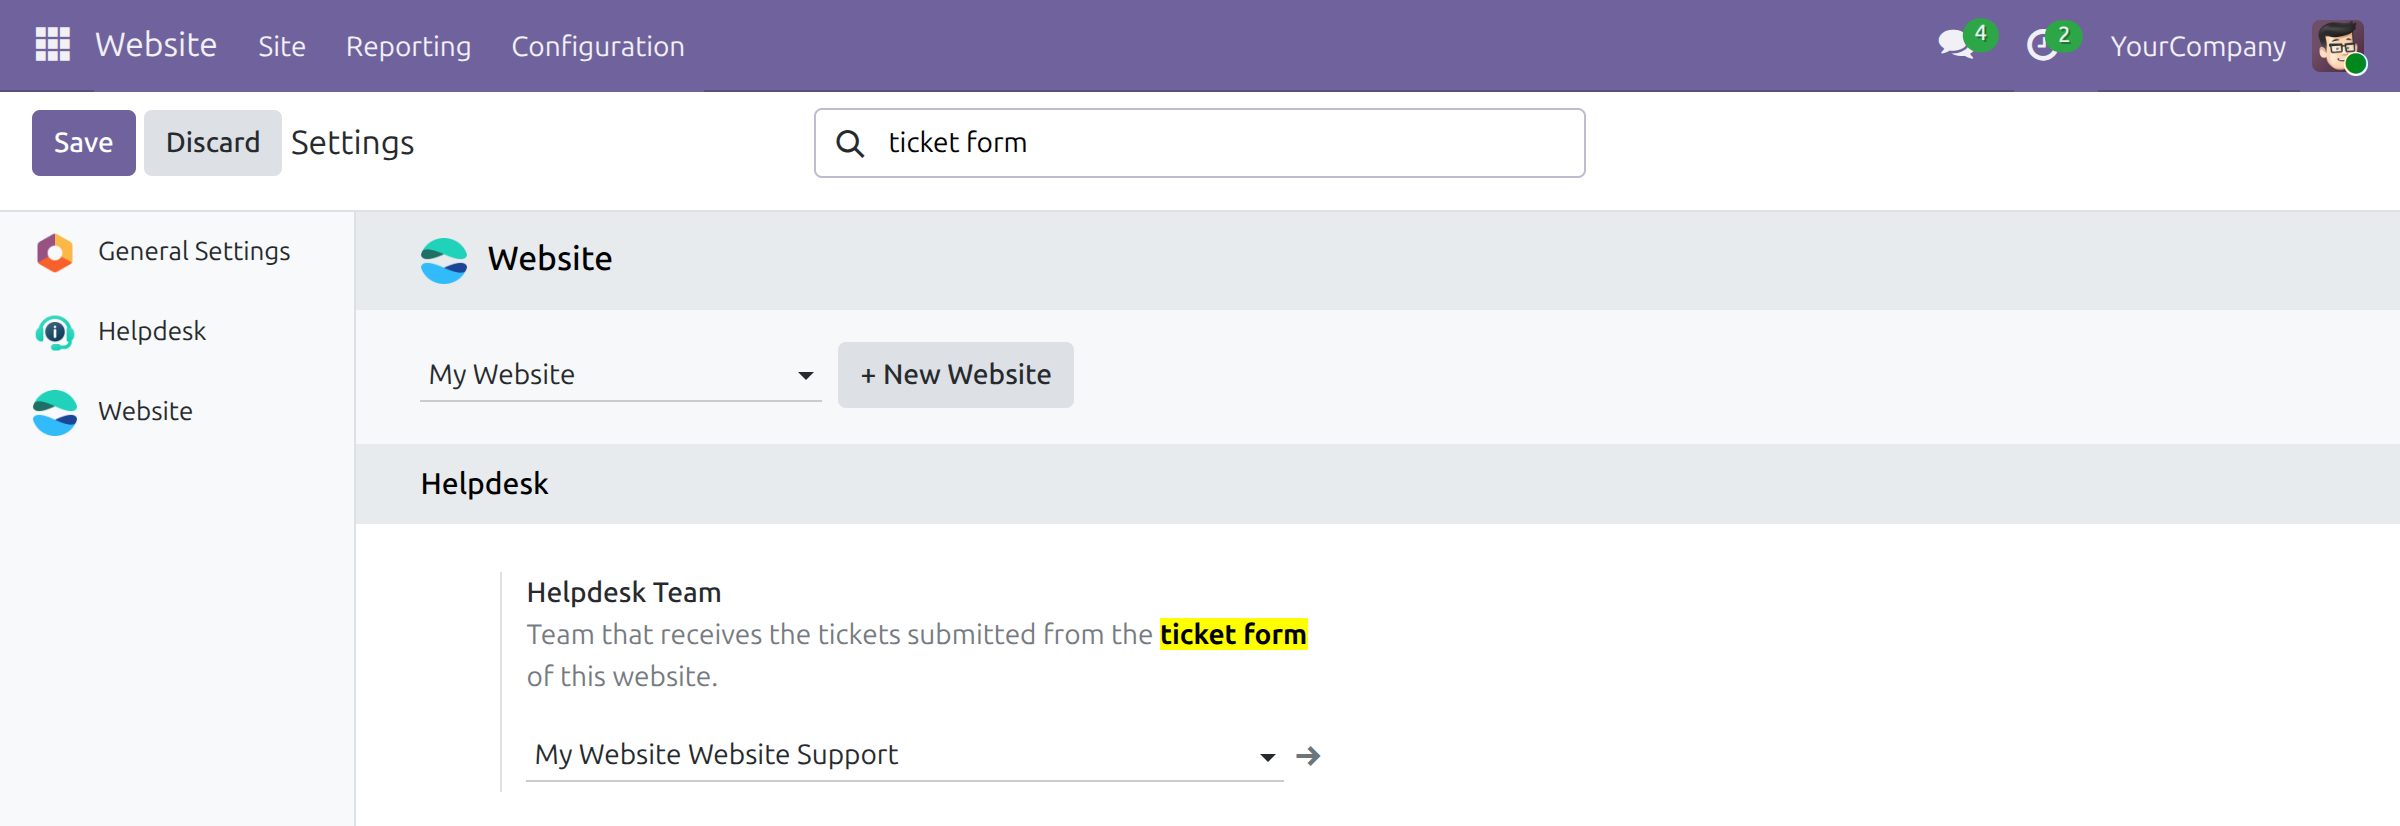
Every website gets a support team named after it (for example My Website Website Support), in portal mode, led by the administrator. The form of the Helpdesk page files its tickets into the Helpdesk Team of the website:
- Open Website ‣ Configuration ‣ Settings.
- Type ticket form in the search box to show only the Helpdesk block, as in the image, and read its Helpdesk Team field next to the website selector. It lists the teams of the website's company that are assigned to this website or to no website.
- Pick another team if the tickets of this website belong elsewhere, then press Save.
Publish a team on the website
A team shows on the Helpdesk page, and gets its own page and its own form, only once it is published. The team of the website also receives the tickets of the general form without being published. To publish a team:
- Open Helpdesk ‣ Configuration ‣ Helpdesk Teams and open the team.
- Press the Go to Website button at the top of the form. The team page opens on the website.
- In the website toolbar, switch Unpublished to Published.
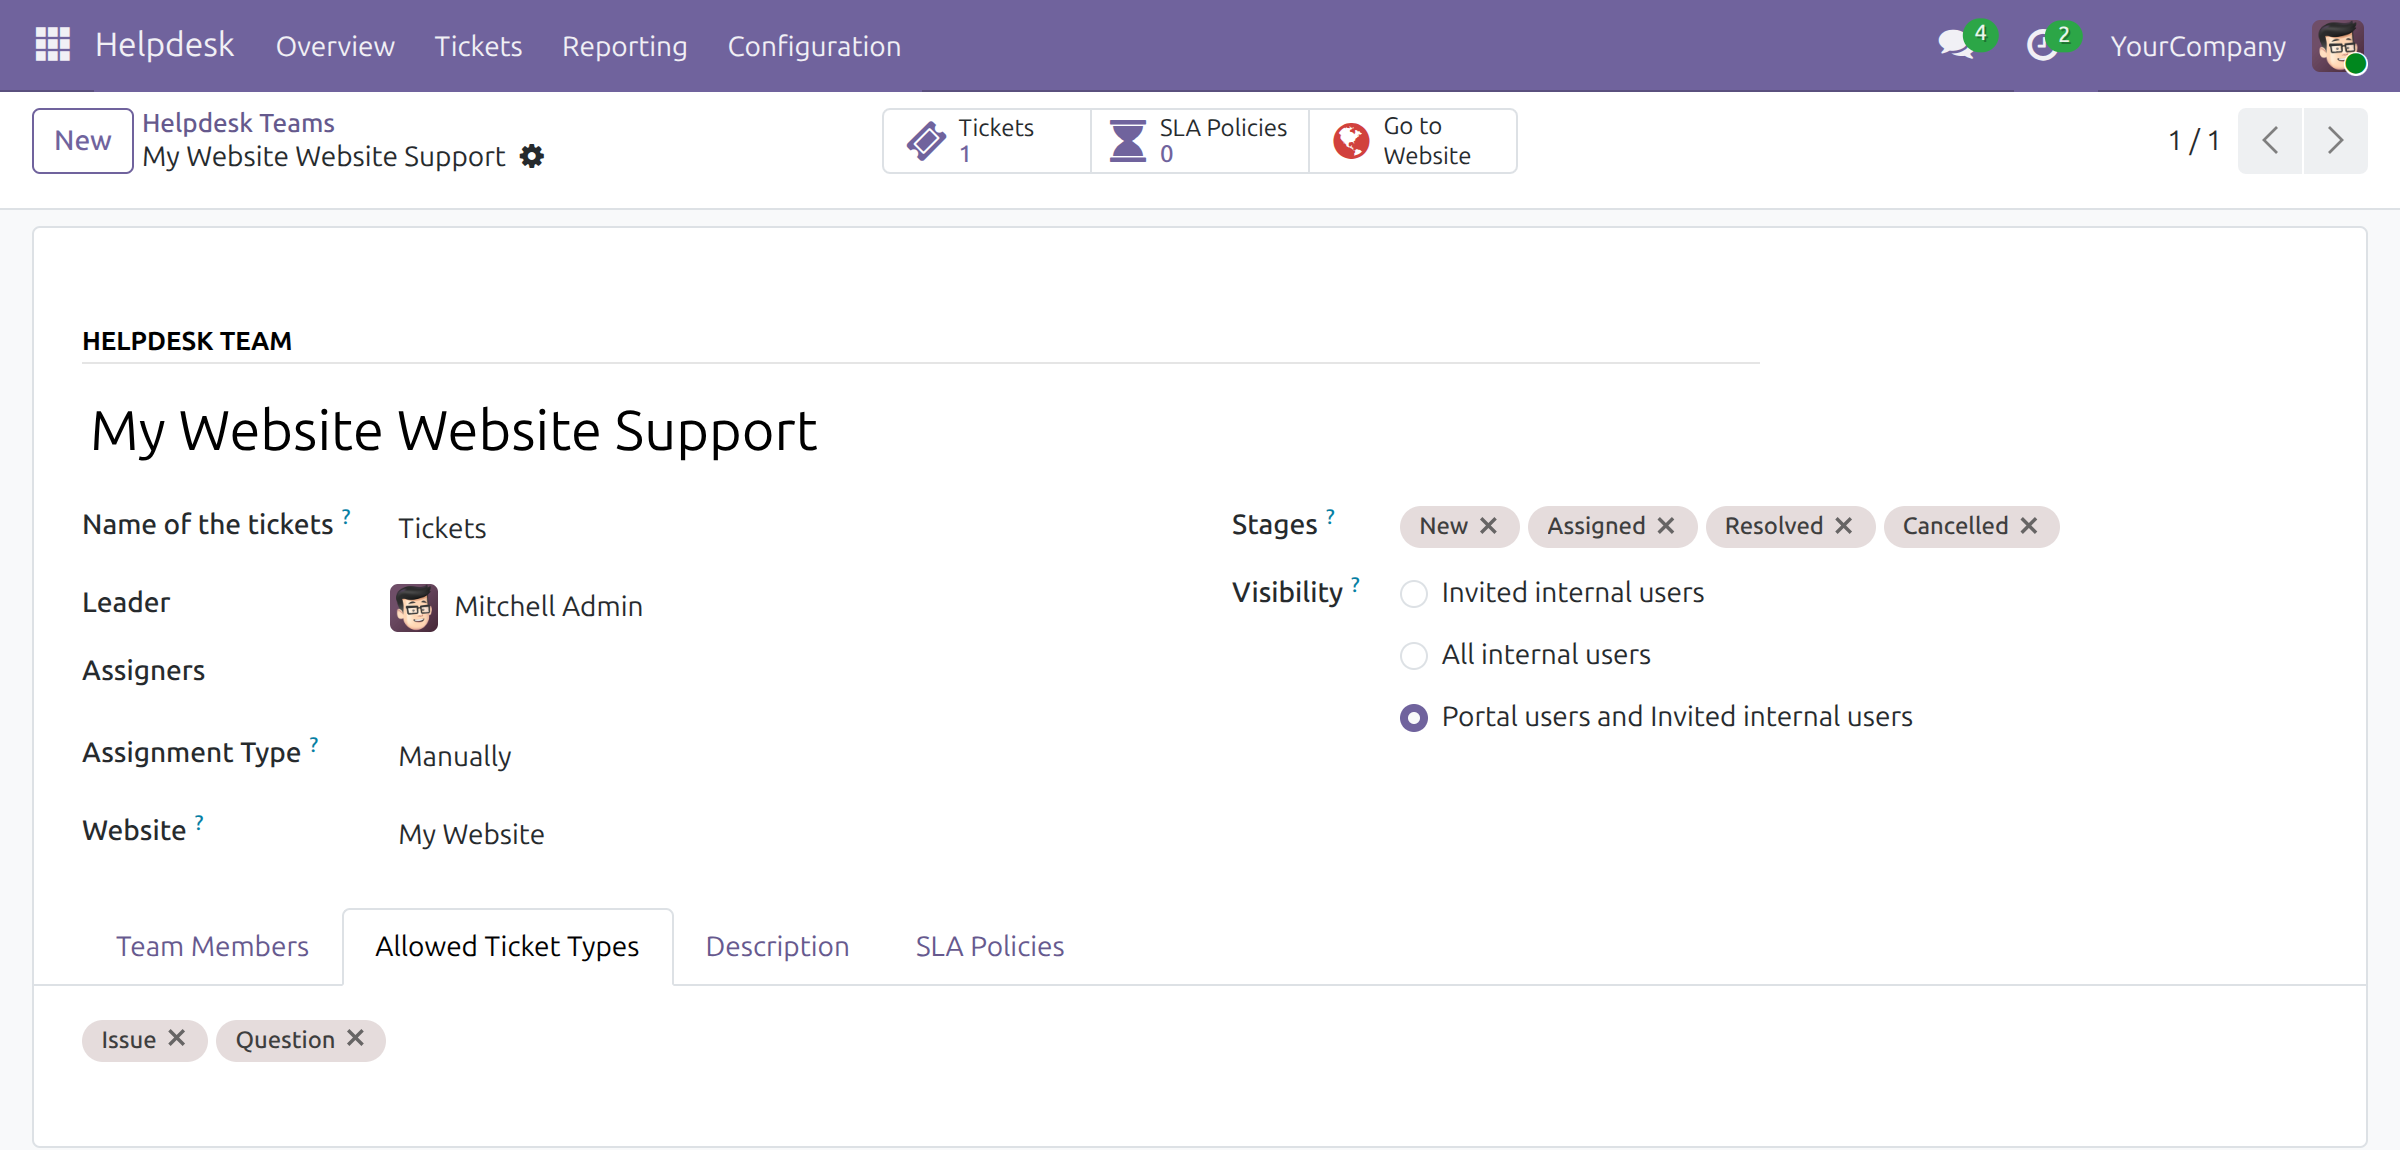

The Website field of the team form, shown when your database runs several websites, limits a team to one website. A team with no website is available on all of them.
Publish the ticket types
The form offers the ticket types that are published on the website, that belong to the team, and that are marked Portal Visible. A type with a description shows that description under the selector, so use it to tell customers what to include:
- Open Helpdesk ‣ Configuration ‣ Ticket Types and open a type.
- Check that the team appears under Available in Teams. Add the type to a team from the Allowed Ticket Types tab of the team when it does not.
- Press the Unpublished button at the top of the form so that it reads Published.

Without any published type the form hides the Ticket Type field and files the ticket under the first type of the team.
Good to know
- The Helpdesk entry of the website menu points to the Helpdesk page. A website editor can rename, move or delete it from the website editor.
- When the database has a reCAPTCHA private key, the ticket form checks it before it creates the ticket; without a key, the check is off.
- The confirmation email is the email template Auth Ticket: Website Ticket. Edit its text from the email templates of the Settings menu in developer mode.
Give each person their access right
Open Settings ‣ Users & Companies ‣ Users, open the person and set the access right of the table in the Overview: Helpdesk / Administrator for the helpdesk manager, Website / Restricted Editor or Editor and Designer for the website editor. Customers need nothing: a portal customer is a contact invited to the portal.
Website Visitor: file a ticket without an account
Find the support page
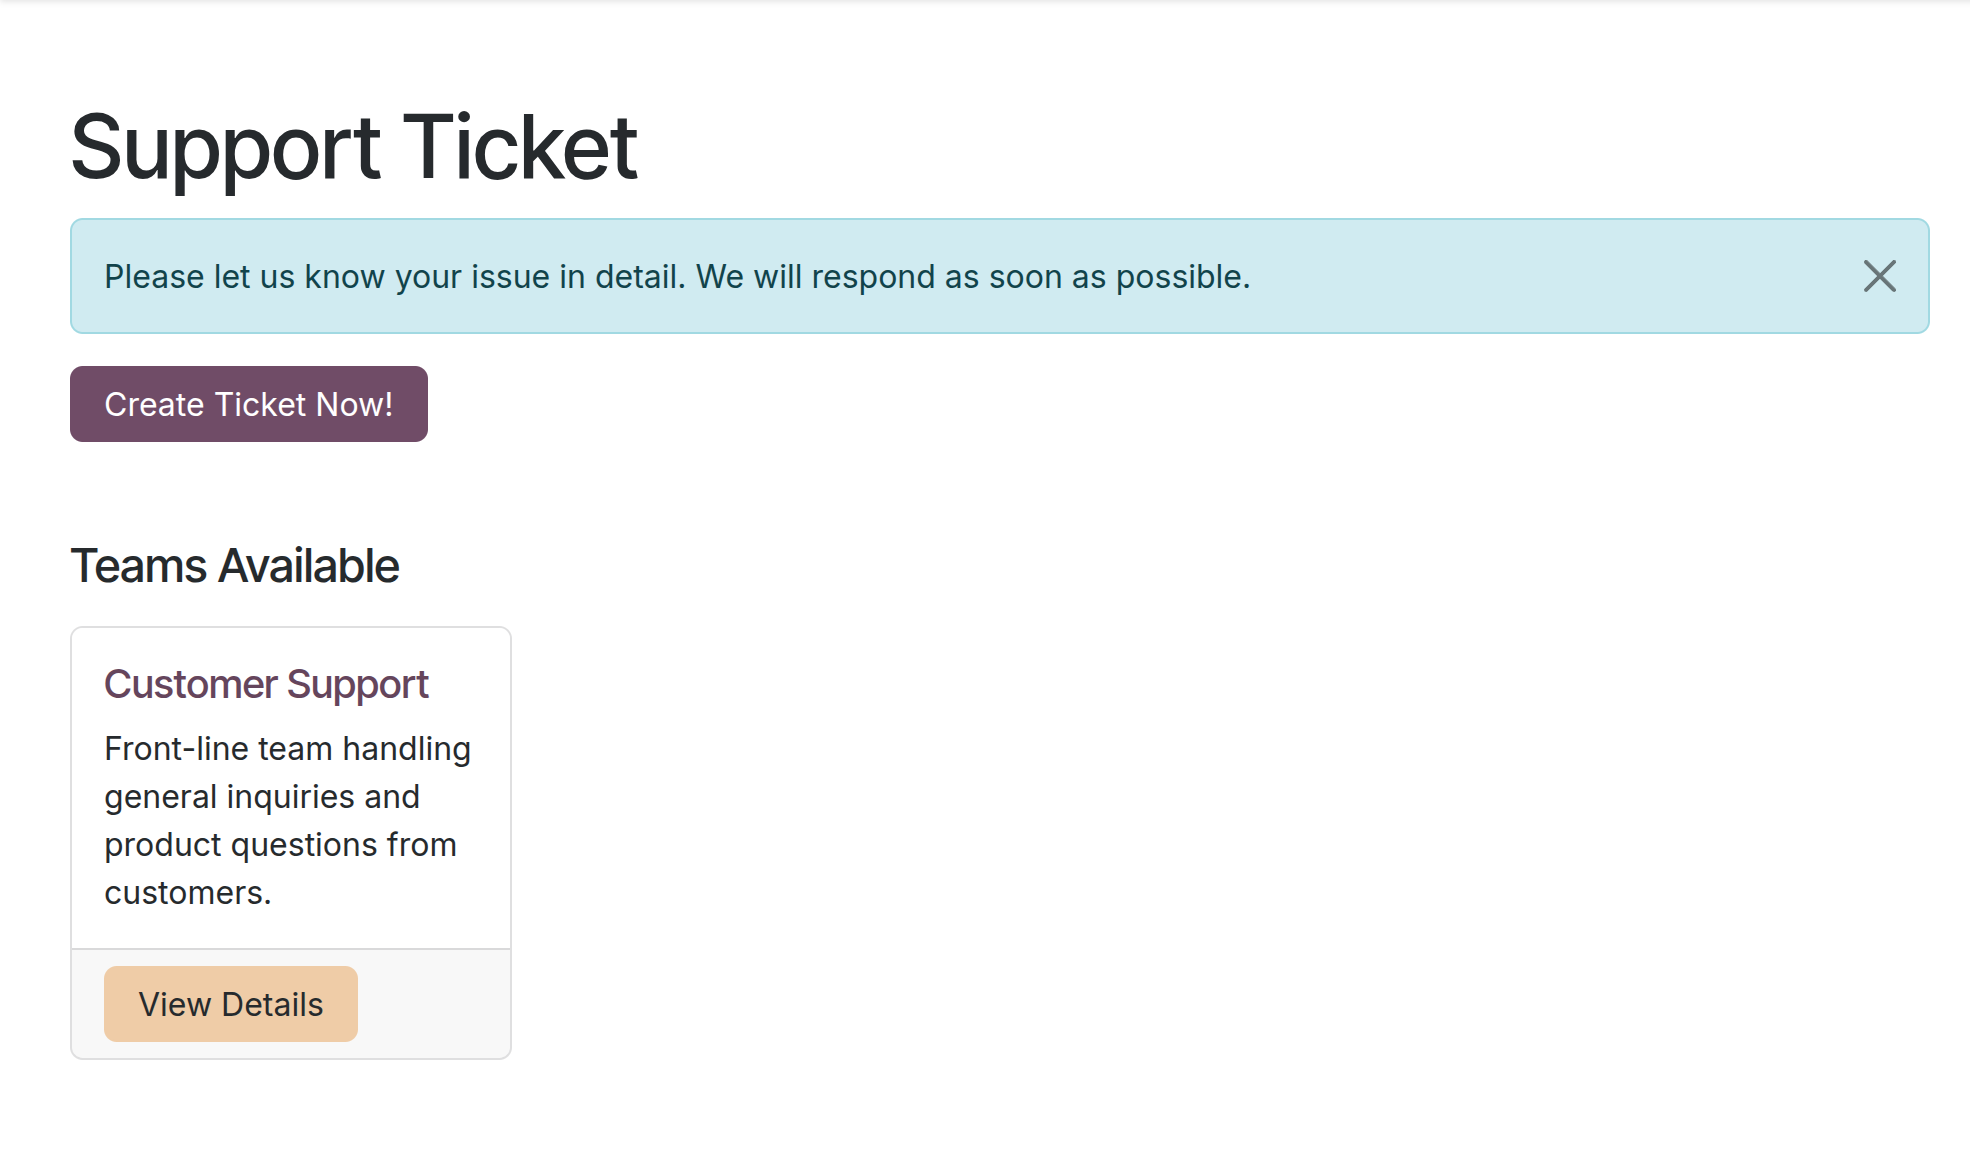
Open the Helpdesk entry of the website menu. The page lists the support teams that are published for this website. Press Create Ticket Now! to file a ticket, or View Details to open a team.
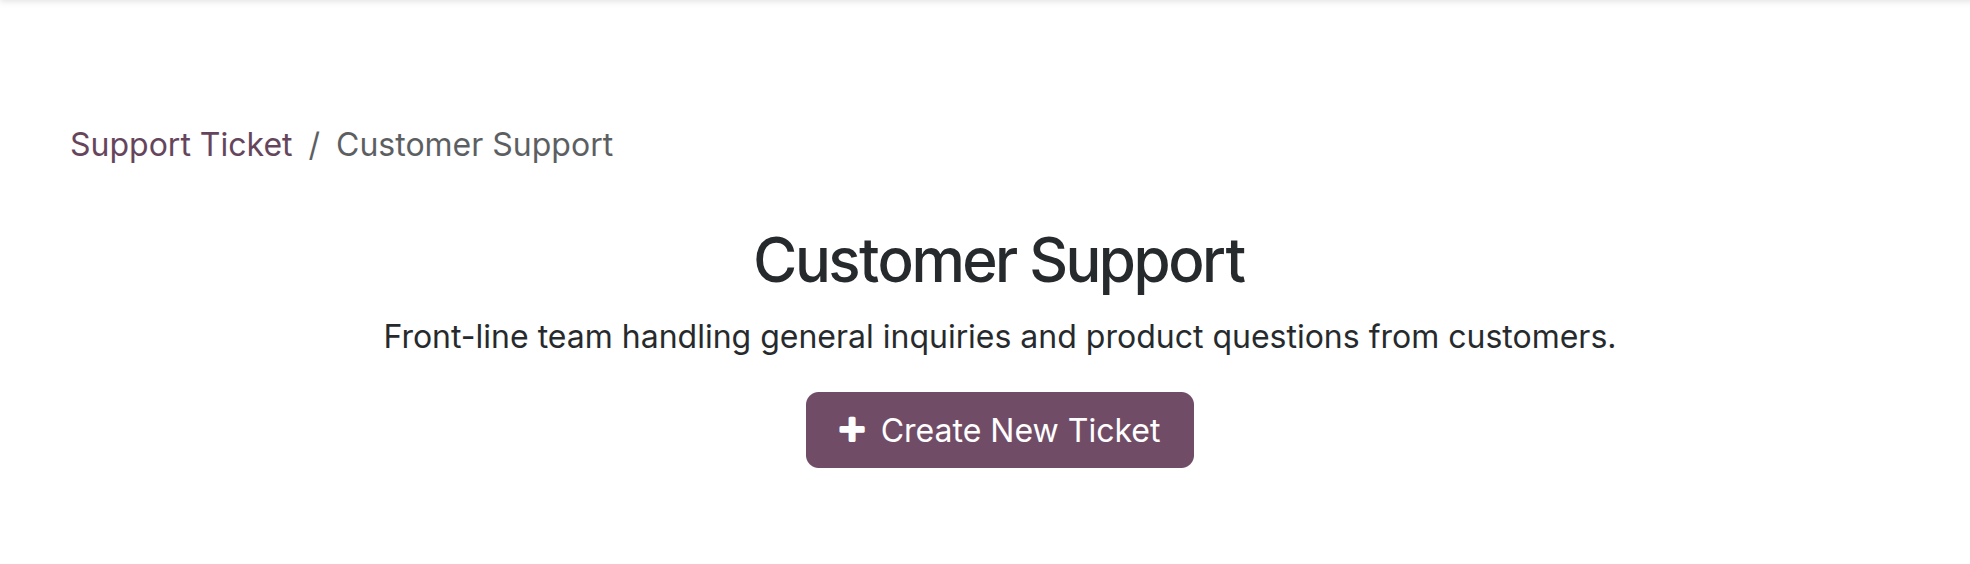
The team page shows the team name and description, and a Create New Ticket button. A ticket filed from there goes to that team.
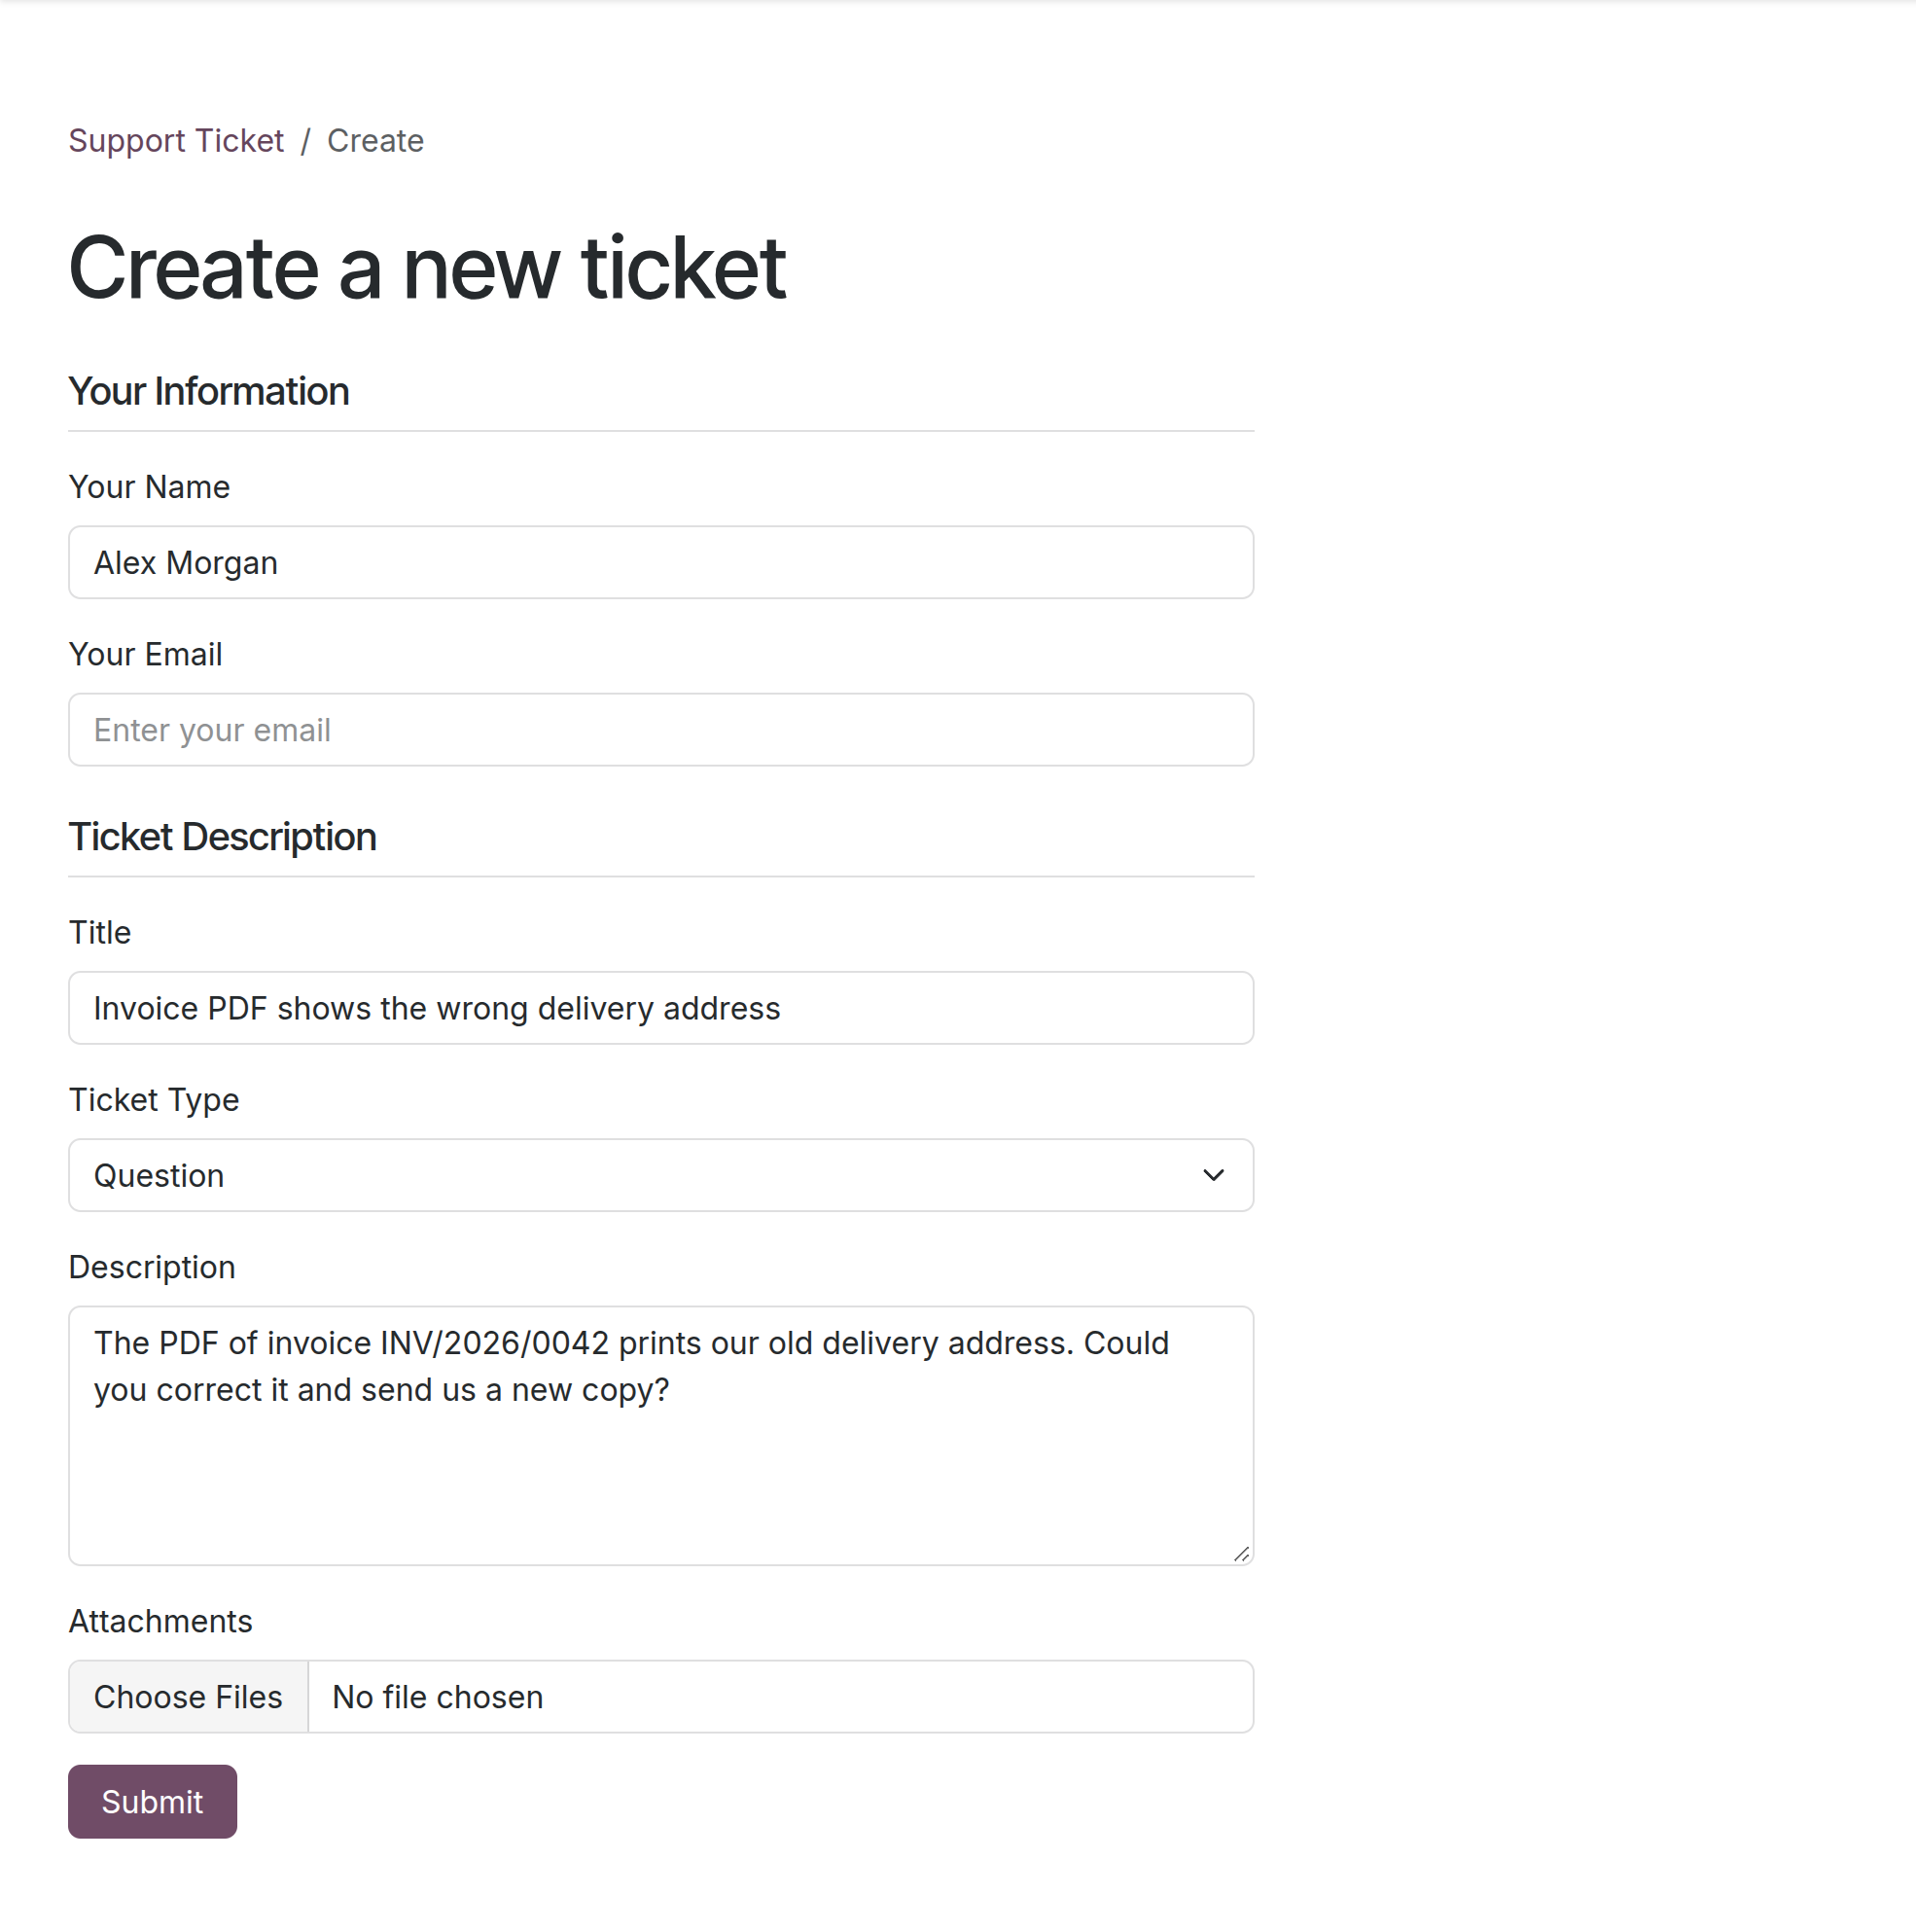
Fill in the form
On the form:
- Under Your Information, type Your Name and Your Email. The confirmation goes to this address.
- Under Ticket Description, type a Title and pick the Ticket Type. When the type has a description, it shows below the selector.
- Fill in the details the type asks for, if any, then type the Description.
- Add files in Attachments if useful. A file that is too big or of a type that is not allowed is refused with a message under the field.
- Press Submit.
After you send the ticket
The website shows Your ticket #<number> has been received., as in the image, and below that line the address the confirmation was sent to. Reloading this page does not create a second ticket.

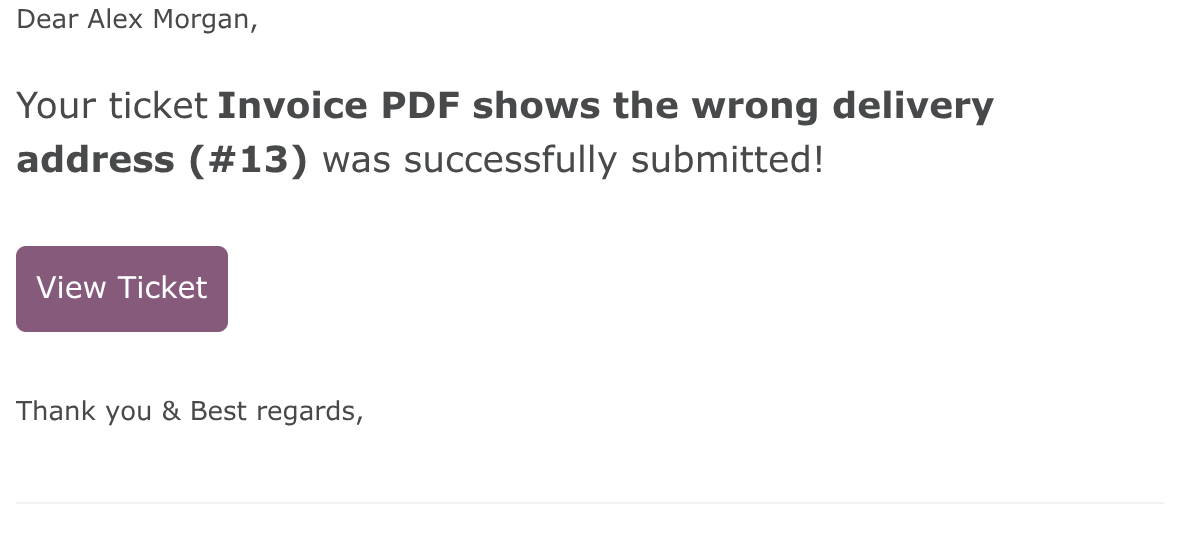
The confirmation email is written in the language of the page you used. It greets you by name and its View Ticket button opens the ticket.
Follow the ticket
Press View Ticket in the email. The ticket page shows its title, status, team, ticket type, creation date and description (and the tags, when it has some), as in the image; below them it names the sender with the name and email typed on the form, and gives a box to write a message to the support team. You do not need an account: the link in the email is enough.
If the form is refused
When something is wrong, for example Please enter valid email., the form opens again with a message at the top and keeps what you typed. Choose your attachments again, correct the field and press Submit once more. No ticket is created until the form is accepted.
Portal Customer: file a ticket while signed in
A signed-in customer gets the same form with name and email already filled in, and the ticket is filed for the customer's contact:
- Sign in to the website, open Helpdesk and press View Details on the team.
- Press Create New Ticket. Your Name and Your Email are filled in; complete the title, the type and the description.
- Press Submit.
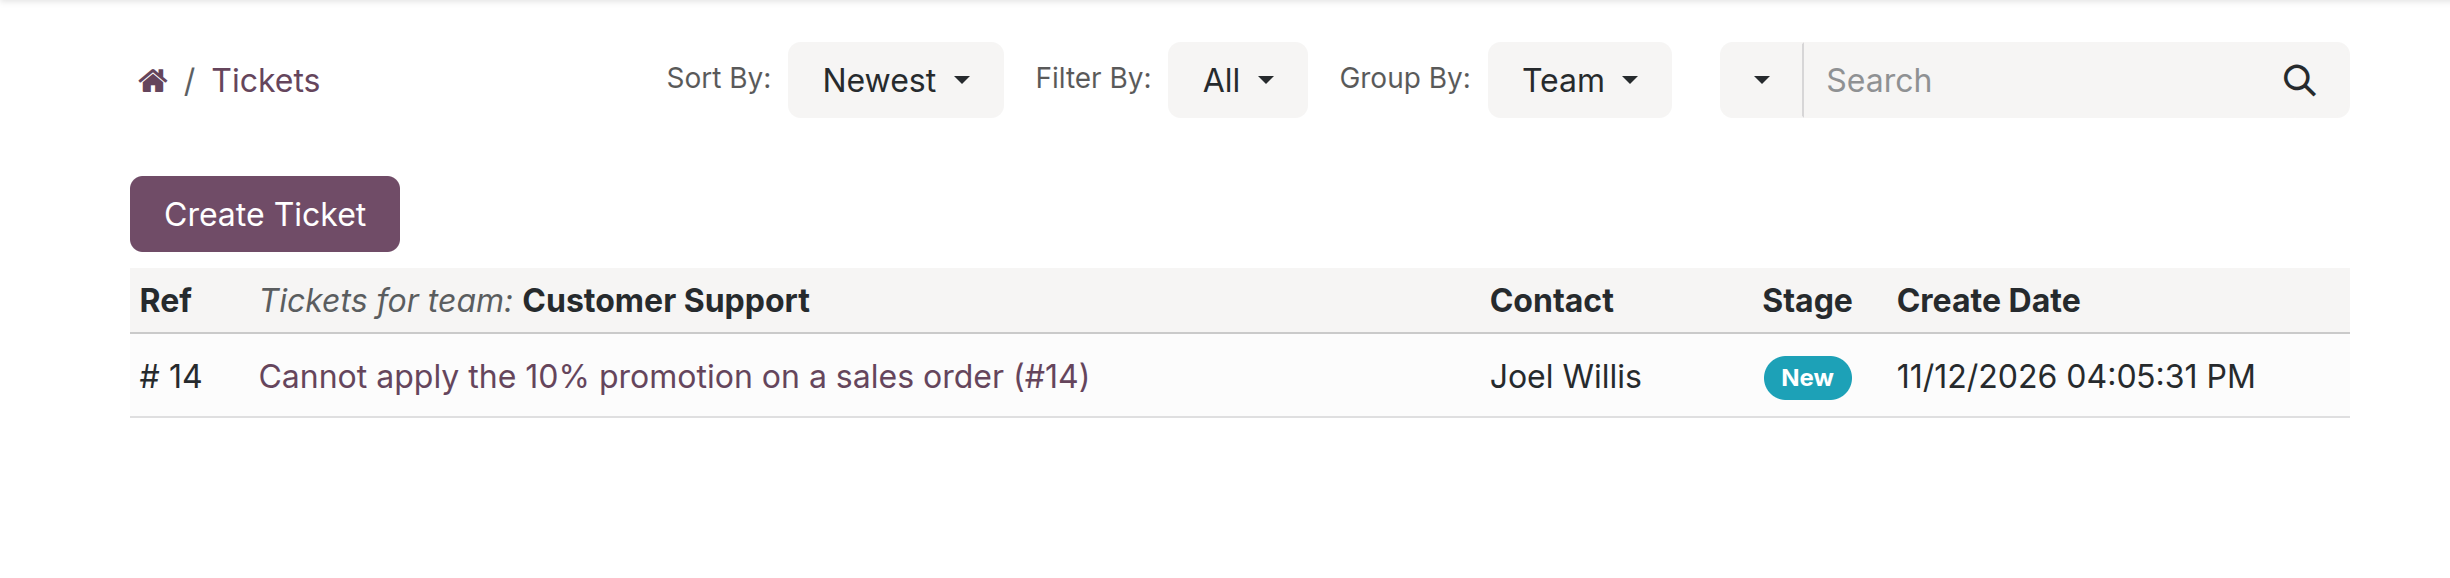
Your tickets are listed in the Tickets of your account, with their reference, stage and creation date, as in the image below; a ticket you have just filed appears there. If you type an email other than your own, the ticket is filed for that address and you stay a follower of it. The Create Ticket Now! button of the Helpdesk page opens the create form of your account instead of this one.
Website Editor / Designer: put a ticket form on a page
Place a ticket form where it helps customers, for example on a contact or product page:
- Open the page on the website and press Edit.
- Drop the Form block on the page, or select the form that is already there.
- In the Form options, set Action to Create a Helpdesk Ticket. The form keeps three fields: Title, Your Email and Description.
- Choose the Helpdesk Team and the Ticket Type of the form. The lists show the published teams in portal mode and the published, portal-visible ticket types.
- Press Save.
A ticket sent from this form goes to the chosen team and type and sends the same confirmation email. The form has no name field, so the email greets the sender with Dear Madam/Sir, unless the sender is signed in. Choose what the visitor sees afterwards in On Success.
Helpdesk Manager: receive and handle the tickets
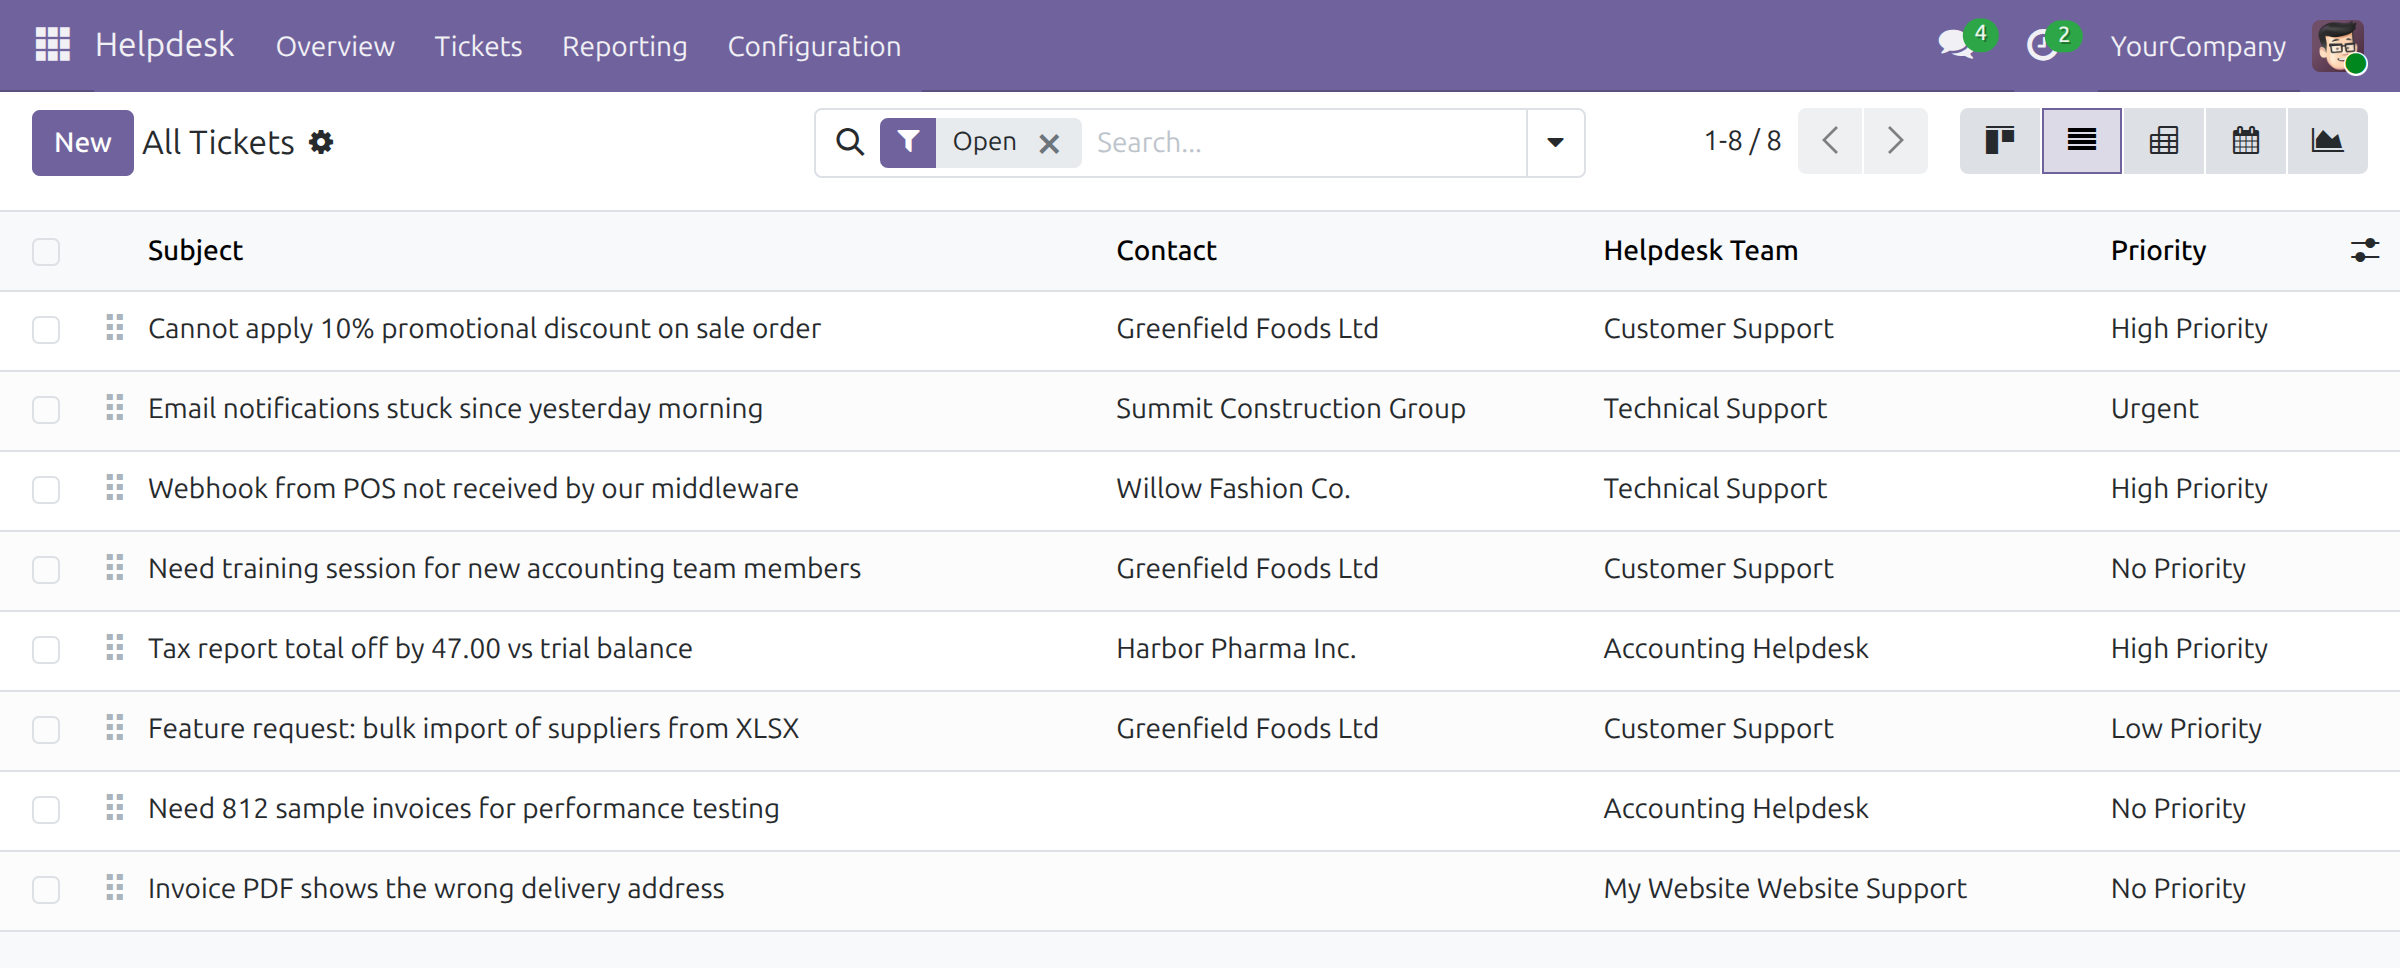
Tickets from the website appear in Helpdesk ‣ Tickets ‣ All Tickets, in the team of the website; the list opens with the Open filter on, so resolved and cancelled tickets show once you remove it. A ticket of a visitor has an empty Contact column; open it to read the typed Contact Name and Email, and Public user as its creator. A ticket of a signed-in customer carries that customer as Contact. The team leader receives a notification email.
Work the ticket as any other: assign it, move its stage and answer in the chatter. The answer reaches the customer by email and shows on the ticket page of the website. Stages, assignment and reports are described in the documentation of Helpdesk.
This software and associated files (the "Software") may only be used (executed, modified, executed after modifications) if you have purchased a valid license from the authors, typically via Odoo Apps, or if you have received a written agreement from the authors of the Software (see the COPYRIGHT file).
You may develop Odoo modules that use the Software as a library (typically by depending on it, importing it and using its resources), but without copying any source code or material from the Software. You may distribute those modules under the license of your choice, provided that this license is compatible with the terms of the Odoo Proprietary License (For example: LGPL, MIT, or proprietary licenses similar to this one).
It is forbidden to publish, distribute, sublicense, or sell copies of the Software or modified copies of the Software.
The above copyright notice and this permission notice must be included in all copies or substantial portions of the Software.
THE SOFTWARE IS PROVIDED "AS IS", WITHOUT WARRANTY OF ANY KIND, EXPRESS OR IMPLIED, INCLUDING BUT NOT LIMITED TO THE WARRANTIES OF MERCHANTABILITY, FITNESS FOR A PARTICULAR PURPOSE AND NONINFRINGEMENT. IN NO EVENT SHALL THE AUTHORS OR COPYRIGHT HOLDERS BE LIABLE FOR ANY CLAIM, DAMAGES OR OTHER LIABILITY, WHETHER IN AN ACTION OF CONTRACT, TORT OR OTHERWISE, ARISING FROM, OUT OF OR IN CONNECTION WITH THE SOFTWARE OR THE USE OR OTHER DEALINGS IN THE SOFTWARE.