Fleet Operations
| Lines of Code | 5334 |
| Technical name | viin_fleet_planning |
| License | OPL-1 |
| Website | https://viindoo.com/apps/modules/19.0/viin_fleet_planning |
| Read description for | v 10.0 v 11.0 v 12.0 v 13.0 v 14.0 v 15.0 v 16.0 v 17.0 v 18.0 |
| Required Apps | Discuss (mail) Employees (hr) Fleet (fleet) |
| Included Dependencies | Fleet Drivers Management Fleet Booking & Trip Management Fleet Loading Capacity Employee Documents Viindoo Unified Routing Framework QR Code Mixin Viindoo Base Advanced HR Management Viin Fleet API Request Logger Partner Working Calendar |
| Extensions | Fleet Pickup and Delivery Planning |
Every trip leaves with a route, and every stop comes back with a time
For companies that run their own vehicles
Plan every route, dispatch every vehicle, and guide every driver from one cockpit.
Odoo 19.0 · Community and Enterprise · OPL-1
Builds on Fleet Booking & Trip Management, for bookings and trips.
Builds on Viindoo Unified Routing Framework, for distances and travel times.
What changes for your team
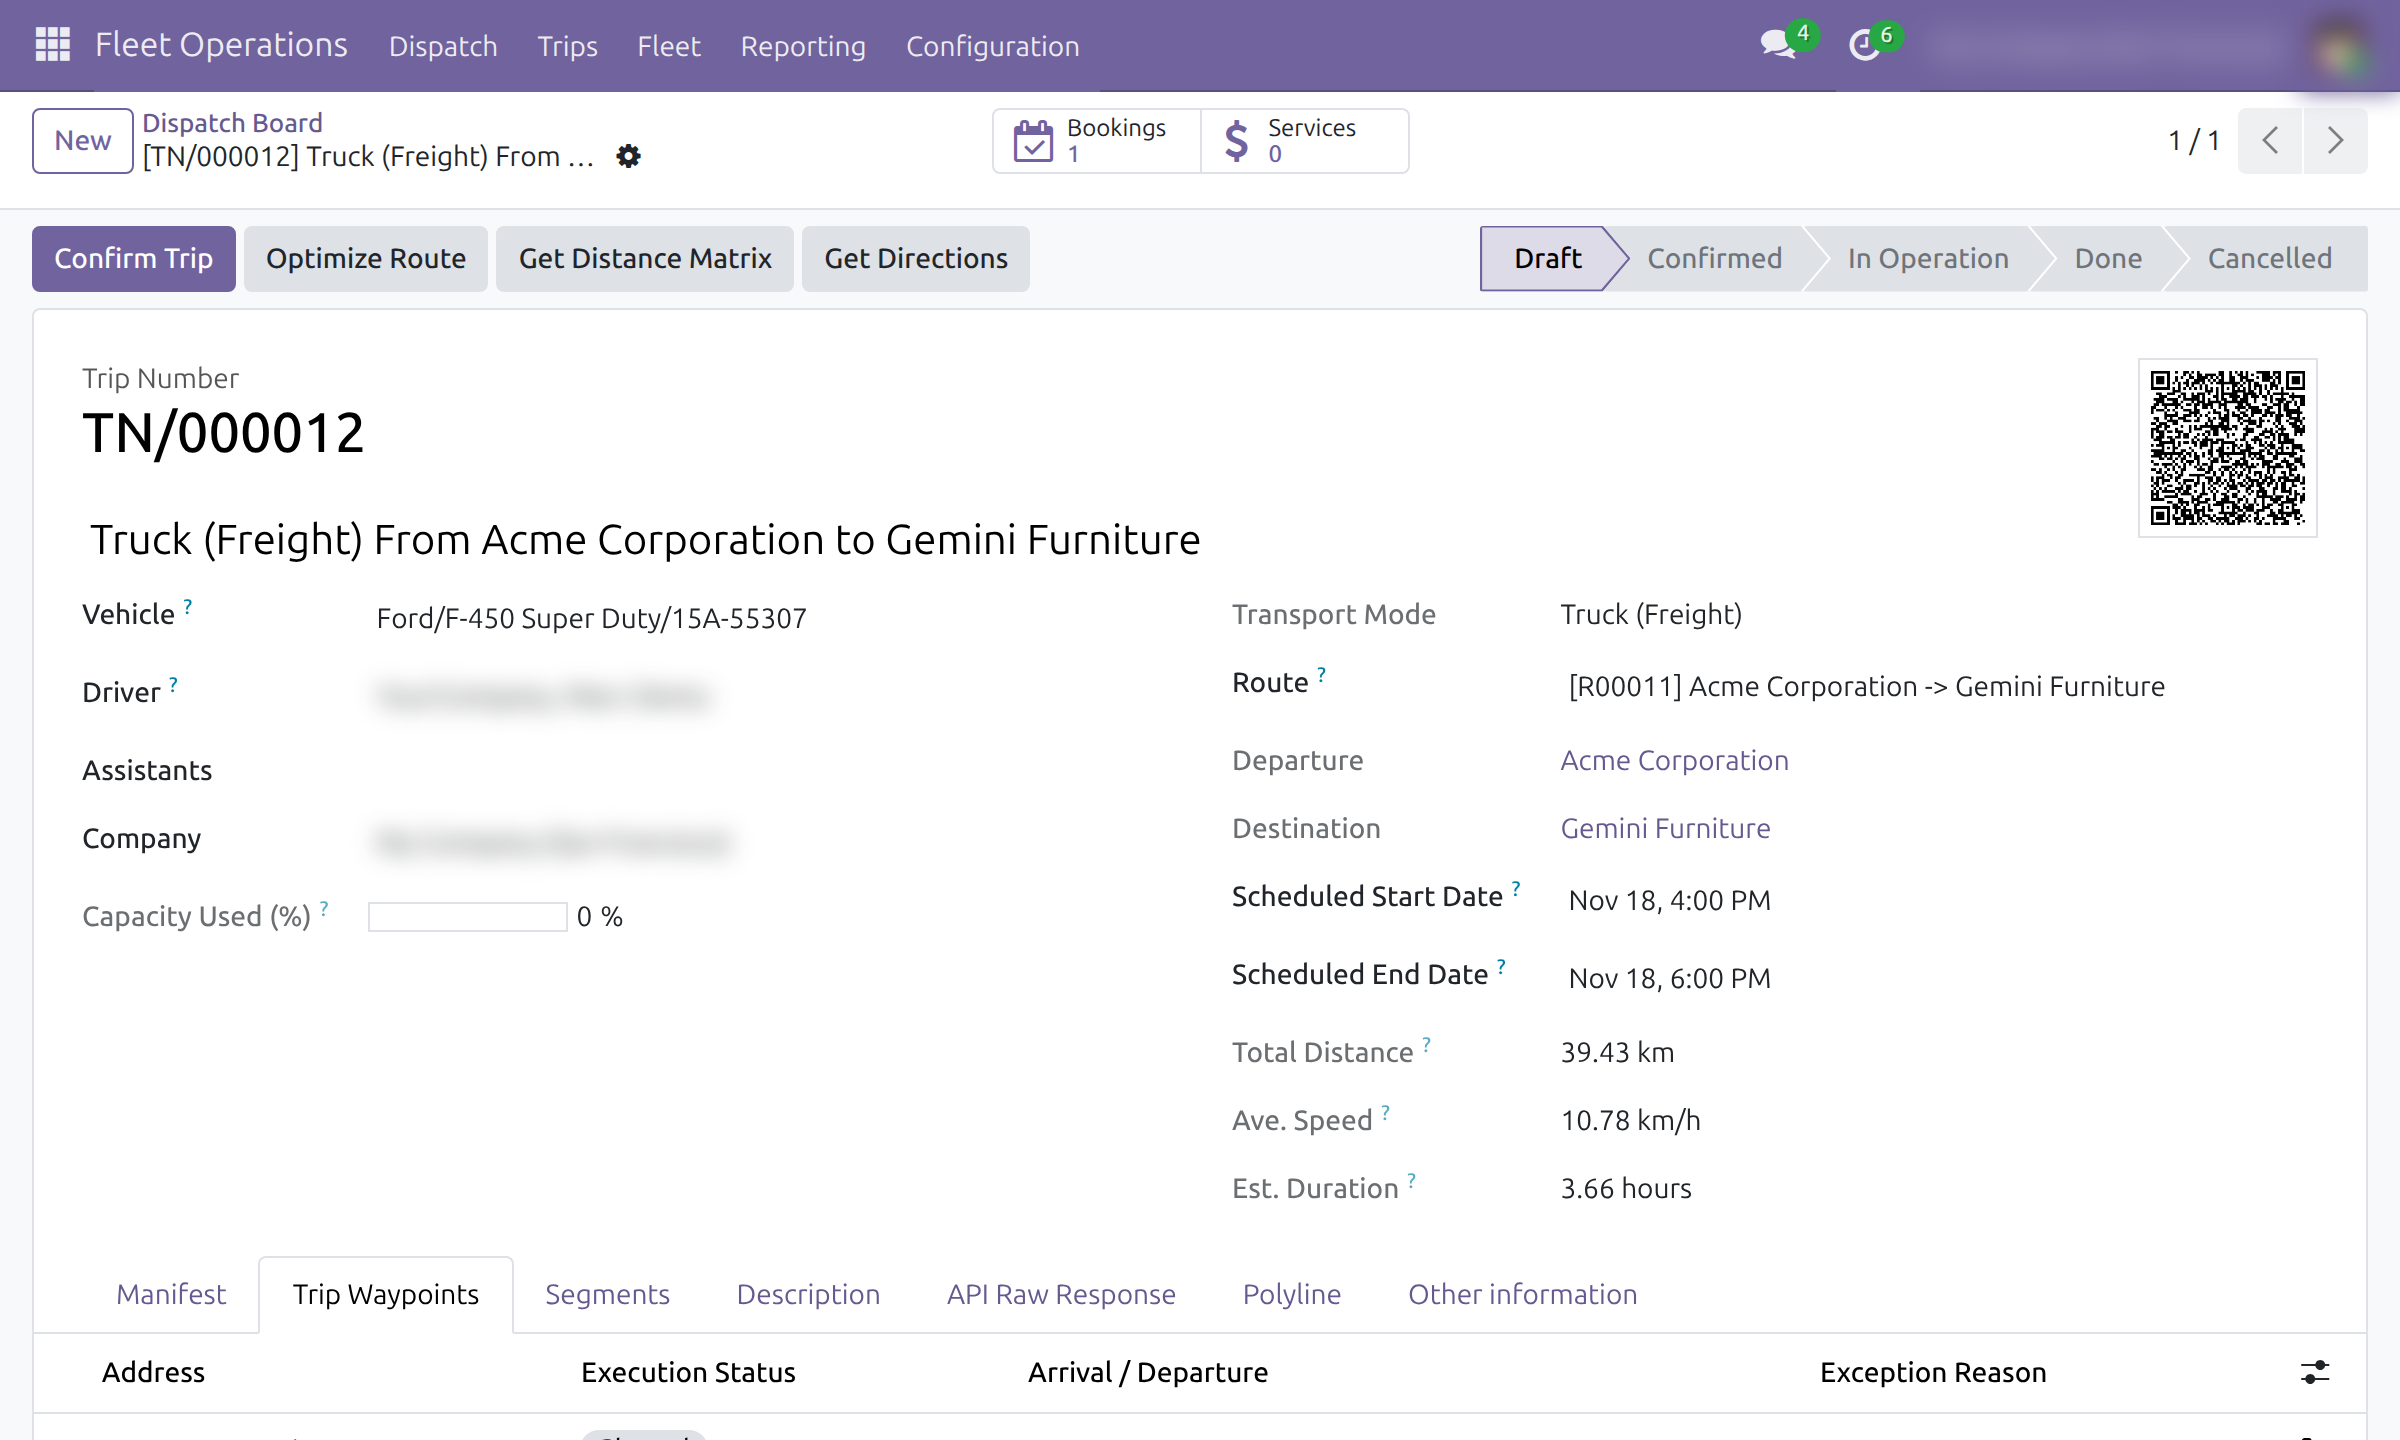
Each trip is routed before it is confirmed
Today, stop order and timing are guessed from experience.
→ One button reorders the stops to shorten the route, others fetch distances and directions. The trip shows its total distance and estimated duration, and is confirmed only with a driver and a stop.
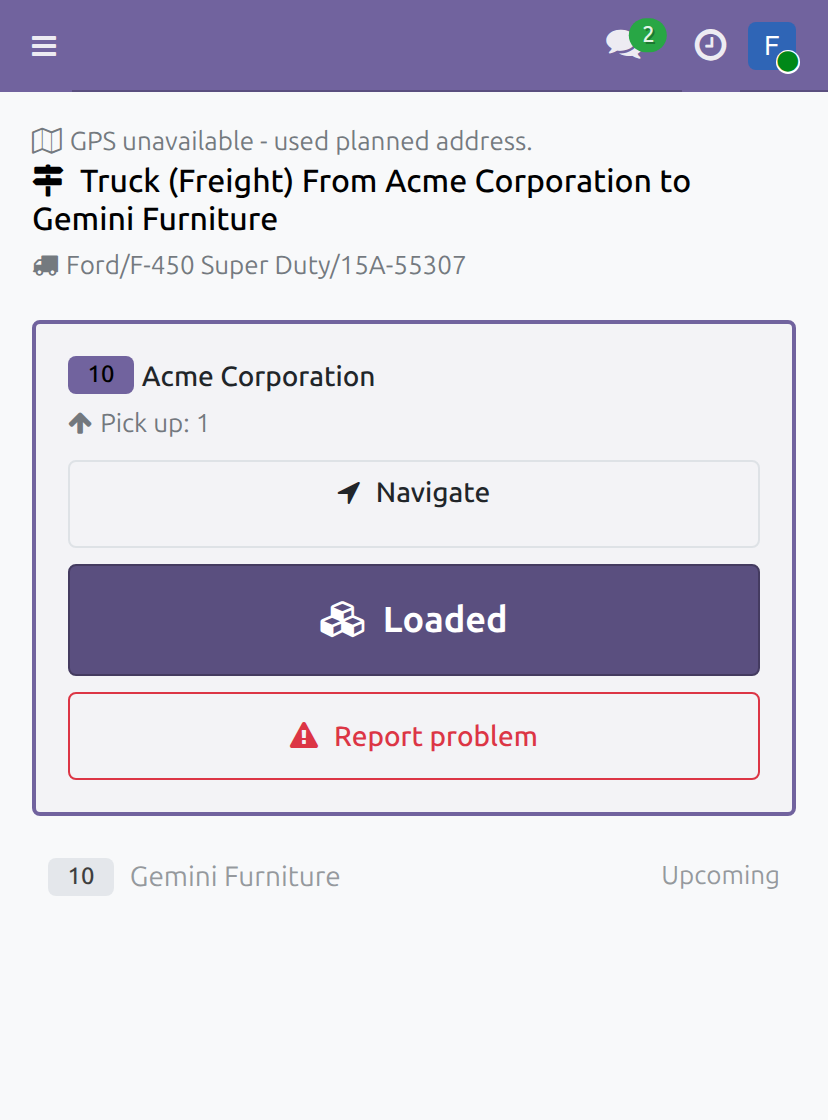
Drivers work from one screen on their phone
Today, drivers call the office at each stop.
→ My Trips shows one stop at a time, with Navigate, the next action (Arrived, Loaded or Delivered, Depart) and Report problem. Each tap records the time and the position: from the phone when allowed, else the planned address.
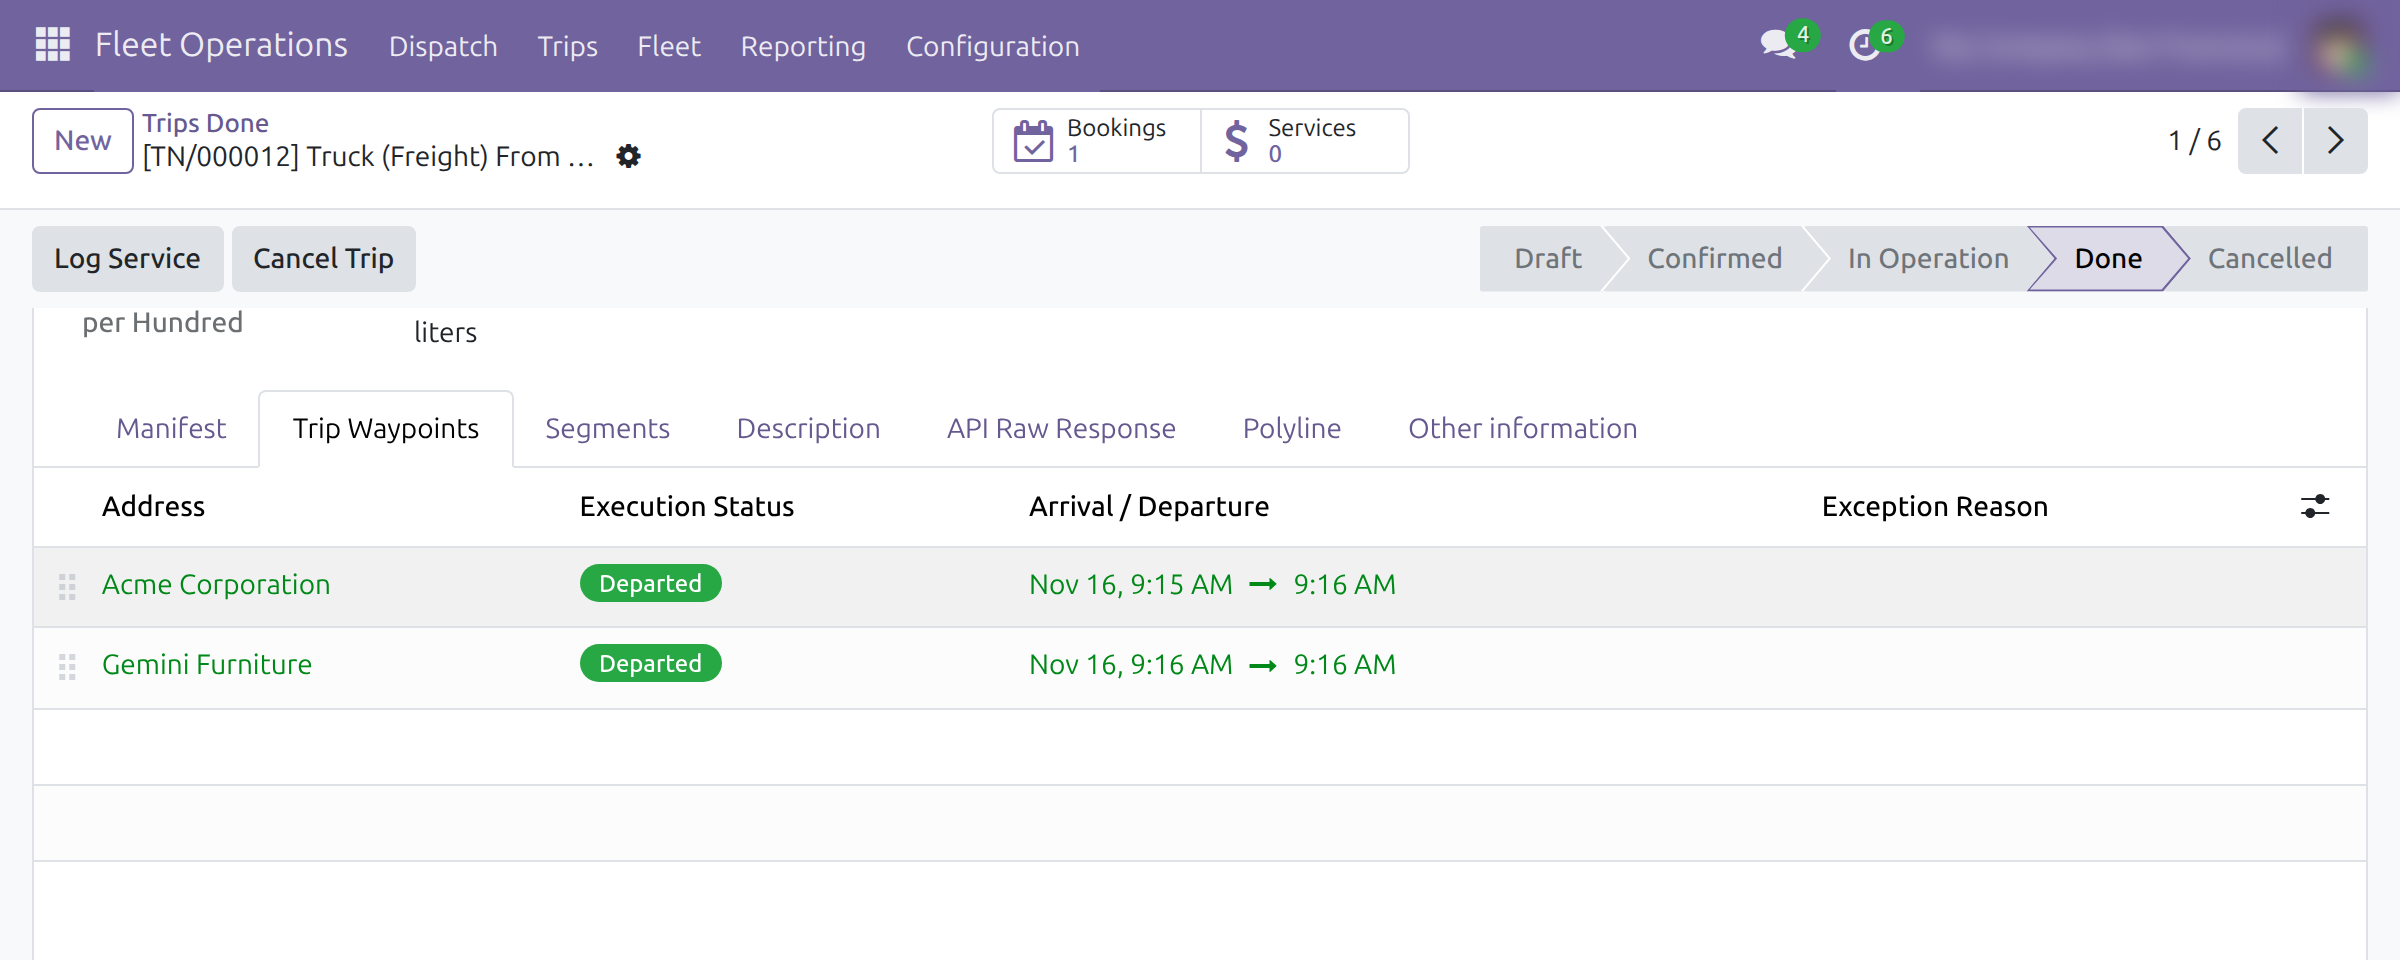
The office sees what happened at every stop
Today, arrival times and failed deliveries are pieced together afterwards.
→ Each stop shows its execution status, arrival and departure times and exception reason. Costs are logged against the whole trip, a stop or a section, and Trips Analysis compares planned and actual time, distance, cost and fuel.
Ready on day one
Three roles
Fleet Driver (Execution) sees only My Trips; Fleet Planning Operator dispatches; Fleet Planning Administrator adds reporting and configuration.
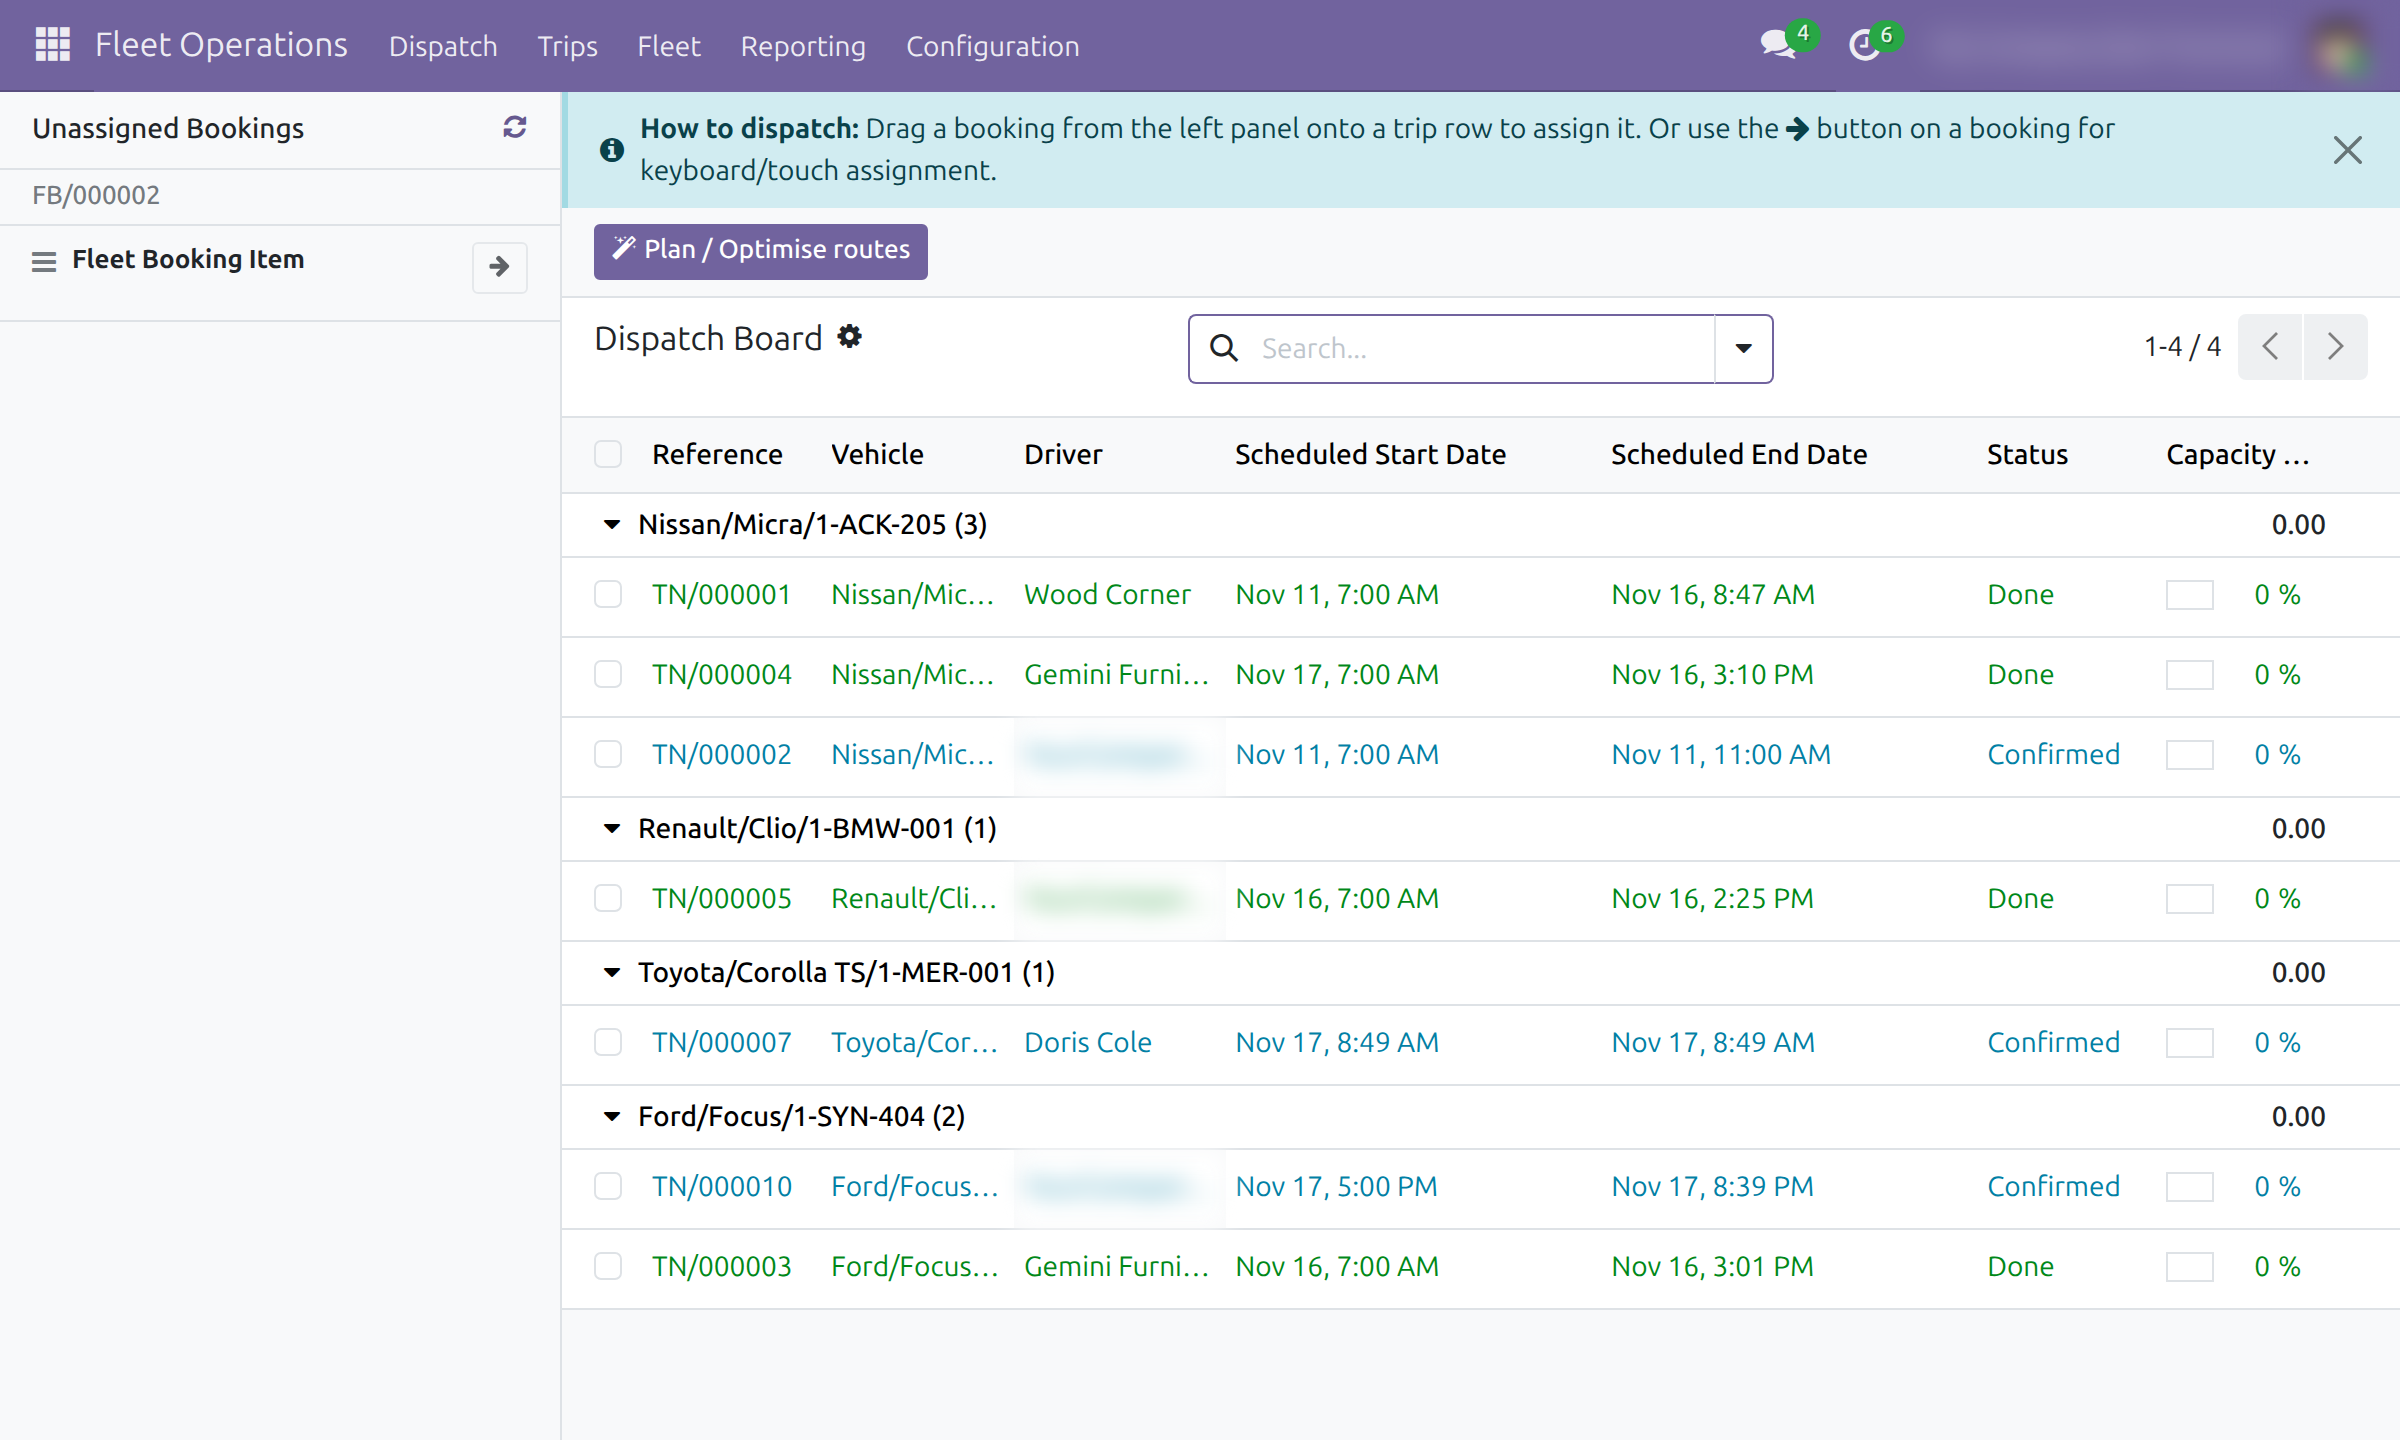
Dispatch Board
Waiting booking items on the left, trips by vehicle on the right; drag to assign, with Undo.
Set up first
Give each person a Fleet role, and each vehicle a default address with coordinates, working hours and a route end.
What is included
The Dispatch Board with a route optimiser, trip routing, the driver screen, assistants and trip instructions by email, costs by trip, stop or section, a printable trip sheet, reusable routes and waypoints, and planned-versus-actual analysis.
Optional extensions
Fleet Pickup and Delivery Planning
Ties inventory transfers to the stops of a trip and checks the vehicle's weight and volume.
Before you decide
Where do the booking items on the board come from?
From a companion booking app that adds items to bookings; the required modules below do not create them from the interface. Without one, the panel stays empty and trips are planned from their route and stops.
Is the optimiser's plan the best possible?
It is the best plan found within a short time limit, flagged when optimality is not proven. It respects working hours, seats and load capacity, gives the reason for each item it could not plan, and applies only what the dispatcher accepts.
Does it track vehicles live?
No. A position is recorded only when the driver taps a stop action.
Which languages does it ship in?
English and Vietnamese.
What does it take to run it?
The Python library ortools on the server. Distances are estimates from coordinates, or road figures from a map service add-on, which receives the stops.
Try it, then ask us
Read the Documentation tab, or open the Live Preview.
Pre-sales & partnership
viindoo.com/contactusTechnical support
viindoo.com/ticketTechnical requirements
- Odoo version: 19.0
- Editions: Community, Enterprise
- Required modules: Viindoo Unified Routing Framework, Fleet Booking & Trip Management, Partner Working Calendar
- Python library: ortools
- License: OPL-1
- Languages: English, Vietnamese
Fleet Operations
Note
Extends Fleet Booking & Trip Management - see its documentation. It also builds on the Viindoo Unified Routing Framework - see its documentation.
This guide is for the people who plan and run vehicle trips: the dispatchers who assign bookings to vehicles, the drivers who carry the trips out from their phone, the fleet managers who follow the results, and the administrator who sets the application up.
Overview
Fleet Operations plans the trips of your fleet and follows each trip to its end. Dispatchers plan the route and the stops of every trip and dispatch bookings on the Dispatch Board: a dispatcher sees every booking item that still needs a vehicle, assigns it to a trip by hand or lets the route optimiser propose which vehicle serves which booking and in what order. Each trip carries its stops, distance and duration. Drivers record each stop from their phone in My Trips, and managers compare what was planned with what happened, as every arrival, departure and problem is recorded.
The process runs in these stages:
- Plan. The dispatcher assigns the booking items waiting on the Dispatch Board to trips, one by one or with Plan / Optimise routes. The trips are created or completed in Draft.
- Prepare. The dispatcher checks the vehicle, the driver, the route and the stops of each trip, fetches distances and directions, then clicks Confirm Trip.
- Run. The driver starts the trip in My Trips, records each stop (arrival, loading or delivery, departure) and clicks Finish trip. The trip is Done, and so are the bookings whose booking items it carried.
- Analyse. The fleet manager reads the trip, cost and booking reports.
| Role | What they do | Access right to assign |
|---|---|---|
| Administrator | Installs the application, completes the vehicle routing settings, maintains routes and gives each person an access right | Administrator role (Roles section of the user) plus Fleet Planning Administrator |
| Dispatcher | Assigns booking items to trips, prepares and confirms trips | Fleet Planning Operator |
| Driver | Starts, works through and finishes the trips assigned to them from a phone | Fleet Driver (Execution) |
| Fleet manager | Reads the reports and keeps the booking purposes and routes | Fleet Planning Administrator |
Setup (for the Administrator)
Installation
- Open Apps, remove the default filter, search for Fleet Operations and click Install.
- The applications it relies on are installed with it: Fleet Booking & Trip Management (see its documentation), the Viindoo Unified Routing Framework (see its documentation) and Partner Working Calendar.
- The route optimiser needs the Python package OR-Tools on the Odoo server; the installation requires it.
A Fleet Operations tile appears next to Fleet Booking, and each driver gets a My Trips tile. The Fleet Booking tile stays available to every employee for requesting vehicles.
Access rights
Open Settings ‣ Users & Companies ‣ Users, select a person, open the Access Rights tab and choose a value in Fleet:
- Fleet Driver (Execution) - sees and executes only the trips assigned to them, from My Trips.
- Fleet Planning Operator - dispatches trips for the whole fleet. It includes the Fleet Driver (Execution) rights and the booking operator rights.
- Fleet Planning Administrator - everything the operator does, plus the Reporting and Configuration menus.
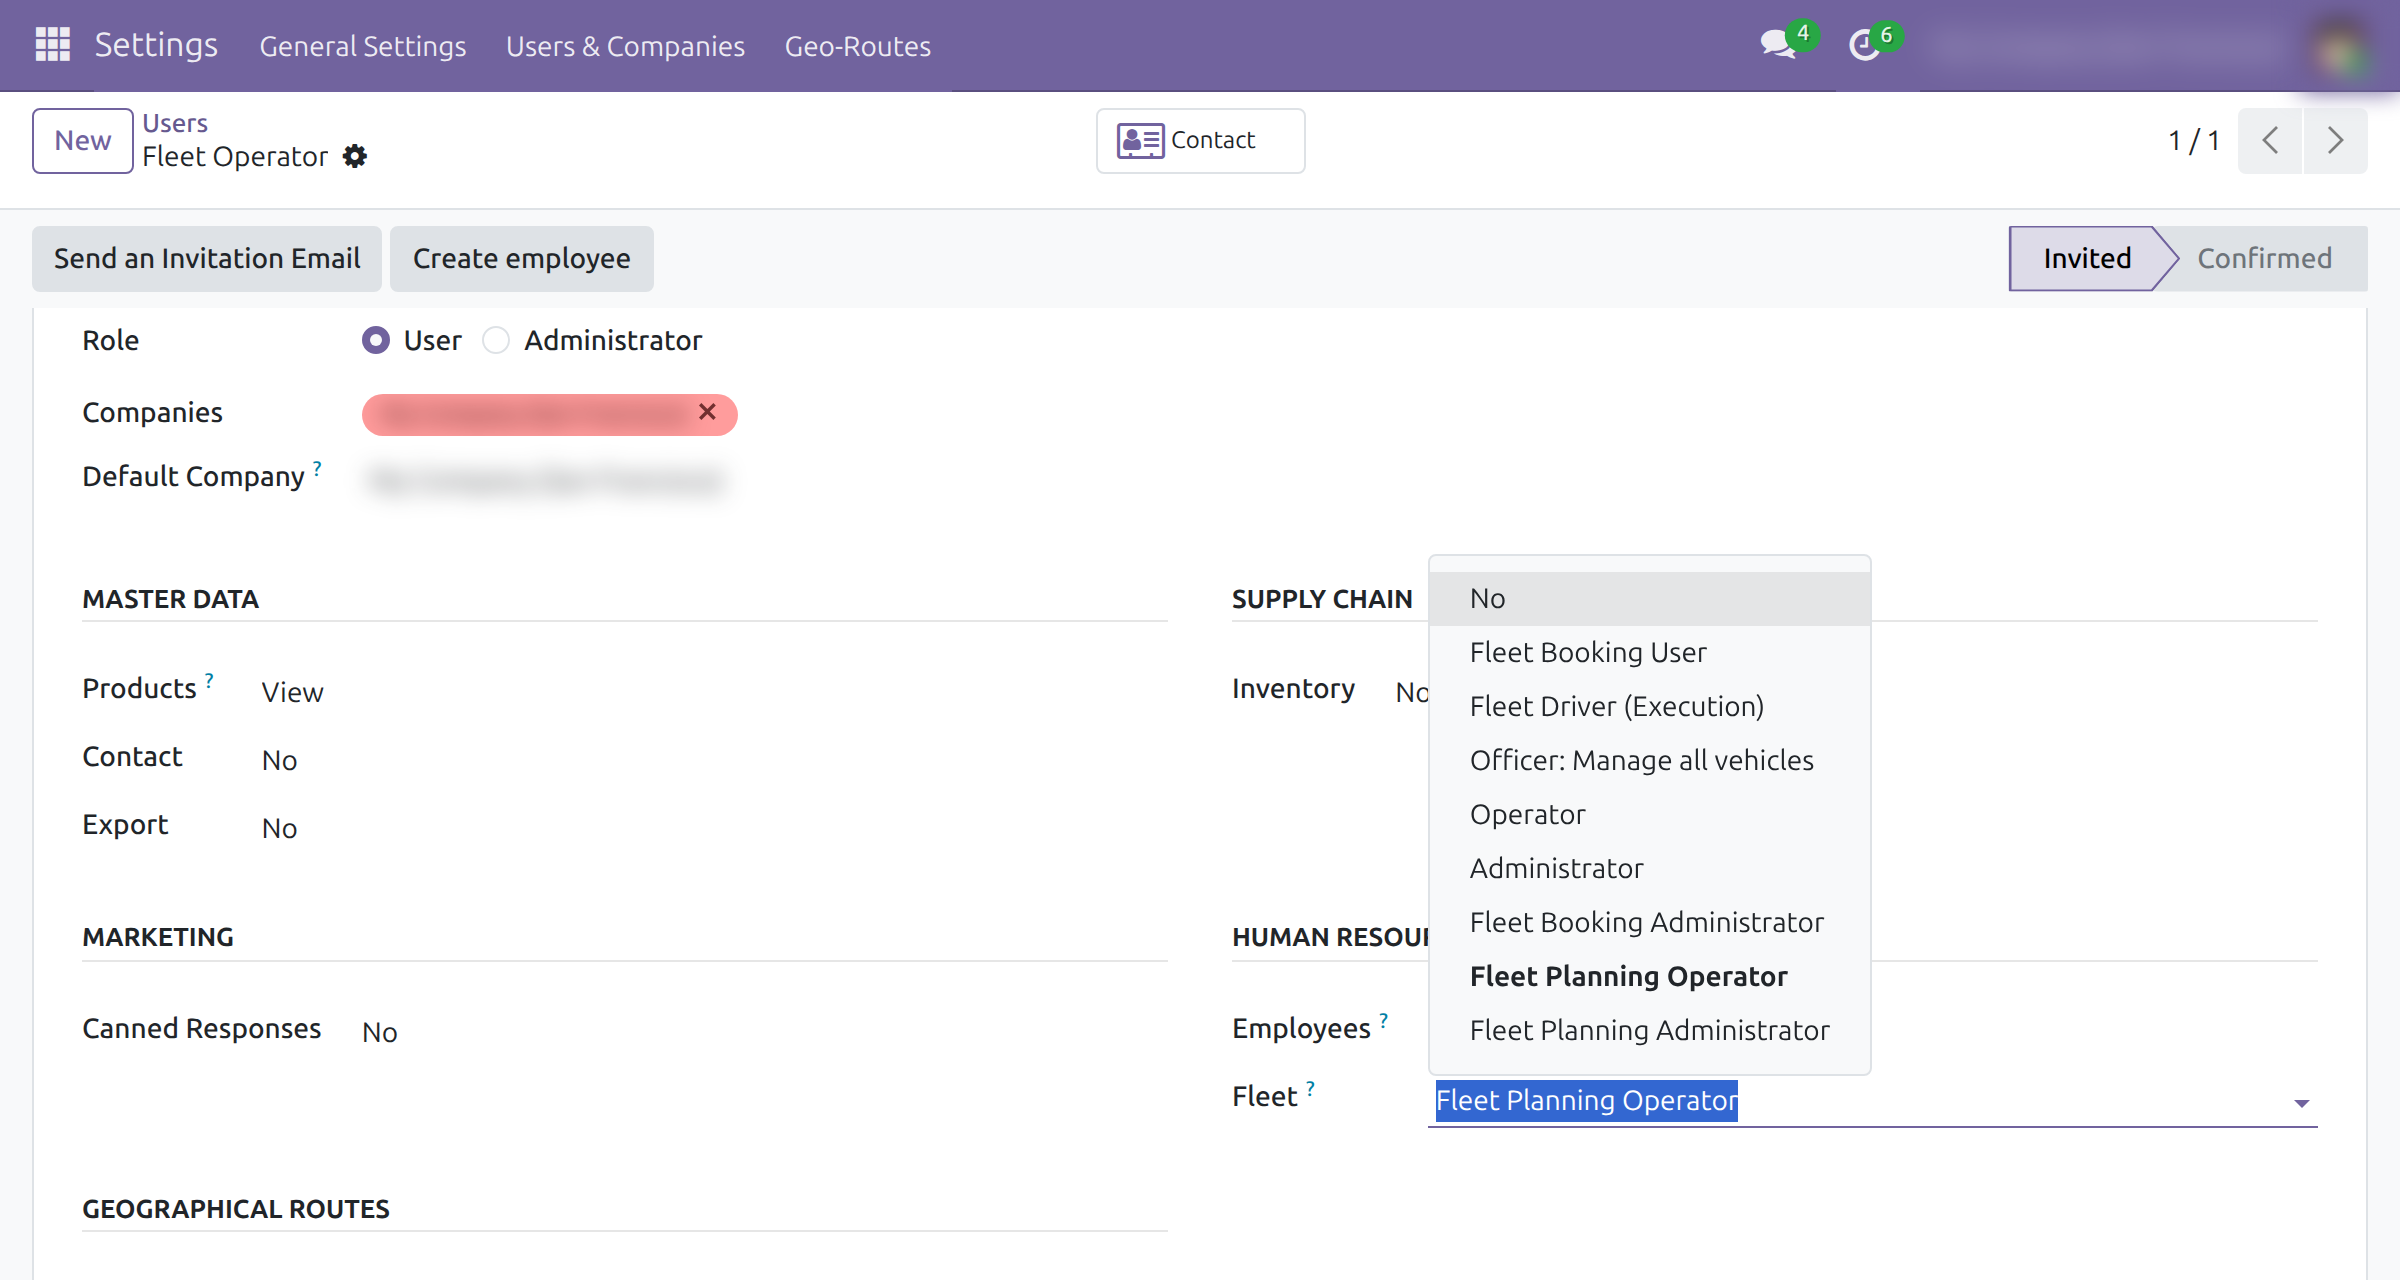
The other values of the list, such as Fleet Booking User and Operator, belong to Fleet Booking (see its documentation). The Settings menu of the application additionally needs the Administrator role in the Roles section of the same tab.
Vehicle routing settings
The optimiser plans a vehicle only when its starting address is known on the map. Complete each vehicle you want it to use:
- Open Fleet Operations ‣ Fleet ‣ Fleet and select a vehicle.
- Make sure its Default Address is a contact with map coordinates. The vehicle starts its day there and, unless you choose another address, returns there.
- Open the Model tab and fill the VRP / Routing group.
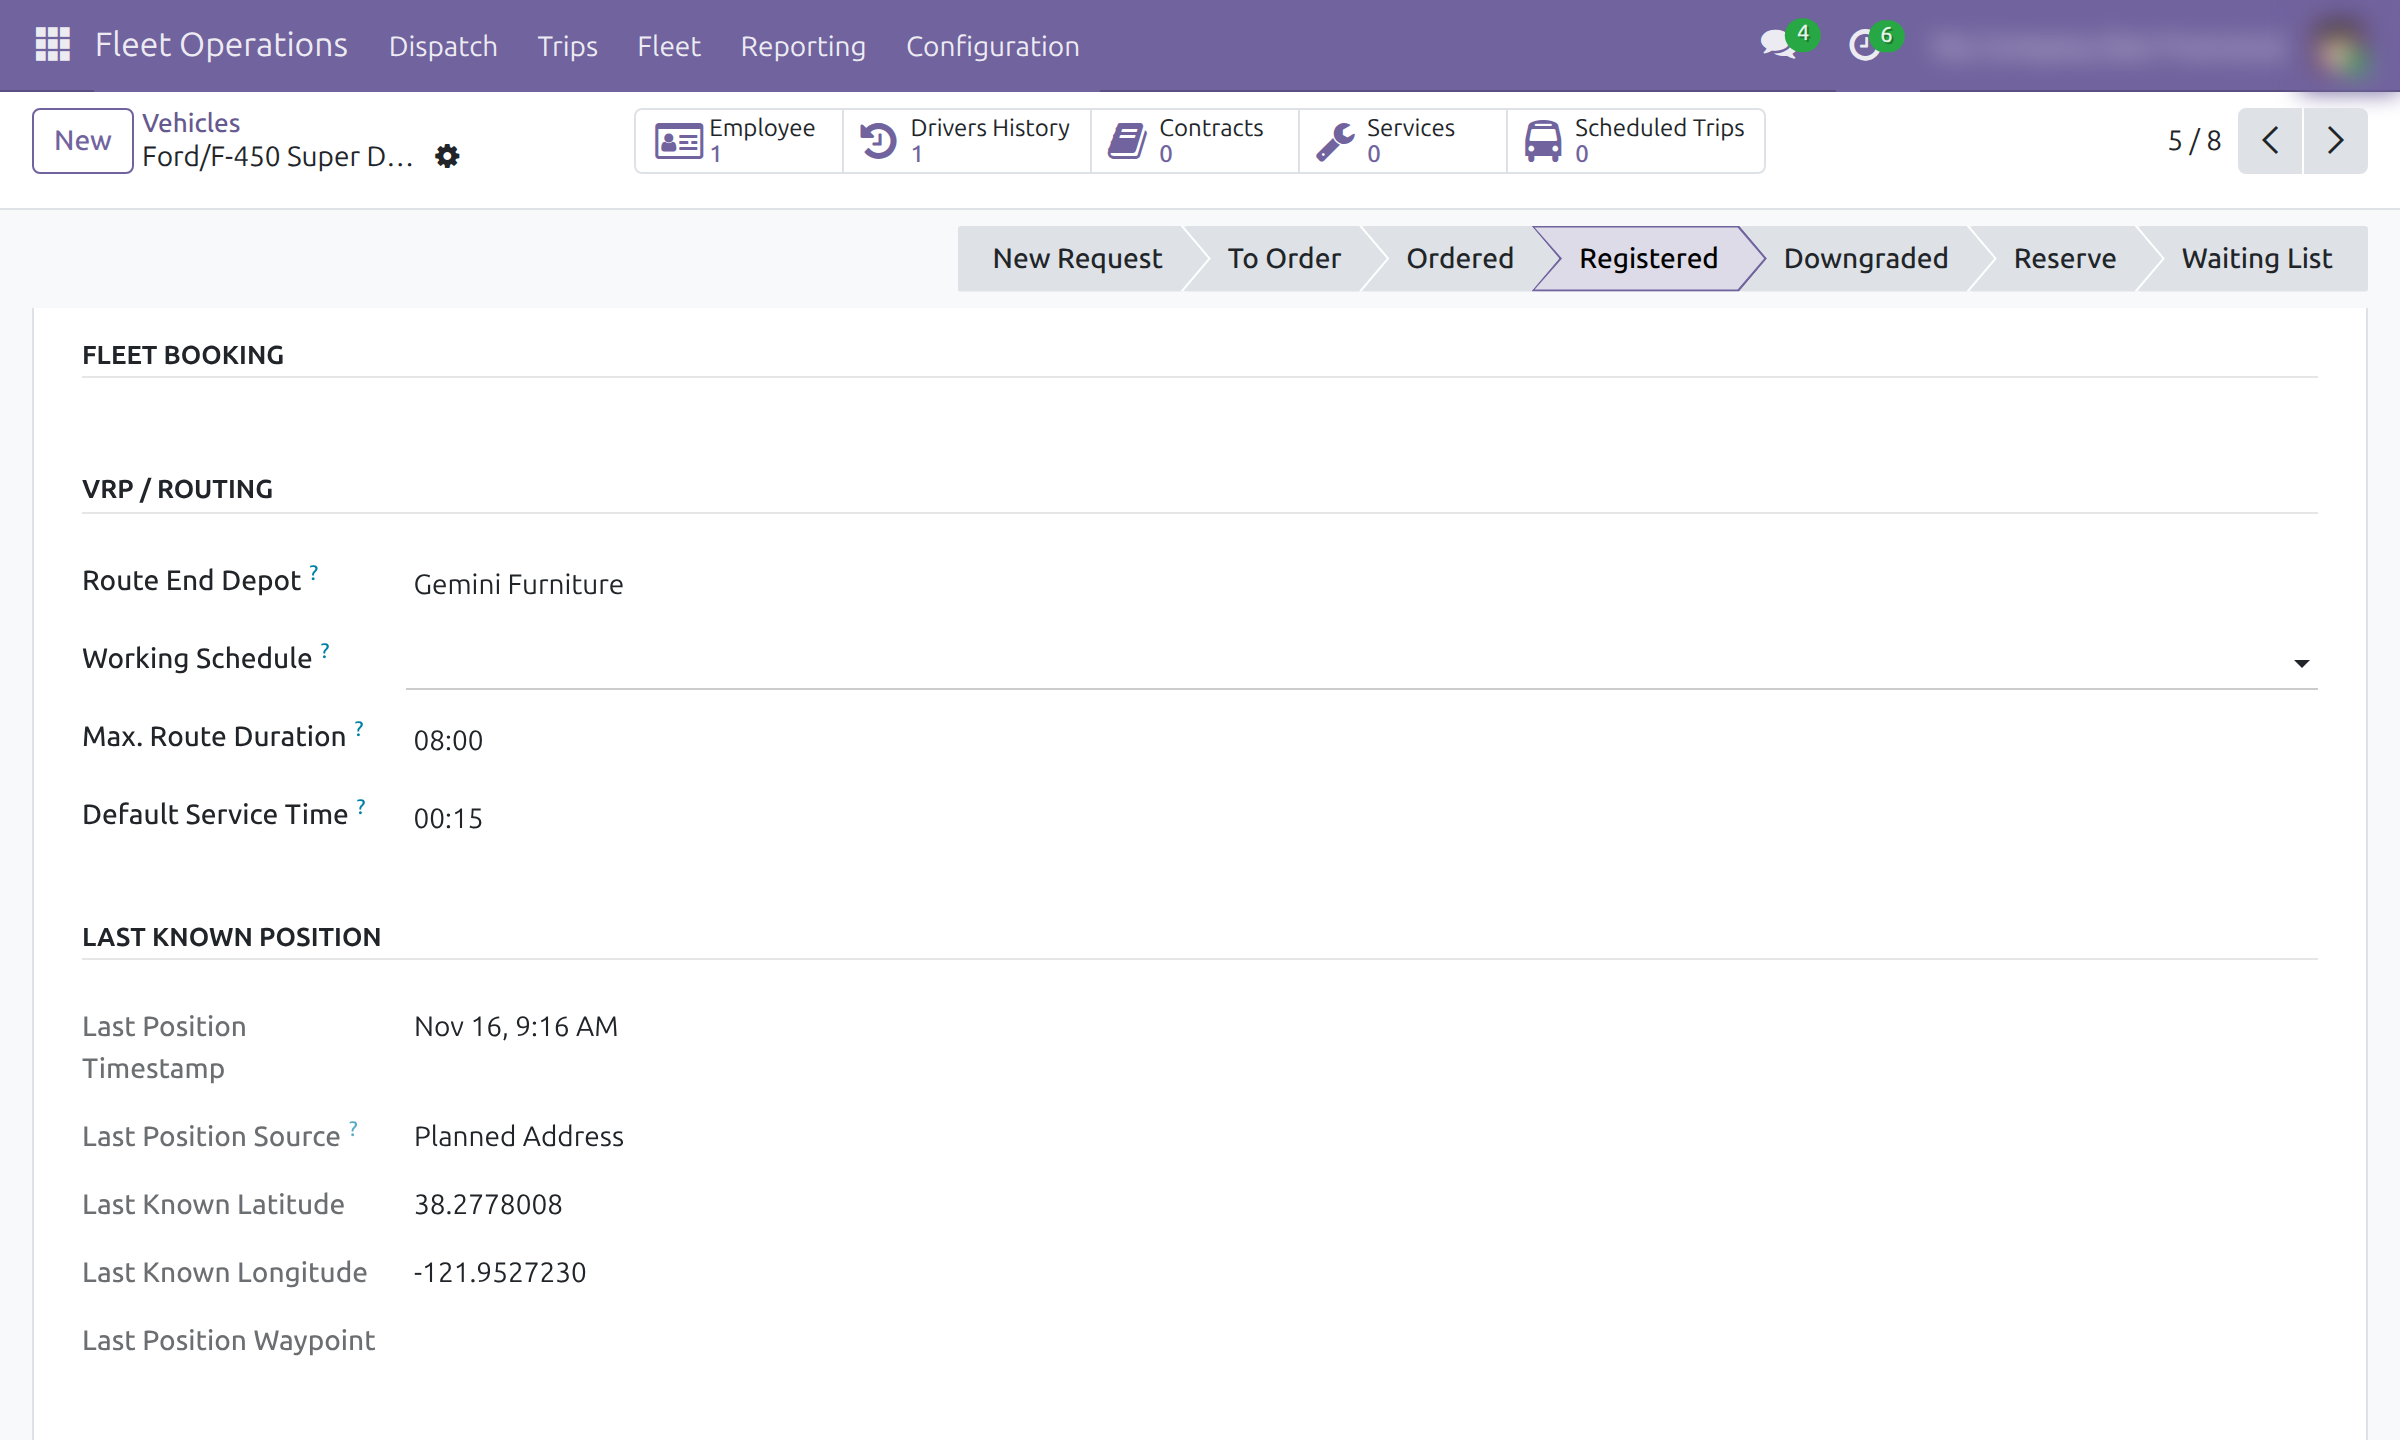
- Route End Depot - the address where the vehicle finishes its route. Leave it empty to return to the Default Address.
- Working Schedule - the working hours the vehicle follows. When empty, the working schedule of the Default Address is used; when that is empty too, only the free time of the vehicle limits the plan.
- Max. Route Duration - the longest a single route may last. 00:00 means no limit.
- Default Service Time - the time spent at each stop when the booking item carries no waiting time.
The capacity fields of the same tab (Warning Volume, Max. Volume, Warning Payload, Max. Payload) set what the optimiser and the Capacity Used (%) column of the board measure a trip against. The group Last Known Position is filled in by the drivers' phones and cannot be edited.
Routes and waypoints
Under Fleet Operations ‣ Configuration ‣ Routes & Waypoints, the menus Routes, Route Sections, Waypoints and Waypoint Areas keep the reusable routes and stops (see the documentation of the routing framework). Fleet Operations adds a Stop Duration to a waypoint, the usual time a vehicle stays there. Fleet Operations ‣ Configuration ‣ Transport Mode Providers chooses which service measures distances for each transport mode; without a provider, distances are estimated from coordinates.
The drivers are kept in the core Fleet application, under Fleet ‣ Drivers.
Dispatcher: plan and prepare trips
The dispatcher needs the Fleet Planning Operator access right. They see Dispatch, Trips and Fleet in Fleet Operations, the bookings of Fleet Booking, and My Trips.
The Dispatch Board
Open Fleet Operations ‣ Dispatch.
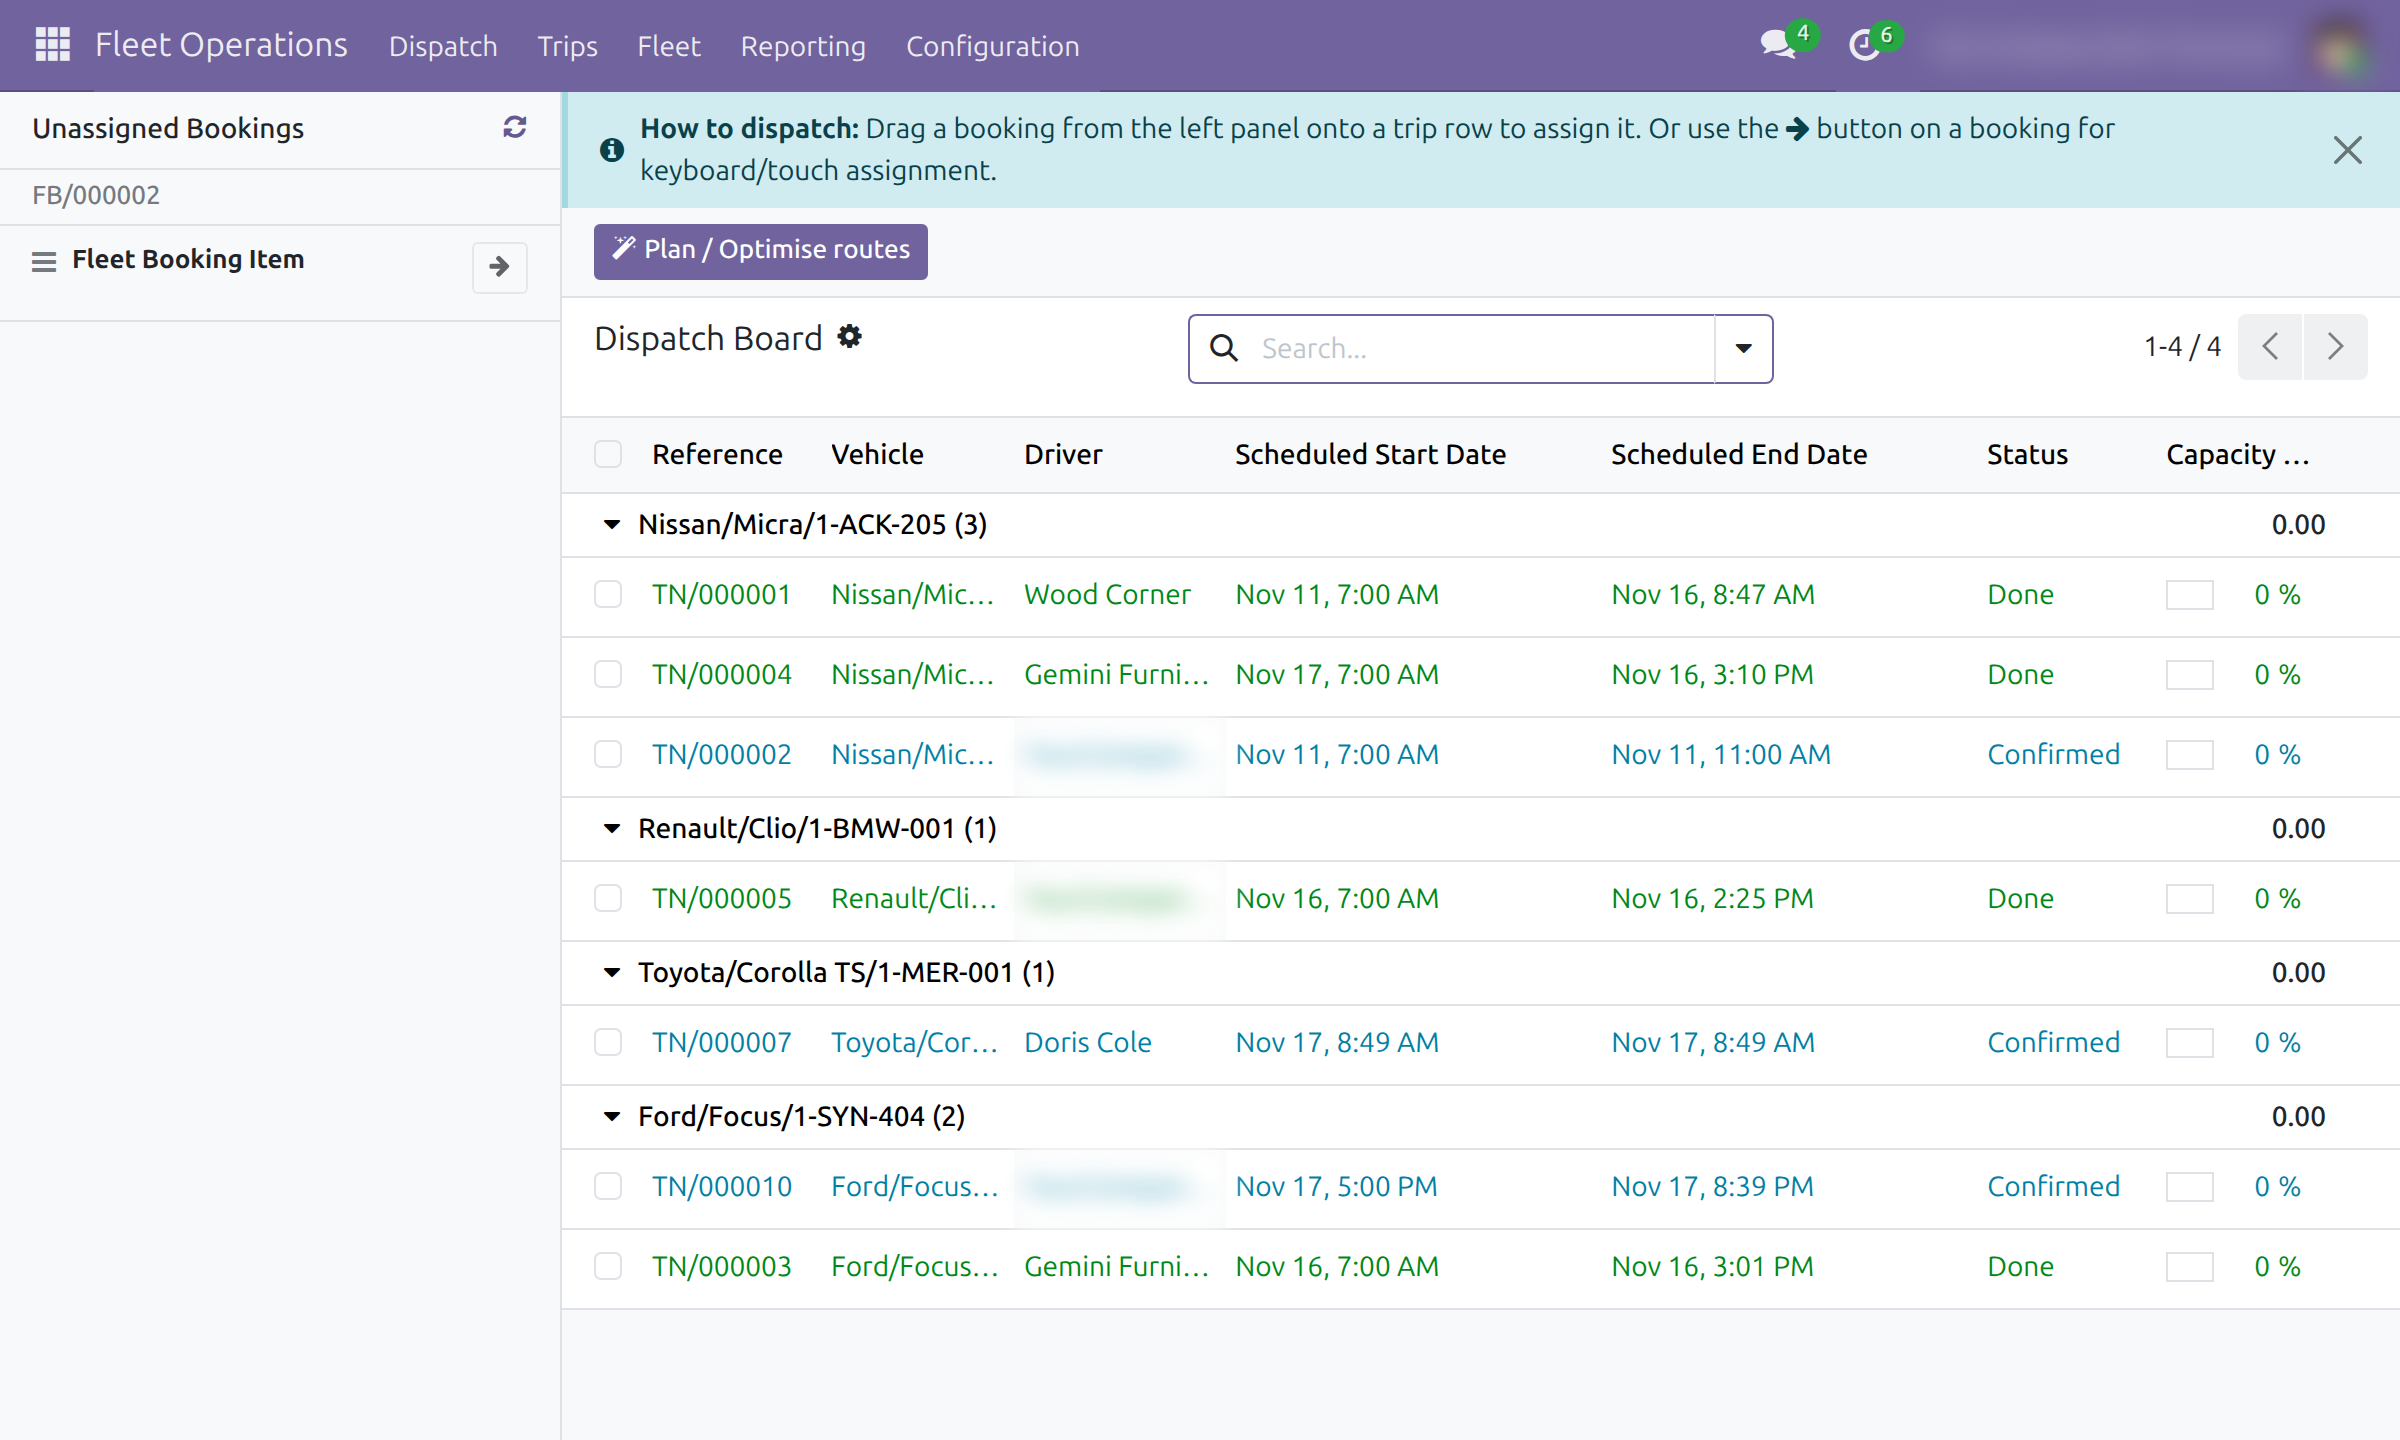
The left panel, Unassigned Bookings, lists the booking items of confirmed bookings that have no trip yet, grouped by booking; it reads Nothing waiting to be assigned when there are none. Booking items come from a companion booking application such as Fleet Booking (see its documentation); without booking items the panel stays empty and trips are planned from their route and stops. The right side lists the trips grouped by vehicle with their reference, driver, scheduled dates, Status and Capacity Used (%). Click a trip to open it. Use Refresh (the arrows icon in the panel header) to reload the panel. Close the how-to banner with Dismiss; it stays closed in that browser.
Assign a booking item to a trip by hand
On the booking item in Unassigned Bookings, click the arrow button Assign to trip - or drag the card onto the row of a trip.
In the Assign to Trip list, click the trip. Only trips in Draft or Confirmed are offered.
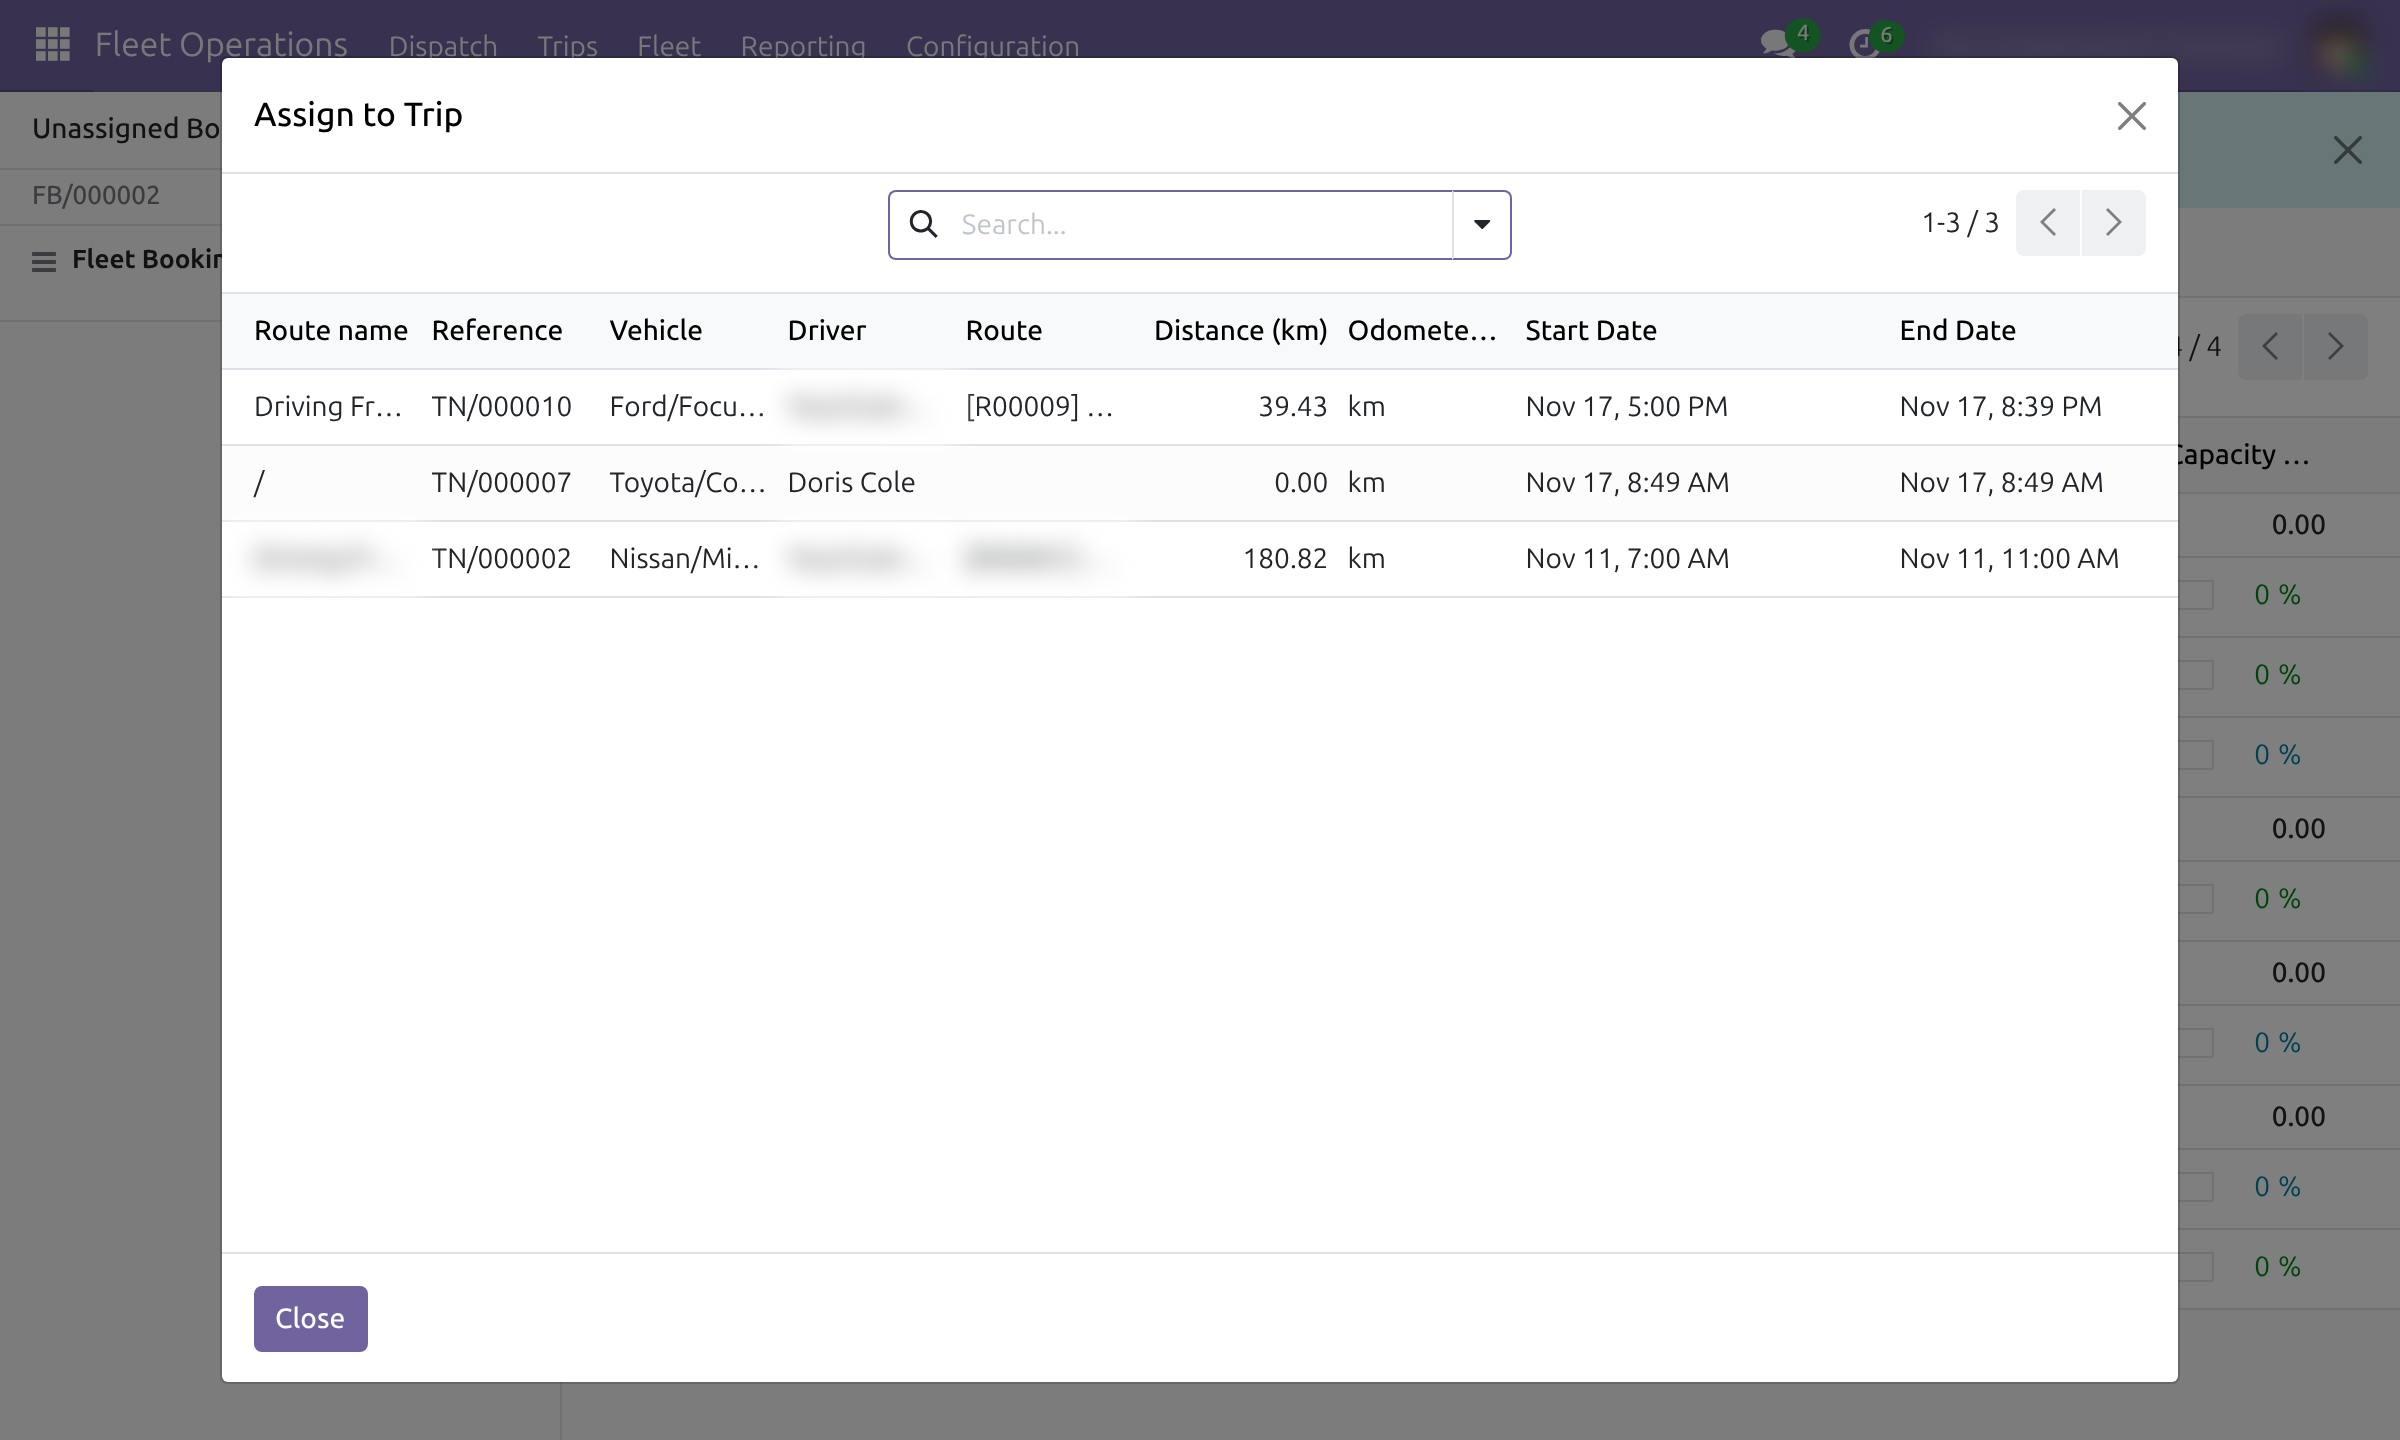
The item leaves the panel and the trip takes its pickup and drop-off as stops. A message offers Undo, which puts the item back in the panel.
When the assignment would take the vehicle above its Max. Payload, a Over Capacity question asks for confirmation; click Assign Anyway to continue.
Let the optimiser propose the plan
On the Dispatch Board, click Plan / Optimise routes. The optimiser considers every booking item in Unassigned Bookings and every vehicle whose Default Address has map coordinates and that is free in the period (a vehicle with a Confirmed or In Operation trip in that period is not available; a Draft trip does not block it). A few seconds later the Route optimisation window opens.
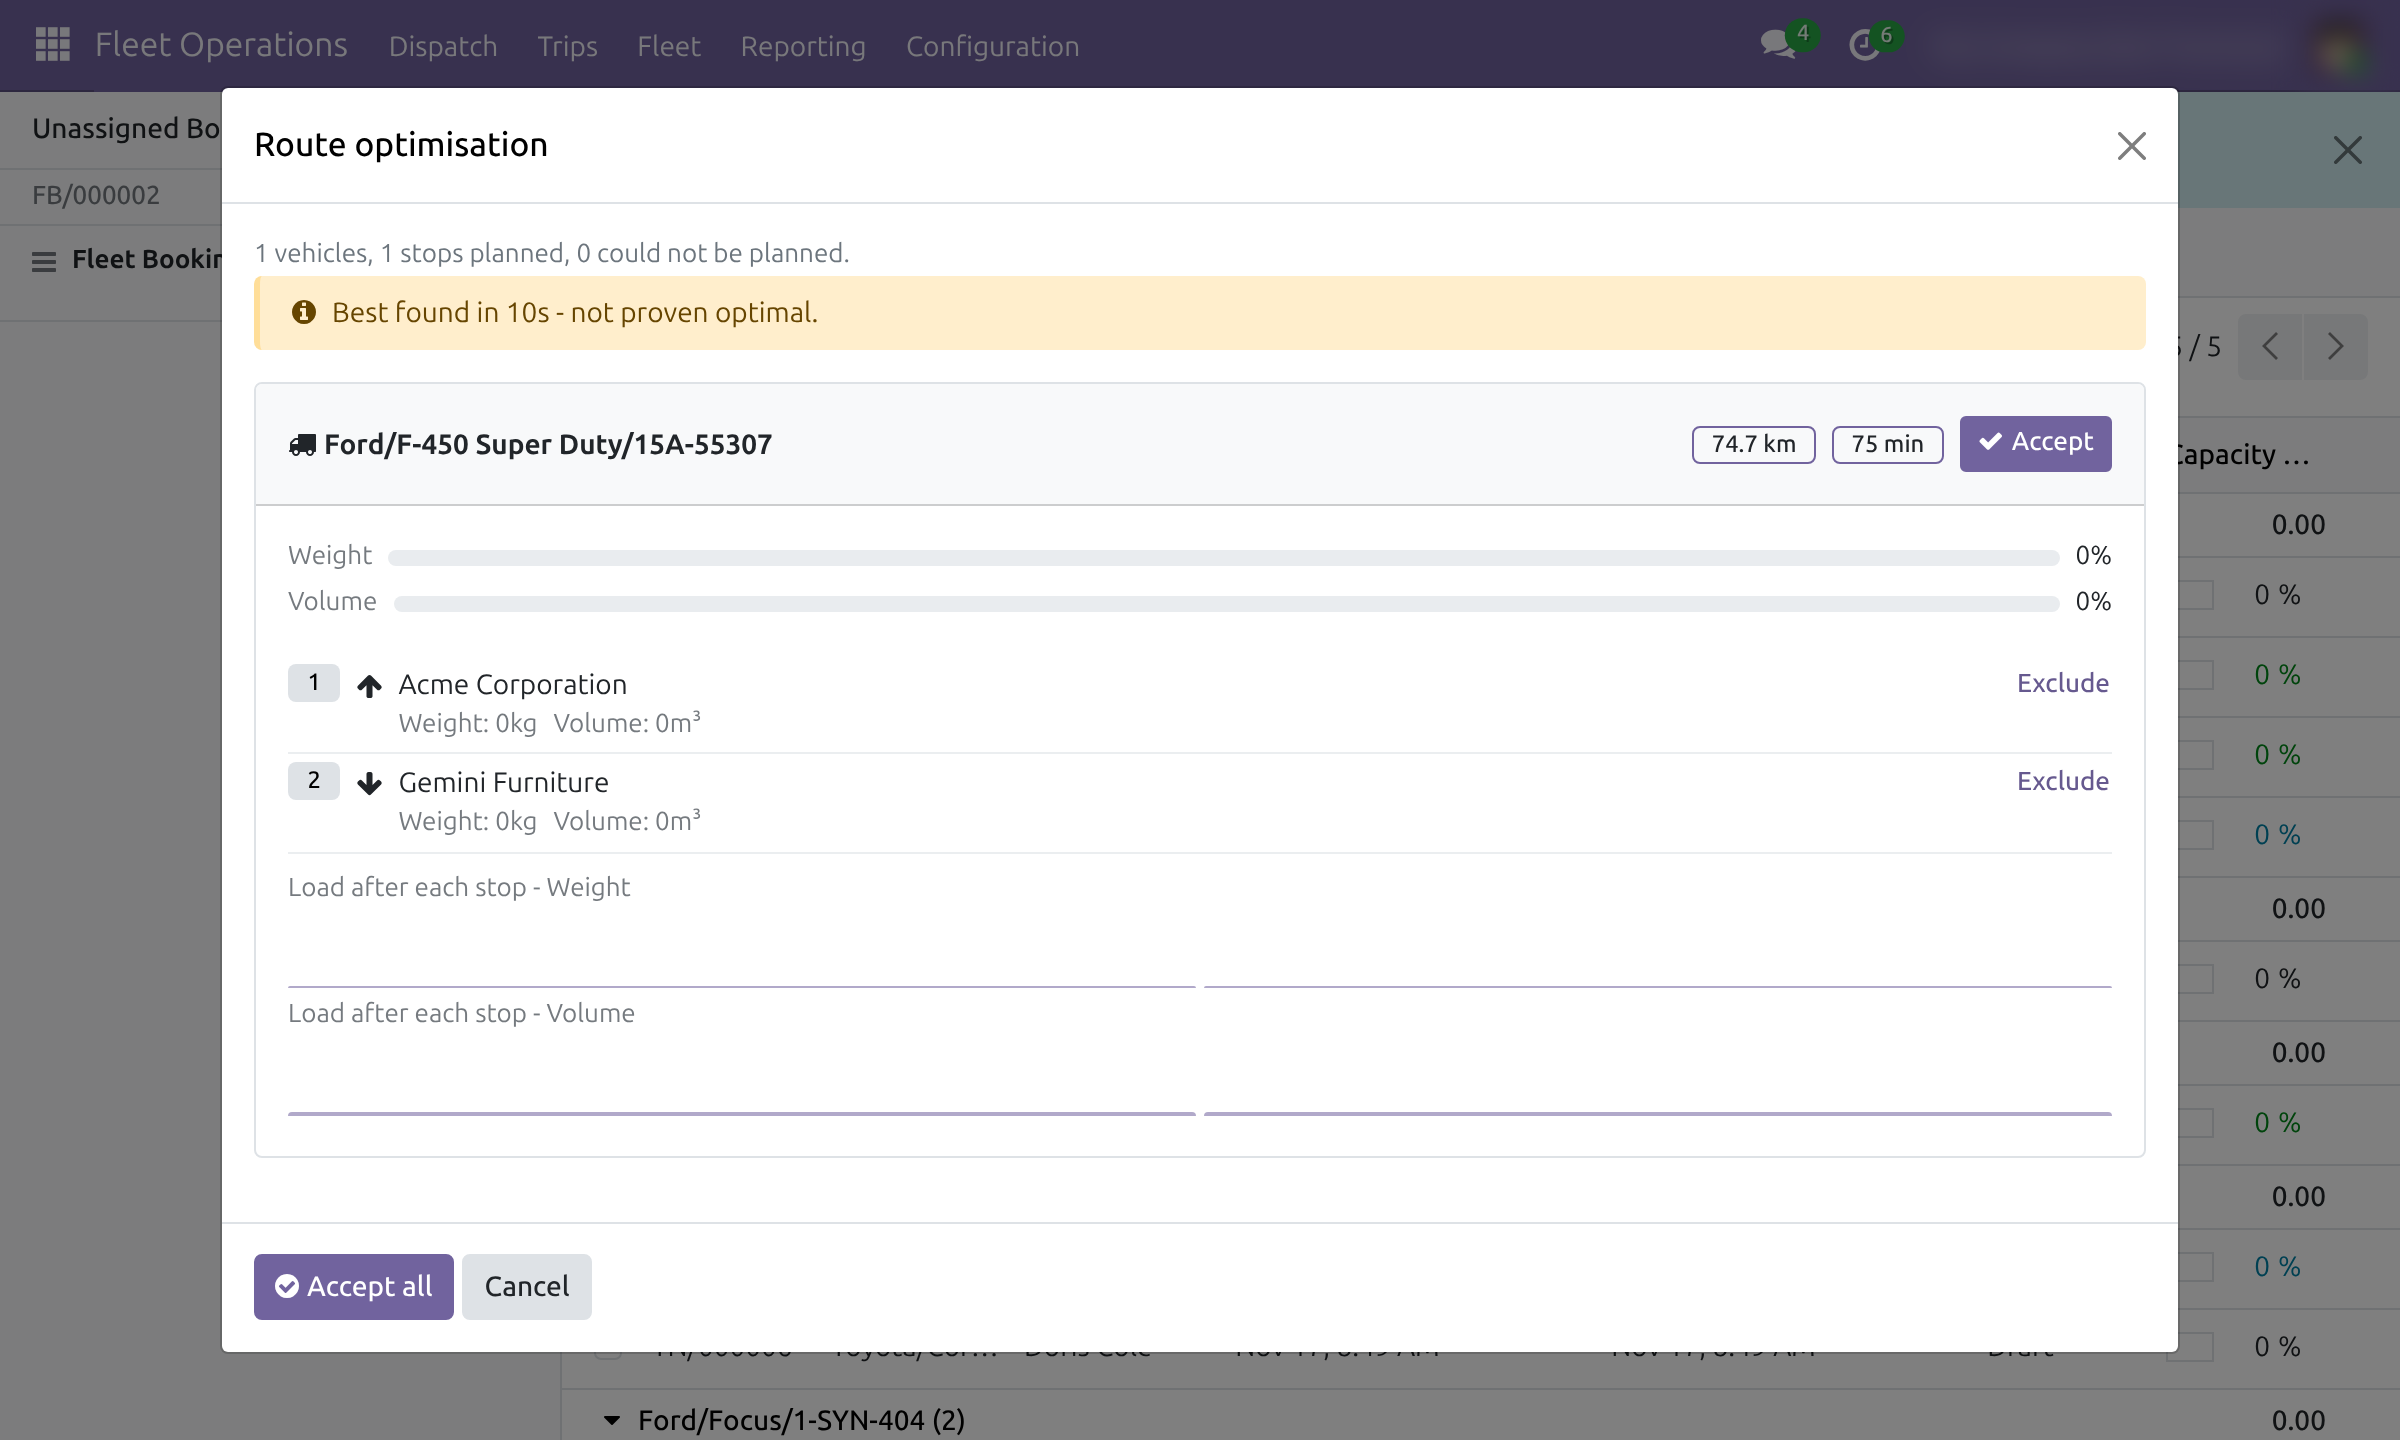
Read the proposal. Each vehicle has a card with the distance and duration of its route, a bar per capacity (Weight, Volume) and the ordered stops: a pickup arrow, a drop-off arrow and the address. The planning period runs from one hour before the earliest pickup or drop-off time of the waiting items to one hour after the latest, and every route must start and end inside it. A note such as Best found in 10s - not proven optimal. says that the search stopped at its time limit.
Click Exclude next to a stop to keep it out of the plan (the button then reads Include). Click Accept to apply one vehicle's route, or Accept all to apply every route. Cancel closes the window without changing anything.
Each accepted route is assigned to a trip of its vehicle: an existing Draft or Confirmed trip is reused, otherwise a Draft trip is created for the vehicle, scheduled at the first pickup and carrying the vehicle's driver. A message tells how many booking items were assigned, and the Unassigned Bookings panel stops listing them.
Booking items the optimiser cannot place are listed in Could not be planned with a reason: Missing coordinates (a pickup or drop-off address has no coordinates), No available vehicle, No feasible vehicle, Capacity, Seats or Time window. Click Fix to open the booking item, complete it, then run the optimiser again. A route also fails when the vehicle cannot return to its end address inside the planning period: choose a nearer Route End Depot on the vehicle.
Complete and confirm a trip
Open a trip from the board or from Fleet Operations ‣ Trips ‣ Planning (a calendar of the trips), Trips Confirmed, Trips in Operation or Trips Done.
Check the Vehicle and the Driver. A trip cannot be confirmed without a driver. Add the people who ride along in Assistants; the driver cannot also be an assistant.
The Route shows the route that matches the stops; it is created for you when no route fits. Departure and Destination show its first and last stop.
Open the Trip Waypoints tab. It lists the stops in order with their address, the Execution Status and the Arrival / Departure stamped by the driver. Drag the handle at the start of a line to reorder, or click Add a line to add a stop. Stops can be edited while the trip is in Draft or Confirmed.
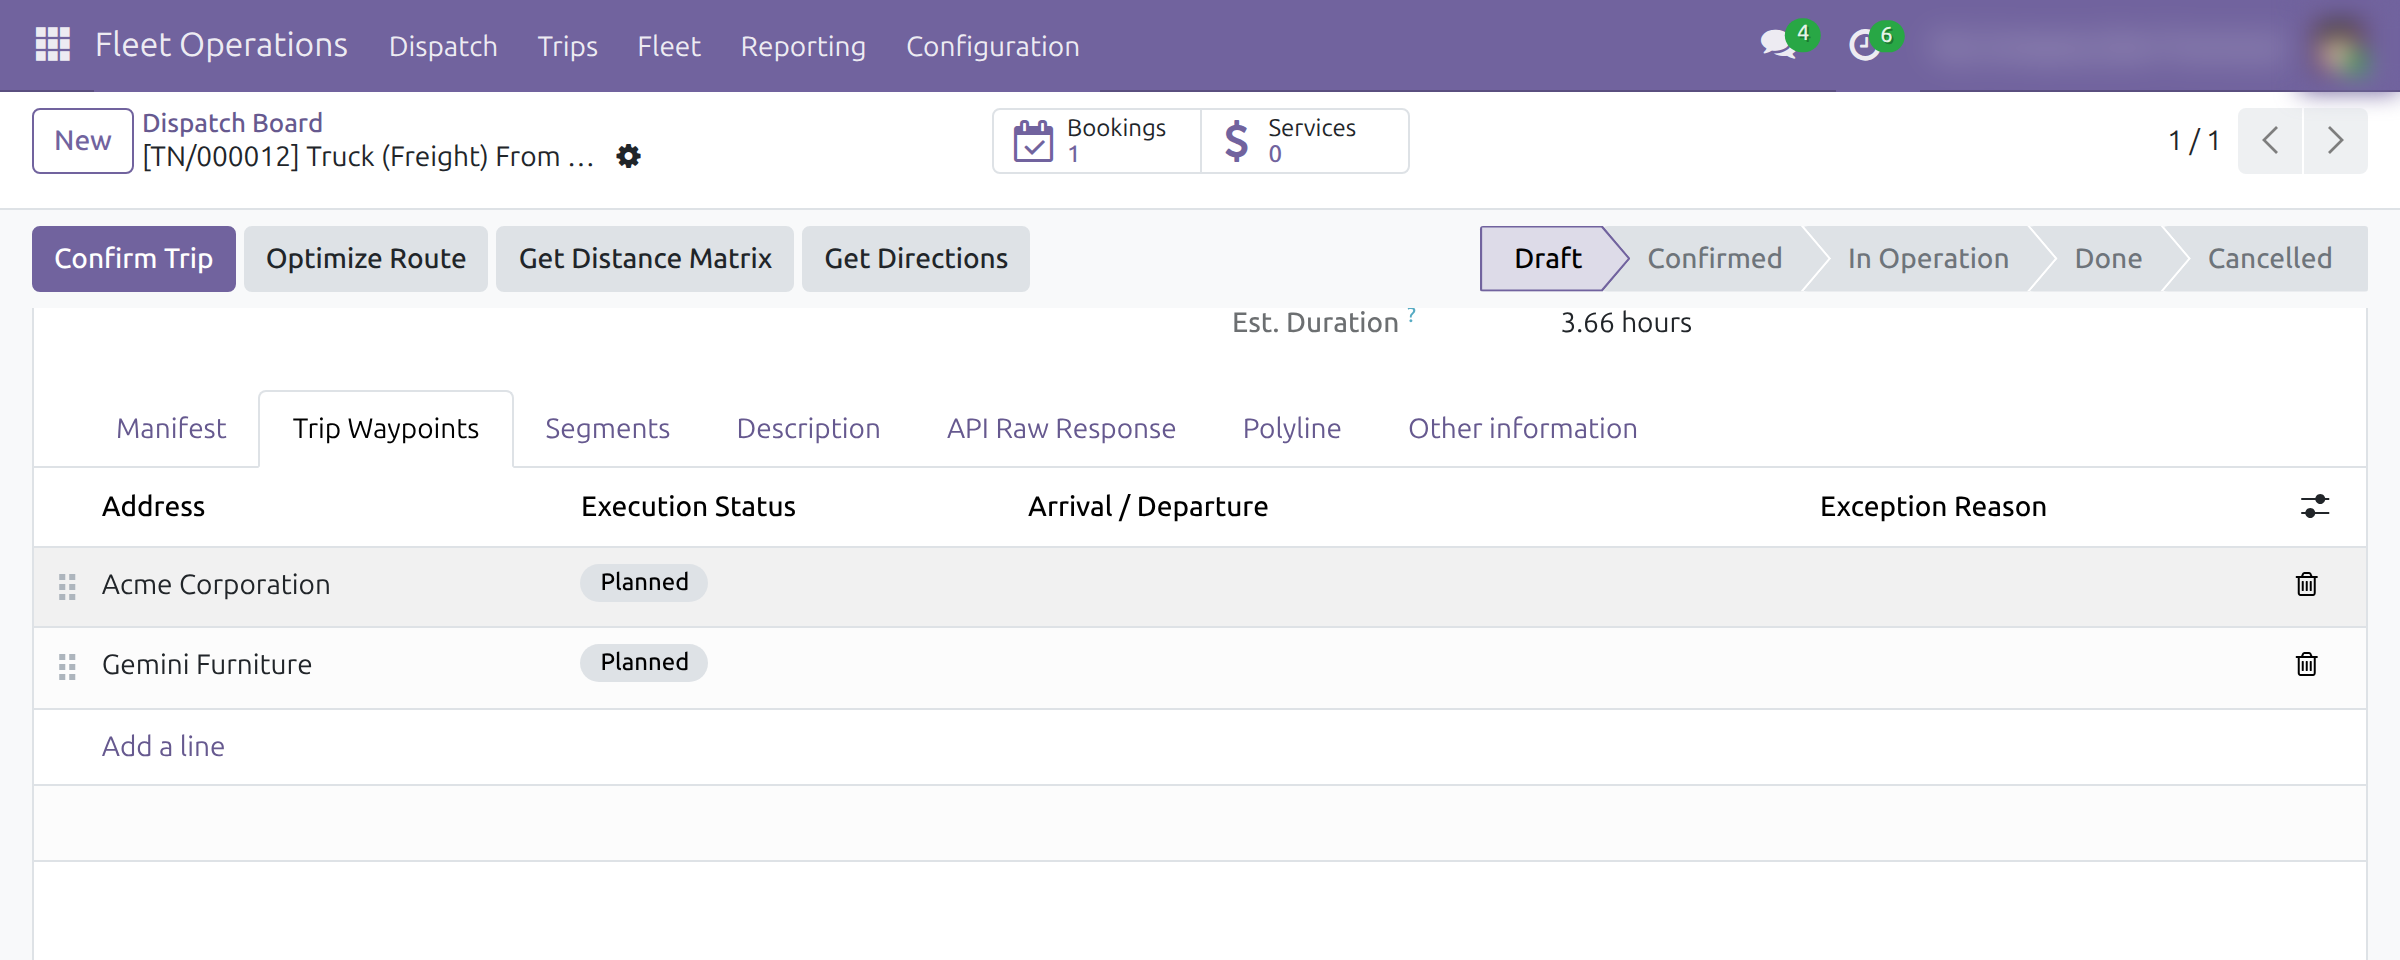
Click Optimize Route to reorder the stops so the trip is shorter; the Segments tab then shows each leg. A trip with fewer than two stops is left unchanged, and a message appears when no provider is available for the trip's transport mode.
Click Get Distance Matrix to fetch the distances between the stops, then Get Directions to fetch the route. Total Distance, Ave. Speed and Est. Duration are filled in. An address without coordinates stops the action with a message: complete the address and try again. These three buttons are shown while the trip is in Draft, Confirmed or In Operation; on a Done or Cancelled trip they are hidden.
Click Confirm Trip. A trip needs at least one stop and a driver to be confirmed. The driver receives an activity, and the trip appears in My Trips and under Trips Confirmed.
Starting a trip from the back office, logging services and ending it are the same as in Fleet Booking (see its documentation). The Log Service window then reads The cost is logged against the entire trip. Choose a trip waypoint or a trip section to log it there instead. and offers Trip Waypoint and Trip Section, so a cost is tied to the exact stop or leg it belongs to; leave both empty when the cost applies to the entire trip. The printed trip report lists the assistants, the stops, the segments and the route.
Driver: run a trip from My Trips
The driver needs the Fleet Driver (Execution) access right and a contact that is set as the Driver of the trip. My Trips is a single mobile screen; it shows only the Confirmed or In Operation trips of the signed-in driver. When there are several, a button per trip switches between them.
Open My Trips. The trip, its vehicle and a Start trip button appear.
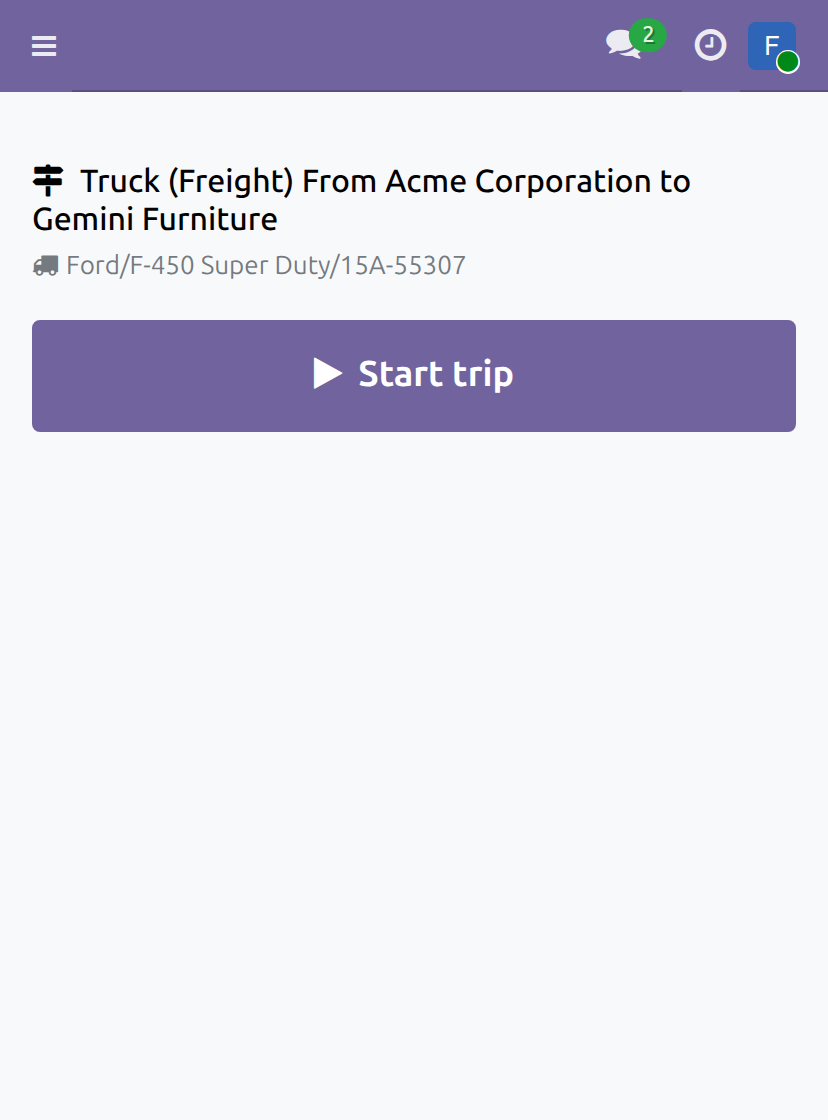
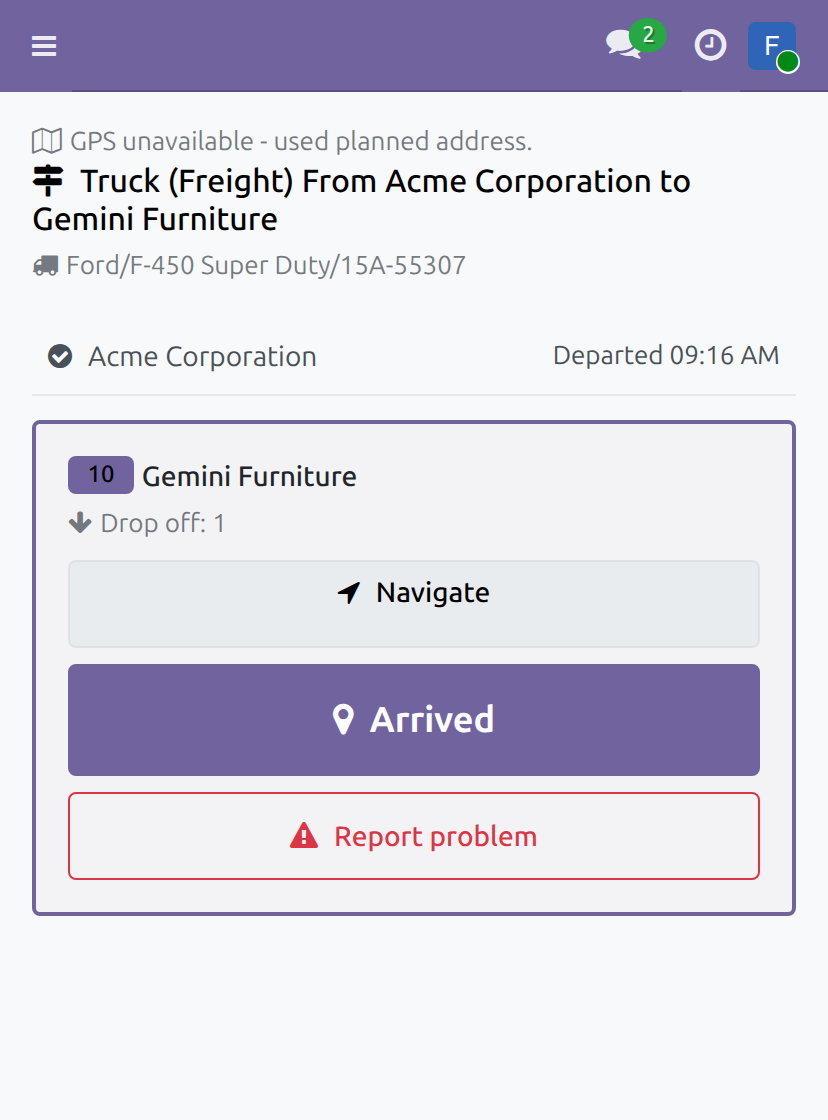
Tap Start trip. The trip is In Operation and the first stop opens as a card showing what happens there (for example Pick up: 1) and three buttons: Navigate opens the address in Google Maps, the main button records the next step, Report problem reports a failure.
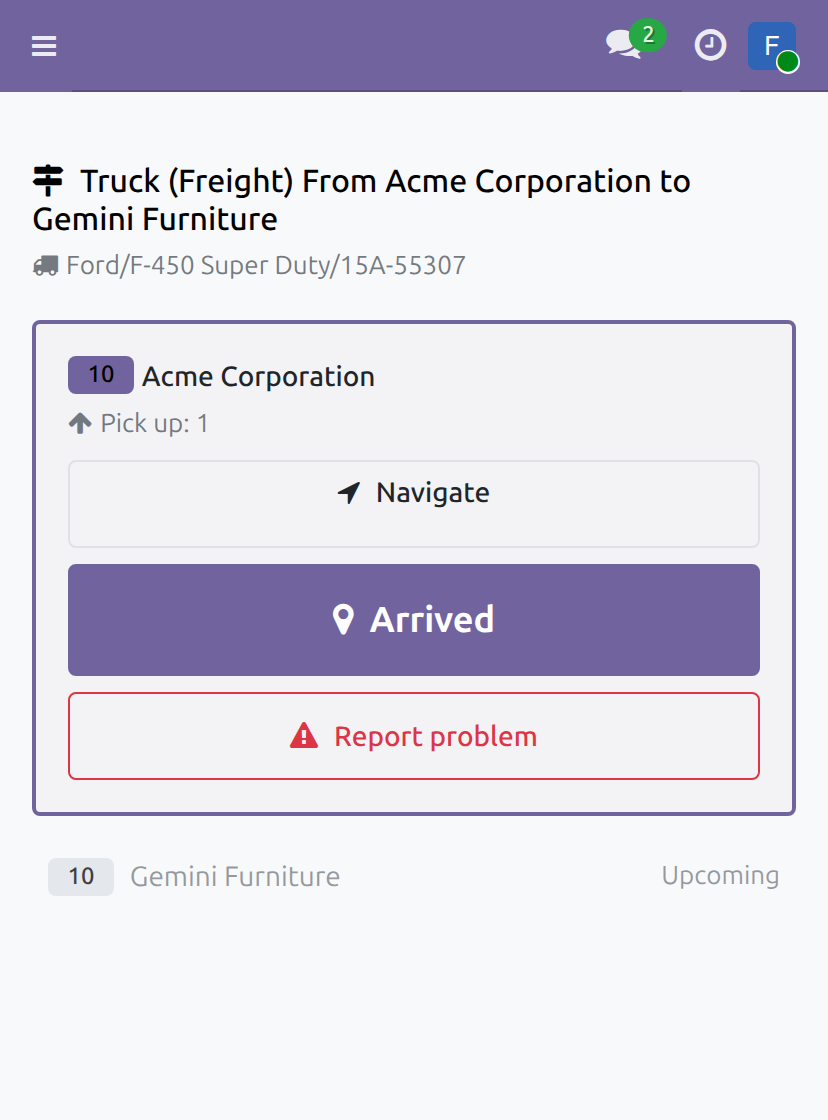
At each stop, tap the main button in turn: Arrived, then Loaded at a pickup or Delivered at a drop-off, then Depart. A stop without booking items goes from Arrived straight to Depart. Each tap stamps the time and, when the phone allows it, the position; the notice GPS unavailable - used planned address. tells that the planned address was recorded instead.
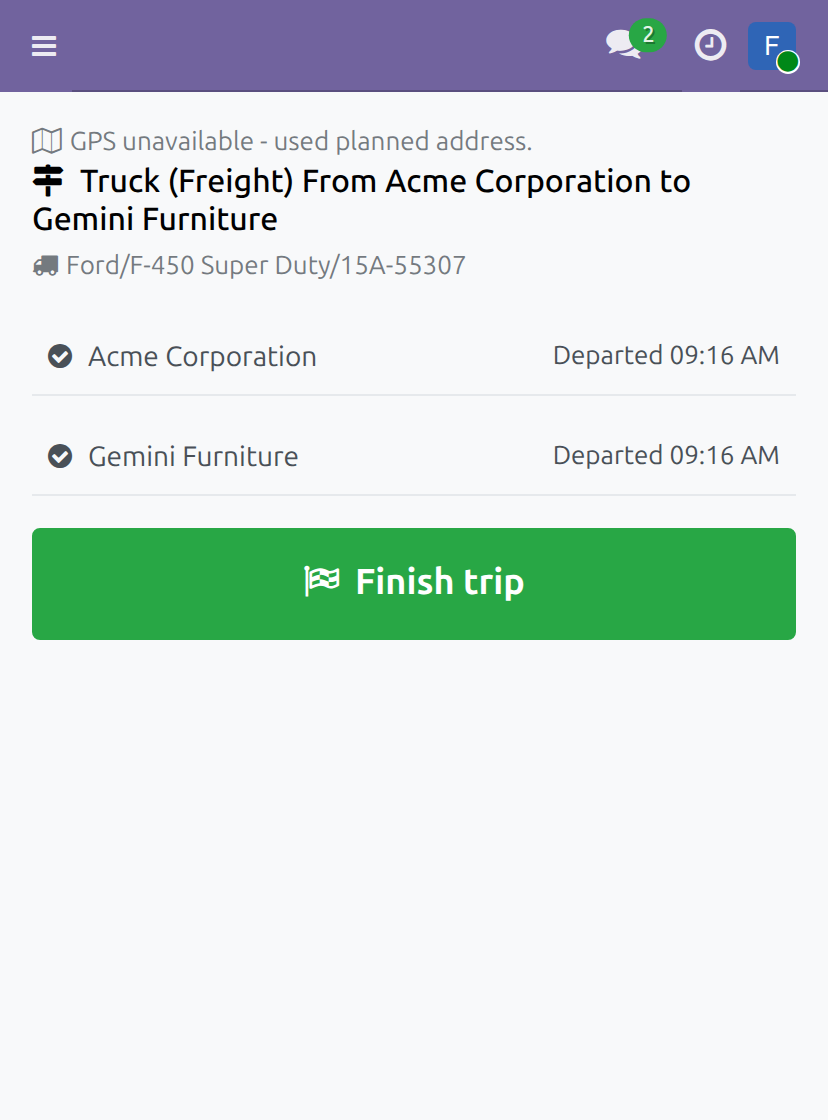
A completed stop shrinks to one line with its Departed time and the next stop opens.
When every stop is departed or failed, the green Finish trip button appears. Tap it. The trip is Done, the bookings whose booking items it carried are Done, and My Trips shows No assigned trips right now.
Report a problem at a stop
Use this when a stop cannot be completed, for example when nobody is there to receive the goods.
On the active stop, tap Report problem.
Tap the reason - Recipient absent, Refused, Closed or Other - and add a short note if you wish. Cancel closes the window.
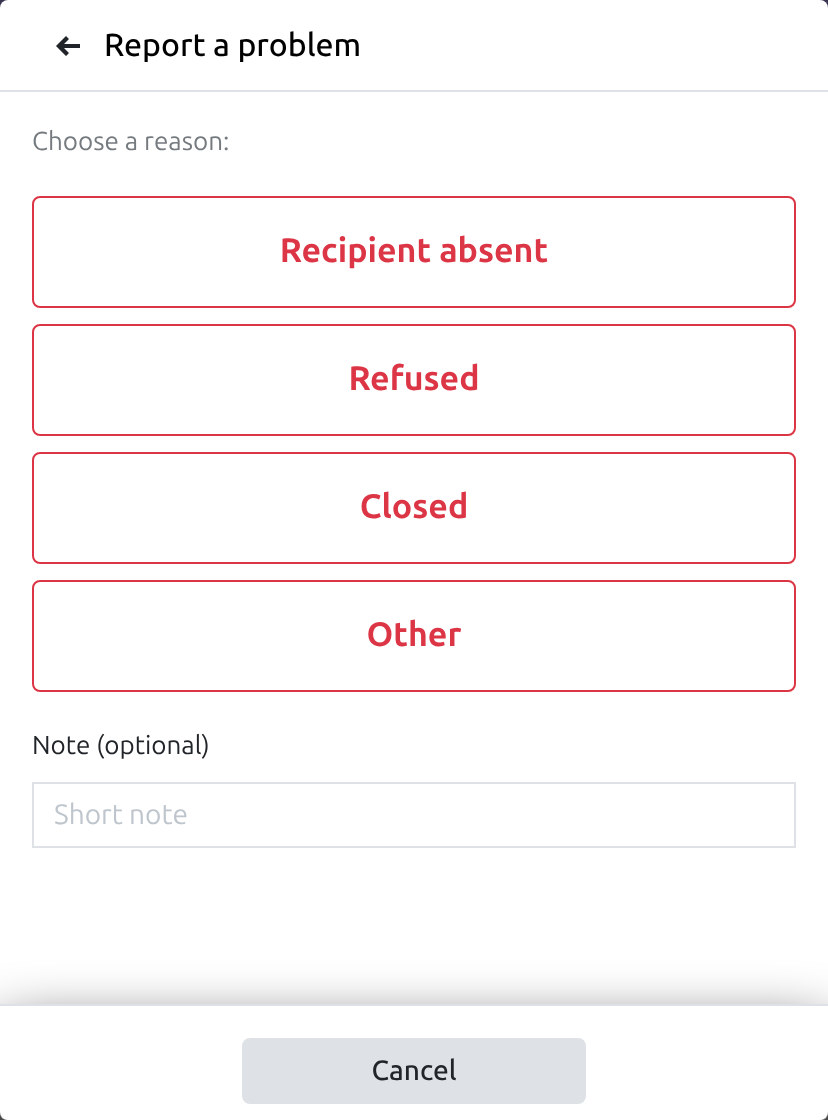
The stop is marked Failed with its reason and the next stop opens. A failed stop does not block Finish trip.
Fleet manager: follow the results
The fleet manager needs the Fleet Planning Administrator access right, which adds Reporting and Configuration to Fleet Operations.
Open Fleet Operations ‣ Trips ‣ Trips Done, open a trip and its Trip Waypoints tab to see what the driver recorded: the Execution Status, the Arrival / Departure of each stop and, for a failed stop, the Exception Reason. The columns shown can be changed with the options button at the end of the header.
A done trip also shows Actual Distance, Distance Deviation, Actual Duration, Time Deviation and Ave. Fuel Consumption per Hundred.
Fleet Operations ‣ Reporting ‣ Trips Analysis gains the distance measures and a Route filter and grouping. Fleet Booking Analysis summarises the bookings.
In the services and cost reports, the filters Route, Route Section and Address/Location select the costs tied to a route, a leg or an address.
Fleet Operations ‣ Fleet ‣ Fleet shows an Operation Distance per vehicle: the actual distance of its done trips.
This software and associated files (the "Software") may only be used (executed, modified, executed after modifications) if you have purchased a valid license from the authors, typically via Odoo Apps, or if you have received a written agreement from the authors of the Software (see the COPYRIGHT file).
You may develop Odoo modules that use the Software as a library (typically by depending on it, importing it and using its resources), but without copying any source code or material from the Software. You may distribute those modules under the license of your choice, provided that this license is compatible with the terms of the Odoo Proprietary License (For example: LGPL, MIT, or proprietary licenses similar to this one).
It is forbidden to publish, distribute, sublicense, or sell copies of the Software or modified copies of the Software.
The above copyright notice and this permission notice must be included in all copies or substantial portions of the Software.
THE SOFTWARE IS PROVIDED "AS IS", WITHOUT WARRANTY OF ANY KIND, EXPRESS OR IMPLIED, INCLUDING BUT NOT LIMITED TO THE WARRANTIES OF MERCHANTABILITY, FITNESS FOR A PARTICULAR PURPOSE AND NONINFRINGEMENT. IN NO EVENT SHALL THE AUTHORS OR COPYRIGHT HOLDERS BE LIABLE FOR ANY CLAIM, DAMAGES OR OTHER LIABILITY, WHETHER IN AN ACTION OF CONTRACT, TORT OR OTHERWISE, ARISING FROM, OUT OF OR IN CONNECTION WITH THE SOFTWARE OR THE USE OR OTHER DEALINGS IN THE SOFTWARE.