Spreadsheet Documents
by Viindoo
| Lines of Code | 10461 |
| Technical name | viin_spreadsheet |
| License | OPL-1 |
| Website | https://viindoo.com/apps/app/19.0/viin_spreadsheet |
| Required Apps | Discuss (mail) |
| Included Dependencies | Viindoo Base Documents Management Multilingual Tracking Token Expiration |
Build Spreadsheets Together, Without Leaving Odoo
Spreadsheet Documents turns any Document into a live, shared workbook - insert Odoo lists and pivots so the numbers stay tied to your data instead of a stale copy, and everyone with access edits the same sheet in real time.
Extends viin_document -
see its documentation.
Work on one sheet, not five versions
Real-time collaborative editing means every colleague sees the same live workbook, with each other's cursors and edits appearing as they happen. Nobody emails a spreadsheet back and forth or reconciles conflicting copies - there is exactly one version, and it saves itself.
Numbers that stay connected to Odoo
Insert a list or pivot straight from any Odoo view into a spreadsheet, then add a global filter that narrows every chart, list and pivot in the workbook from one place. The sheet stays a live view of the data instead of a snapshot that goes stale the moment a record changes.
One workspace, one set of access rules
A spreadsheet is a Document like any other - filed in a workspace, covered by the same sharing and permission rules your team already uses for every other file. Share it with a named colleague or the whole company at the access level you choose, comment on a specific cell, and roll back to an earlier version, all without a separate tool to manage.
Key Features
Real-Time Collaborative Editing
See every collaborator's live cursor and edits as they happen, saved automatically with no Save button, so nobody works from an outdated copy or loses changes to a conflict.
Insert Odoo Data into a Sheet
Send the rows of any list or pivot view straight into a new or existing spreadsheet, so a report stays tied to the records it came from instead of a copy-pasted snapshot.
Global Filters
Define one filter and narrow every pivot, list and chart in the workbook at once, instead of adjusting each one by hand.
Version History
Browse the complete, named history of a spreadsheet and restore or copy any earlier version, without asking anyone to dig up a backup.
Cell Comment Threads
Discuss a specific number right on the cell it concerns, with a full reply thread and a resolve state, so the conversation stays attached to the figure.
Share with Named People or the Whole Company
Grant named colleagues their own access level - Viewer or Editor - or open the document to everyone inside the company as viewers, all from the same Share dialog.
Add to Dashboard
Publish a spreadsheet as a live, still-editable entry in a Spreadsheet Dashboard group, so a status report stays current for everyone who reads it.
Spreadsheet Templates
Save any workbook as an organisation-wide template, so the next budget, report or tracker starts from a finished layout instead of a blank grid.
Export to Excel or JSON
Take a finished workbook back out as a genuine Excel file or raw JSON, straight from the editor's File menu.
Favourite Your Key Spreadsheets
Star the workbooks you return to most, right from the editor toolbar, and find them faster the next time you open Documents.
How It Works
Start from Documents. Open the Documents app, choose New > Spreadsheet, and pick Blank or a template from the gallery. The workbook opens directly in the editor - no separate Save step.
Bring in the team. Open File > Share, set internal access to Viewer or Editor, and invite specific colleagues by name. Everyone with access opens the same live document, sees each other's cursors, and every edit commits automatically as it's typed.
Pull in the numbers. From any Odoo list or pivot view, use Actions > Spreadsheet > Insert list in spreadsheet to send the visible rows into the workbook, then add a global filter so every connected source narrows together.
Discuss and decide. Right-click a cell to insert a comment thread, or open View > All Comments to see every open discussion on the sheet at once; mark a thread resolved once it's settled.
Keep a history, then publish. Use File > Version History any time to review or restore an earlier state, and File > Add to Dashboard to publish the finished workbook as a live entry the team reads from the Dashboards app.
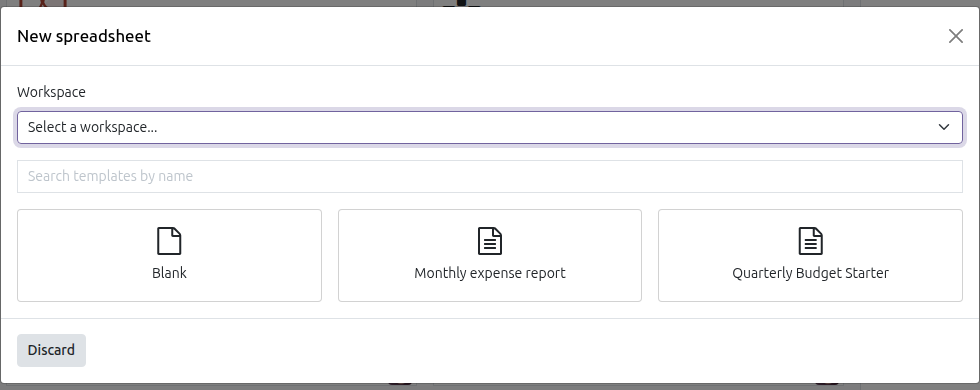
Start blank, or from a saved template
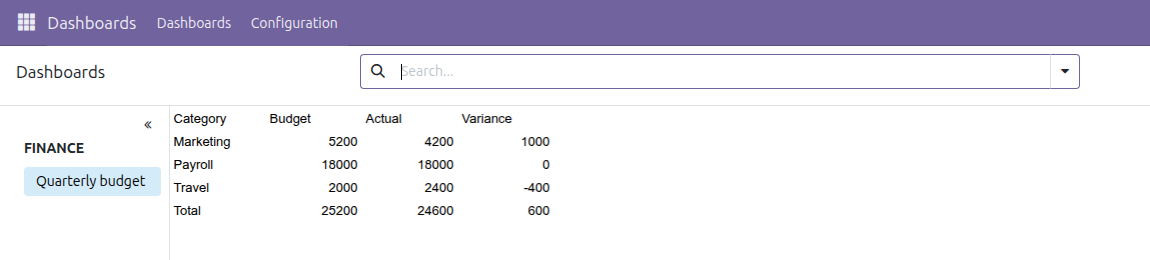
A published spreadsheet, live on the Finance dashboard
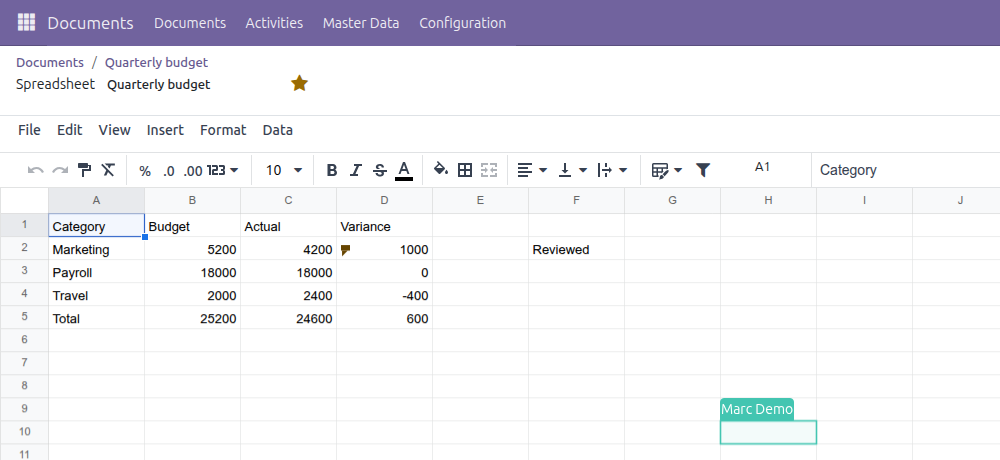
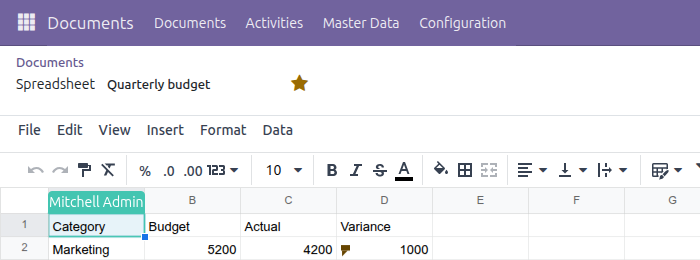
Two People, One Live Sheet
Marc's own session is open on this same workbook. His named cursor shows exactly where he's working, and the cell he just filled in - "Reviewed" - is already here, with no refresh needed on this side.
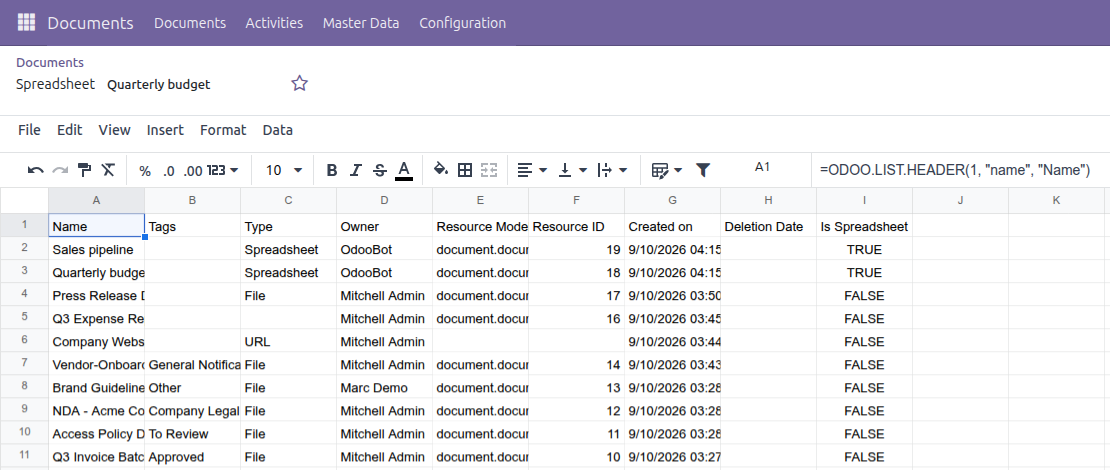
A Real Odoo List, Living in the Sheet
Send the rows of any Odoo list view into a spreadsheet in one click. Here, the Documents list itself becomes a sheet tab, sitting right alongside the workbook's own formulas.
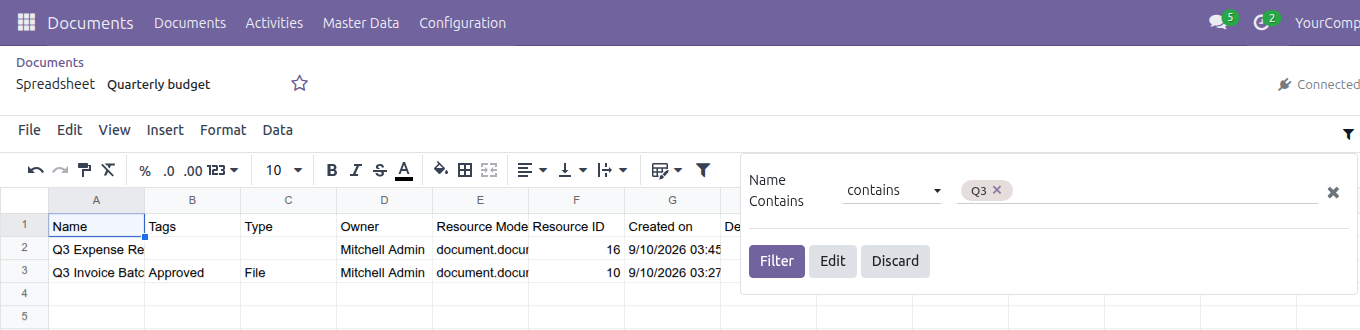
One Filter, Every Chart and List
Define a global filter once - here, a "Name Contains" text filter set to "Q3" - and every linked list, pivot and chart in the workbook narrows to match, instantly.
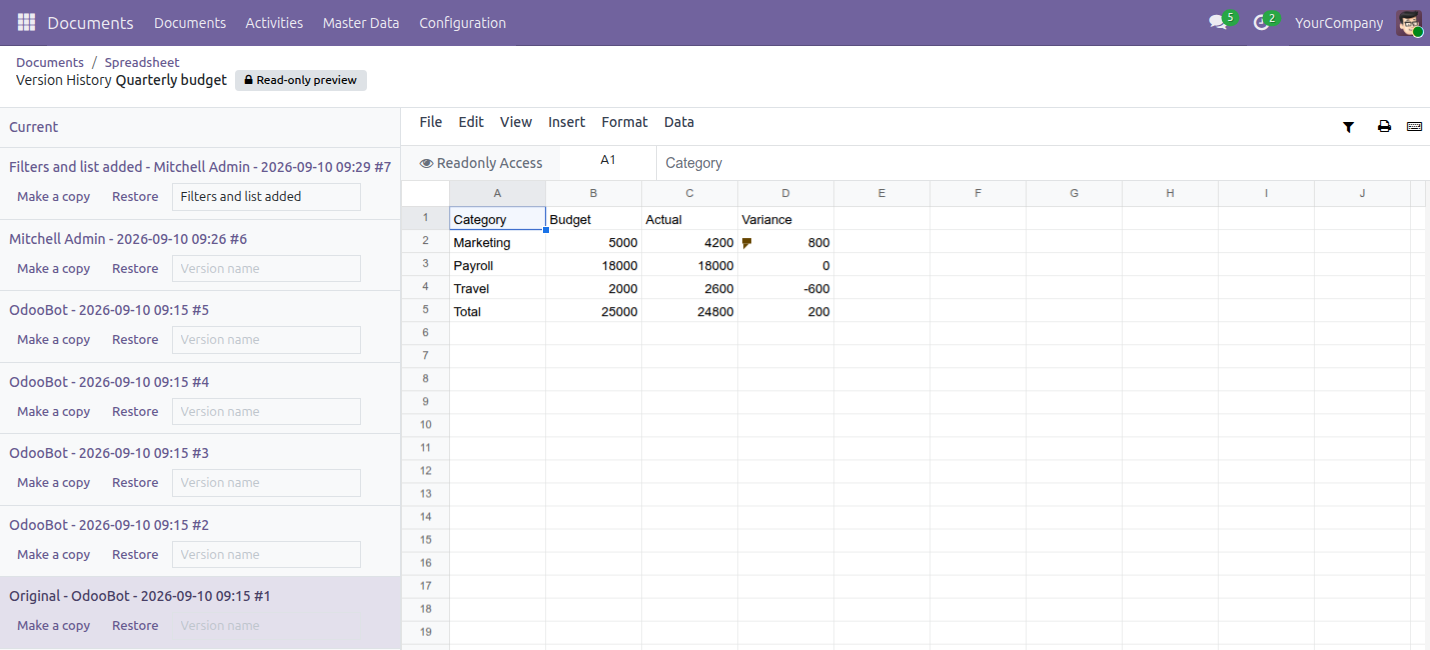
Every Version, Named and Restorable
File > Version History lists the complete, ordered history of a spreadsheet. Select any earlier entry - here, the very first save - to preview it read-only before restoring or copying it.
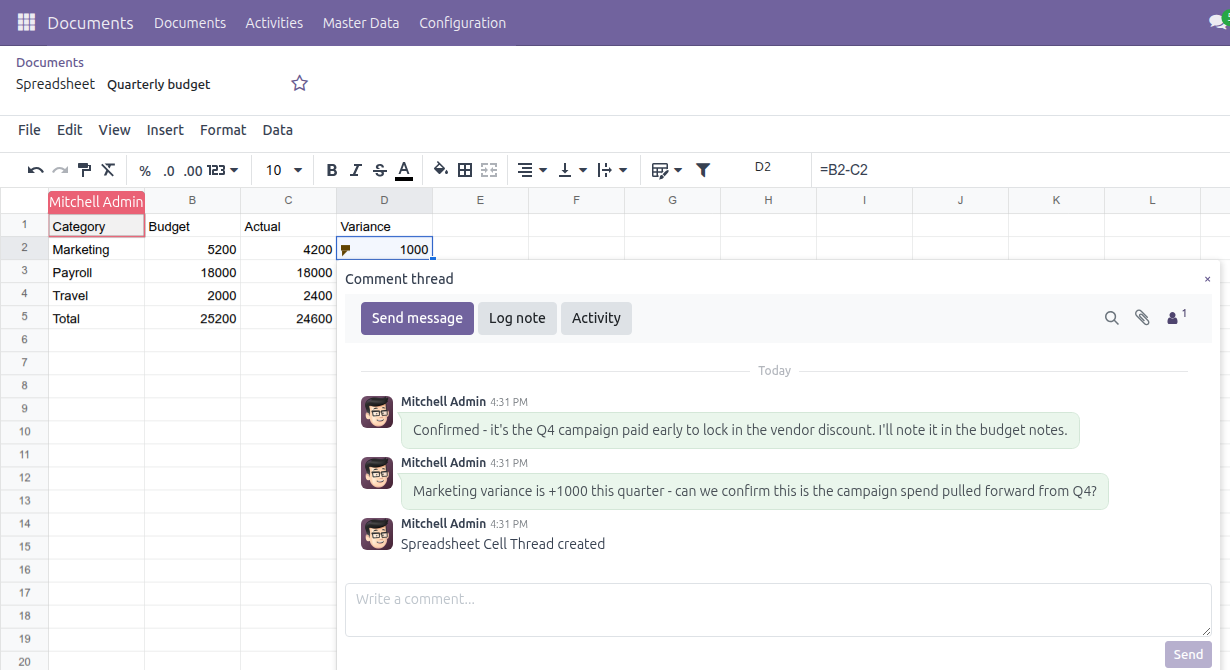
A Conversation, Attached to the Number
Right-click a cell to open its comment thread. The question and the answer stay pinned to the exact figure they're about, with a small flag marking the cell for anyone who opens the sheet later.
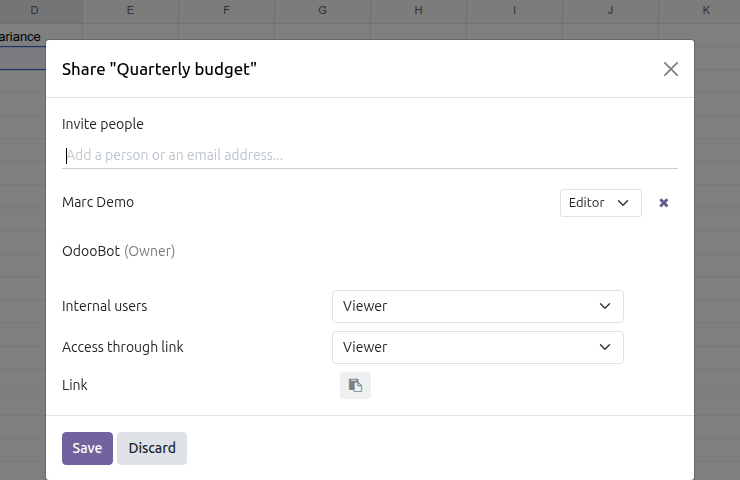
Share It Exactly as Far as It Should Go
Set internal access to Viewer for the whole company, then invite one colleague by name at their own access level - here, Marc Demo as an Editor - without changing anyone else's access.
Publish a Live Entry to a Dashboard
File > Add to Dashboard puts the spreadsheet straight onto a dashboard group - Finance, Sales, or any other - as a live, still-editable entry everyone on the team can open.
Turn Any Workbook into a Starting Point
File > Save as Template makes any spreadsheet available to the whole organisation from then on, listed under Documents > Configuration > Spreadsheet Templates with who created it and when.

Find Your Key Spreadsheets Faster
One click on the star in the editor toolbar favourites the open spreadsheet, so it's quicker to find the next time you're back in Documents.
Need help with Spreadsheet Documents?
Support
apps.support@viindoo.comSee It Running
Try the Live DemoTechnical Requirement
- Odoo version: 19.0
- Editions: Odoo Community Edition, Viindoo SaaS
-
Required app: Documents (
viin_document) - a spreadsheet is a Document, filed in a workspace with the same access rules as any other file - Also uses: Odoo's own Spreadsheet and Spreadsheet Dashboard frameworks
- License: OPL-1
Frequently Asked Questions
Which Odoo edition does this need?
Odoo Community or Viindoo SaaS. No Enterprise edition or Enterprise-only feature is required.
Does it turn itself on when installed?
No. Spreadsheet Documents is installed explicitly from Apps - it doesn't activate on its own.
What does it depend on?
The Documents app (viin_document) - a spreadsheet is a Document, filed in a
workspace with the same access rules as any other file - plus Odoo's own spreadsheet and
dashboard frameworks. Install Documents first if it isn't already on your instance.
Do I need demo data to try it?
No. A production install ships with the templates gallery empty and no sample workbooks; everything in this listing works from a fresh install. A demo dataset (two sample spreadsheets, one template, one shared example) is only present on demo databases.
Can I share a spreadsheet with just one colleague instead of the whole company?
Yes - invite them by name from the Share dialog and set their own access level, Viewer or Editor, without changing what anyone else in the company can see.
Spreadsheet Documents
Note
Extends viin_document - see its documentation.
Installation
- Open Apps.
- Search for "Spreadsheet Documents".
- Click Activate.
Installing Spreadsheet Documents also installs, on your behalf, the apps it depends on: Documents, and Odoo's own Spreadsheet and Dashboards frameworks. You never install these separately. Once installation finishes, opening a document from the Documents app can put you straight into a live, editable spreadsheet.
Configuration
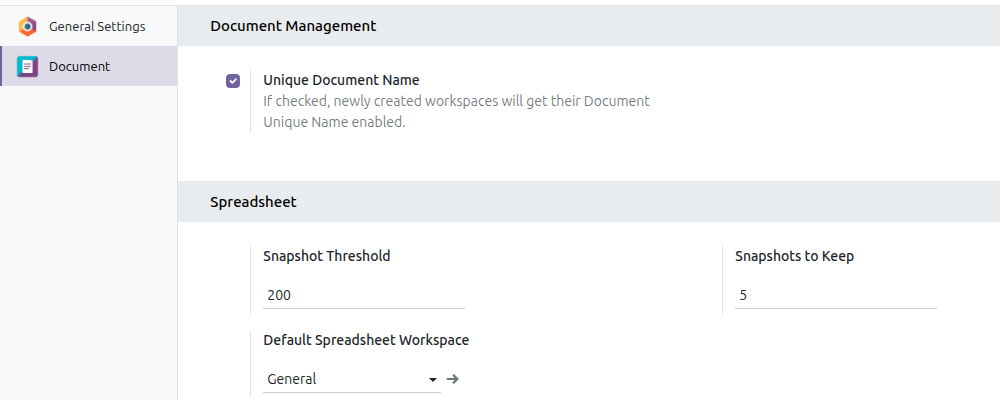
Tune how a spreadsheet's history is kept
This is optional - a fresh install already ships with working defaults.
- Open Settings ‣ General Settings.
- Open the Document tab.
- Under Spreadsheet, set Snapshot Threshold (how many saved changes build up before a spreadsheet's history is compacted for anyone who joins it), Snapshots to Keep (how many past compactions are kept alongside the original), and Default Spreadsheet Workspace (where a spreadsheet created from an Odoo list or pivot view lands).
- Click Save.
Usage
A spreadsheet is a Document like any other - it lives inside a workspace, and the same access rules that cover any other file in Documents cover it too. Open Documents ‣ Documents to reach every spreadsheet the same way you reach any other file.
Create a new spreadsheet
- Open Documents ‣ Documents.
- In the left panel, click the workspace you want the new spreadsheet to land in (for example General).
- Click New, then Spreadsheet.
- If no specific workspace was active, pick one first under Workspace.
- In the gallery that opens, click Blank for an empty workbook, or click any of the organisation's own templates to start pre-filled with that template's layout and formulas.
The workbook opens straight in the editor - there is no separate Save step; every change you make from here on is kept automatically.
Turn a spreadsheet into a reusable template
- Open the spreadsheet you want to reuse as a starting point.
- Open the File menu and click Save as template.
- Edit Template name - it starts pre-filled with the document's own name.
- Click Save as template to confirm.
The template becomes available to anyone in the organisation the next time they create a spreadsheet, listed under Documents ‣ Configuration ‣ Spreadsheet Templates with who created it and when. From that same list you can also click New spreadsheet on any template's row to start a new document from it directly, Edit to change the template itself, or Make a copy to duplicate it.
Import a file as a new spreadsheet
- Open Documents ‣ Documents and pick a workspace.
- Click New, then Import spreadsheet.
- Choose an .xlsx or .csv file from your computer under Spreadsheet file.
- Click Import.
Charts and images in the source file are never carried over; everything else is meant to become an editable spreadsheet.
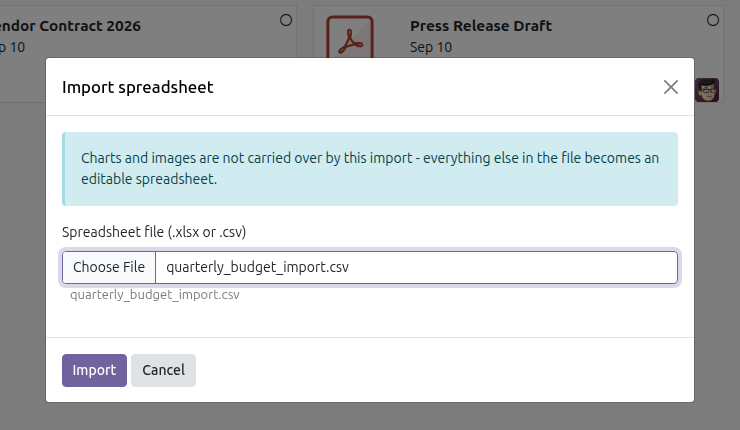
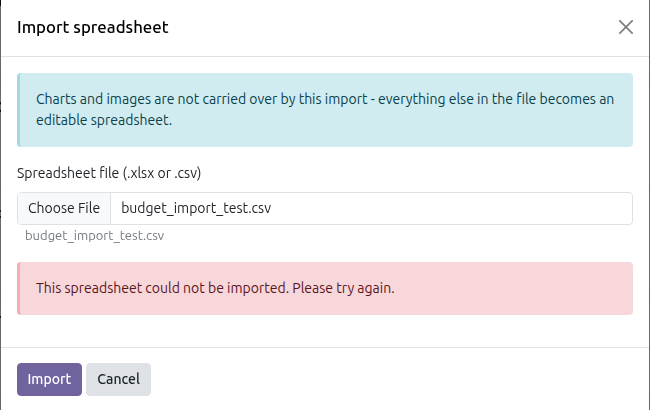
At the time of writing, this Import step can fail on a well-formed .xlsx or .csv file with the message "This spreadsheet could not be imported. Please try again." - see Troubleshooting below before relying on it.
Co-edit a spreadsheet with colleagues in real time
Open a spreadsheet that others also have access to, and simply start editing - there is nothing extra to turn on.
Every colleague who has the document open sees your cursor, labelled with your name, moving as you work, and every cell you fill in appears on their screen the moment you type it - with no manual refresh and no Save button anywhere. If two people edit different cells at the same time, both changes are kept.
Mark a spreadsheet as a favourite
- Open the spreadsheet.
- Click the star icon next to its name in the toolbar.
The star fills in gold and the button now reads Remove from favorites; click it again to unmark the spreadsheet. This is the only place in the app where favouriting a document is available.
Browse a spreadsheet's version history and restore an earlier version
- Open the spreadsheet.
- Open the File menu and click Version History.
- In the left panel, every past state is listed, newest first, labelled with who made the change and when; type into Version name on any entry to give it a name you will recognise later.
- Click an entry to preview that point in time - the grid switches to a Read-only preview and nothing there can be edited.
- Click Restore on that entry to roll the live document back to it, or Make a copy to open that state as a brand-new, independent document instead.
Restoring adds a new entry at the top of the history rather than deleting anything that came after it, so the history itself is never lost.
Share a spreadsheet with specific people or the whole company
- Open the spreadsheet.
- Open the File menu and click Share.
- Under Invite people, search for a colleague and pick the access level next to their name (Viewer or Editor).
- Set Internal users to control what every other colleague in the company can do with the document by default - None, Viewer, or Editor.
- Click Save.
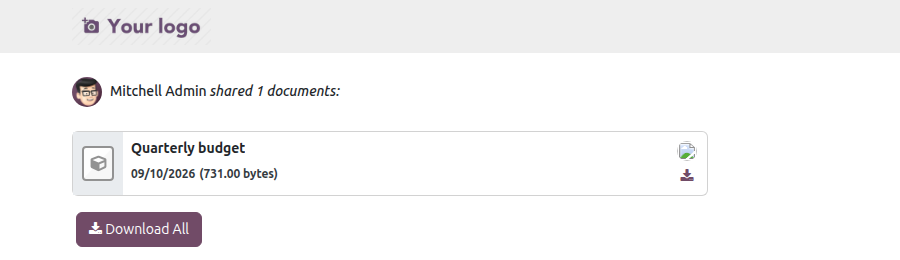
Share a spreadsheet through a public link
- Open the spreadsheet, open the File menu, and click Share.
- Set Access through link to Viewer.
- Click the copy icon next to Link, then click Save.
- Hand the copied link to anyone, inside or outside the company.
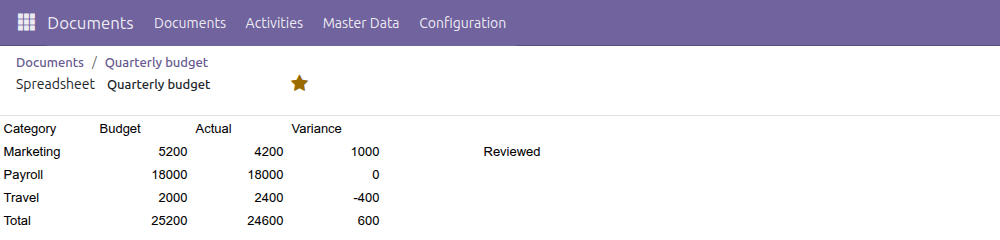
Whoever opens that link, with no Odoo login at all, reaches a page that names the document and lets them download it; nothing on that page can be edited or typed into. Set Access through link back to None at any time to stop the link from working.
Discuss a specific cell with a comment
- Open the spreadsheet and click the cell you want to discuss.
- Open the Insert menu and click Insert comment.
- Type your message and send it.
A small flag appears on the cell for anyone who opens the sheet afterwards. Open the View menu and click All Comments to see every comment thread on the sheet in one panel, reply to any of them, and click Resolve once a discussion is settled.
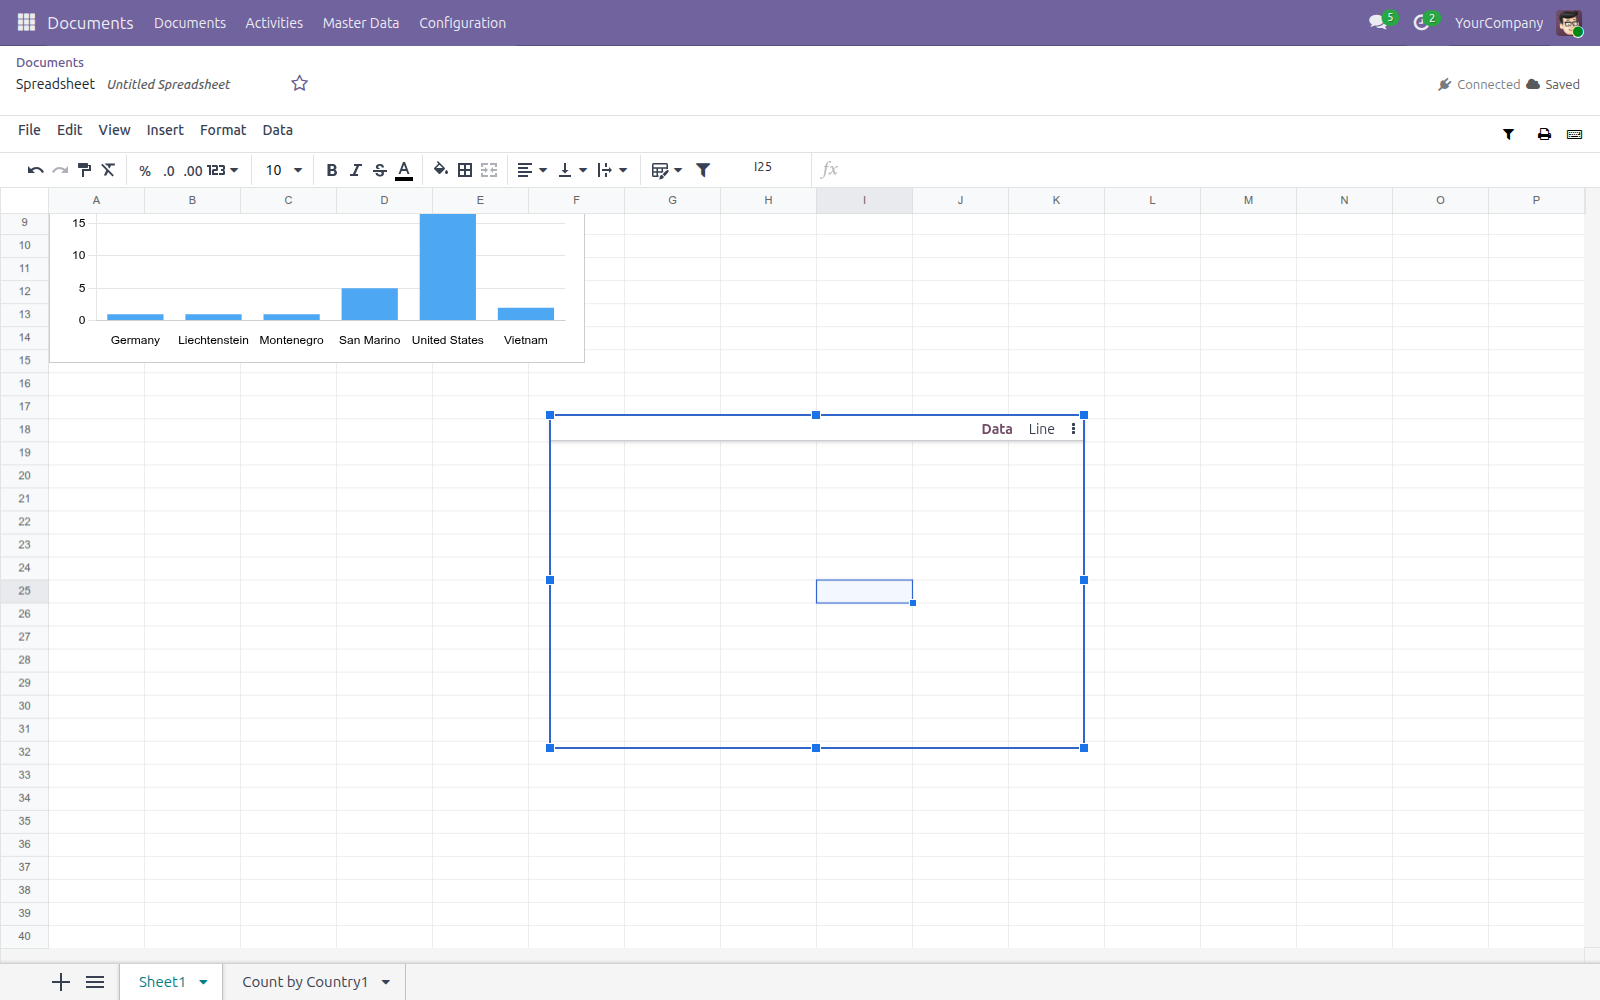
Build a chart from your records
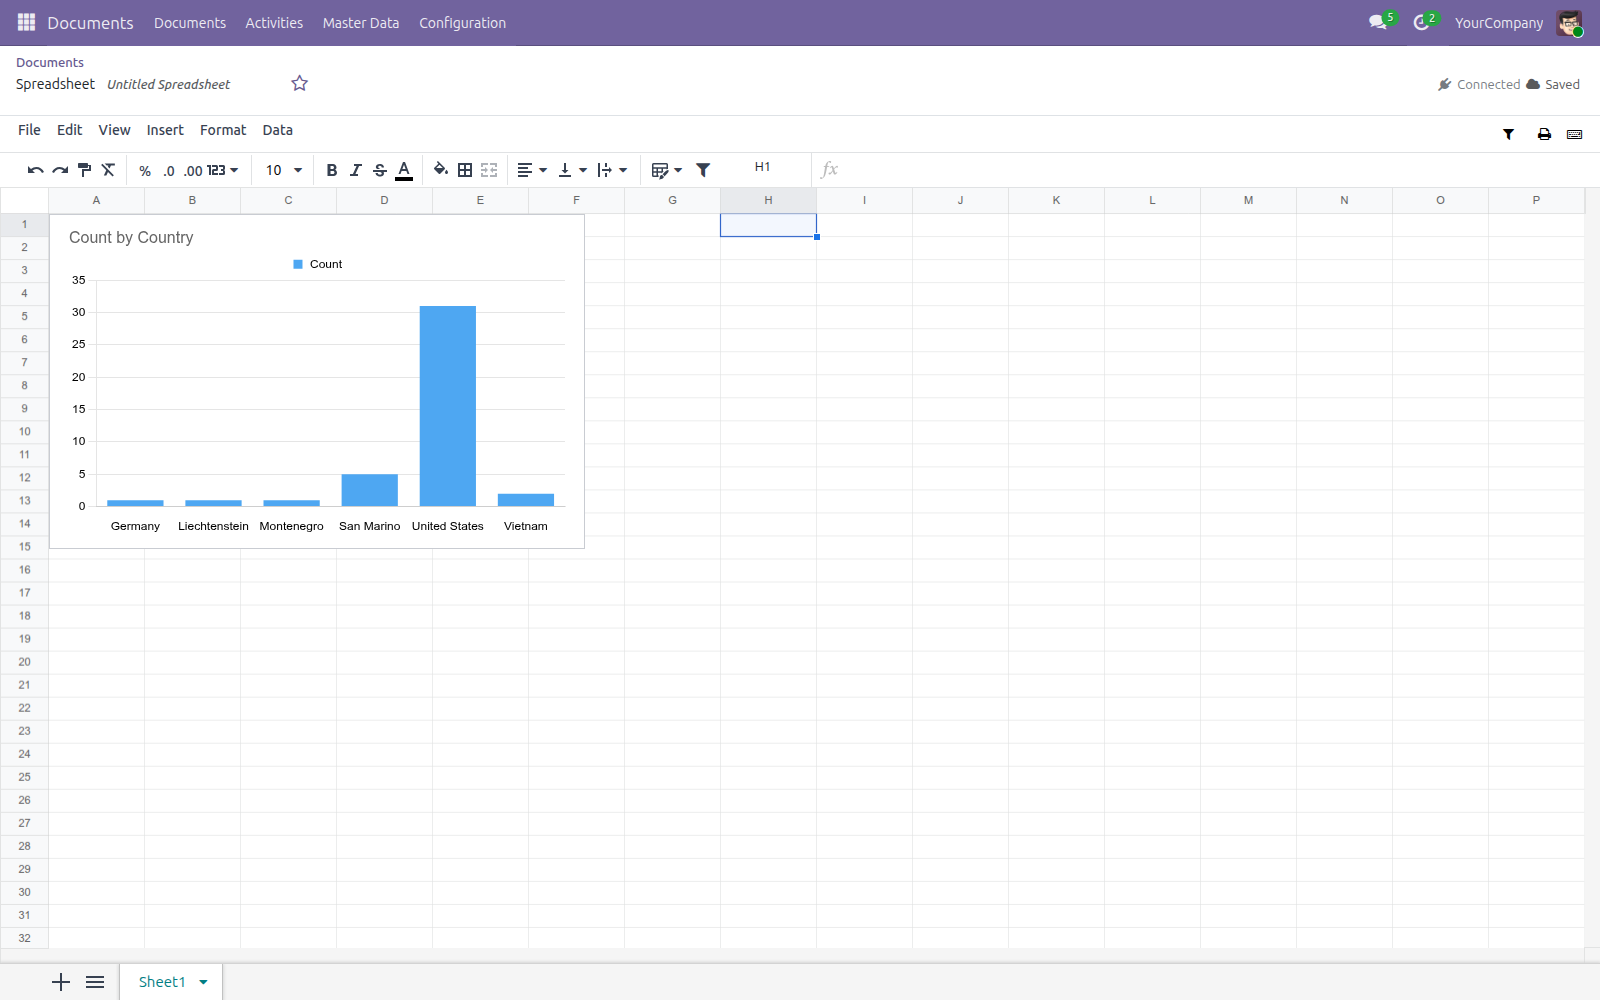
A chart can be drawn two ways: from cells already on the sheet, or straight from your records - with nothing to copy into cells first.
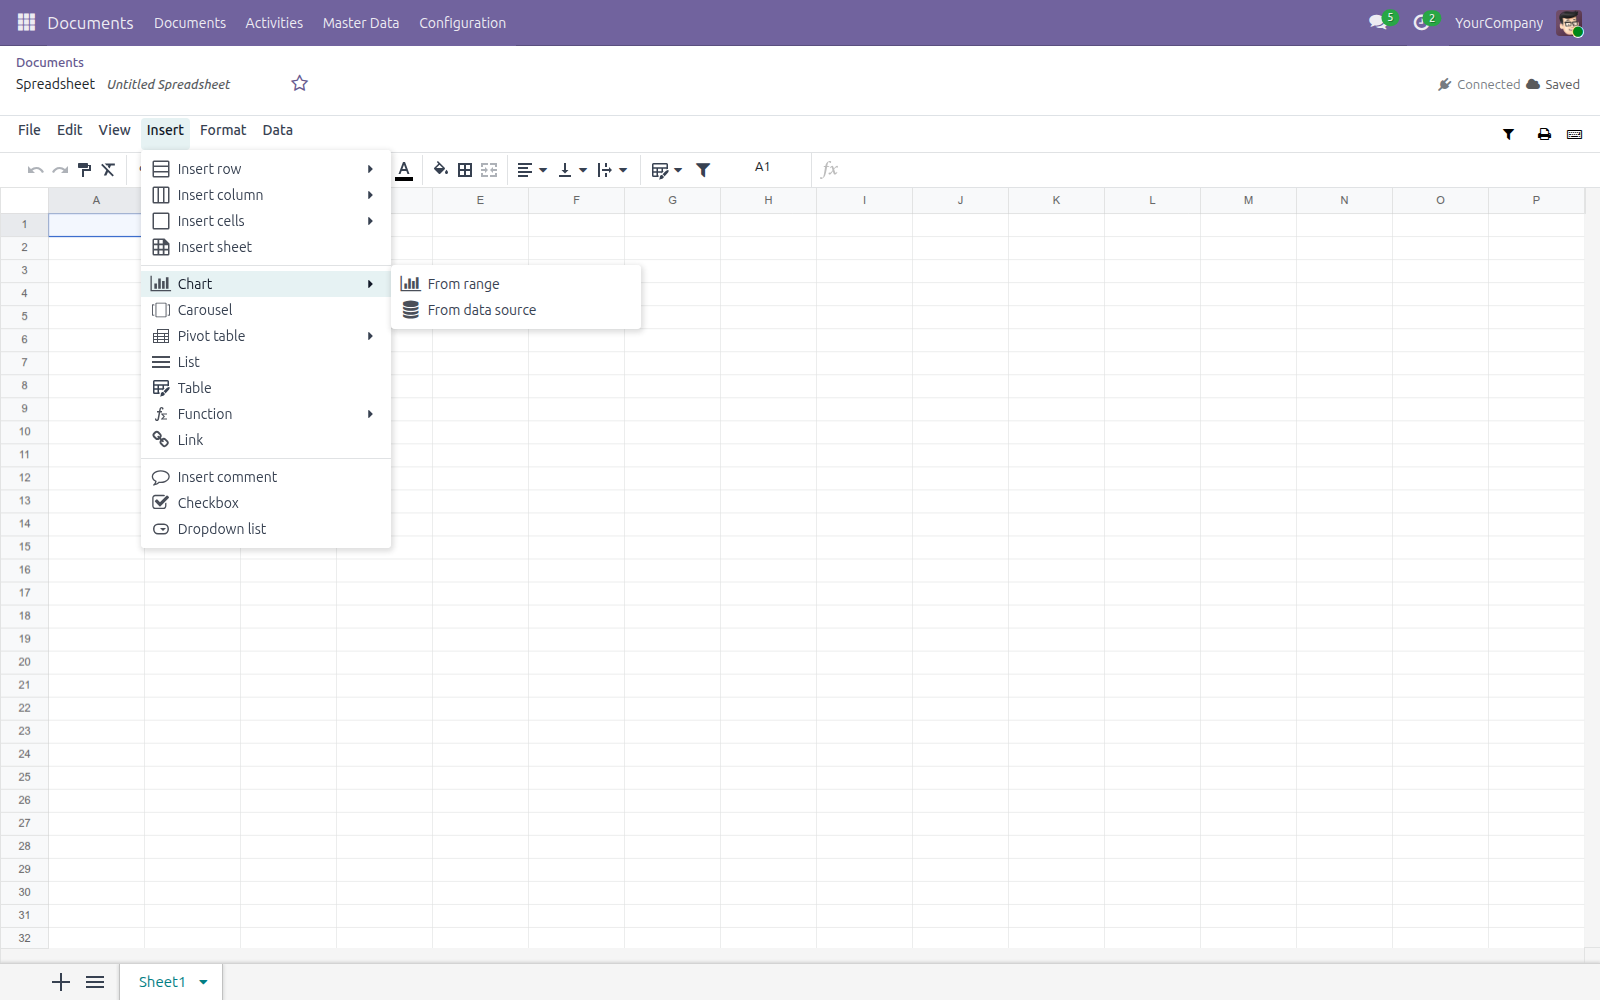
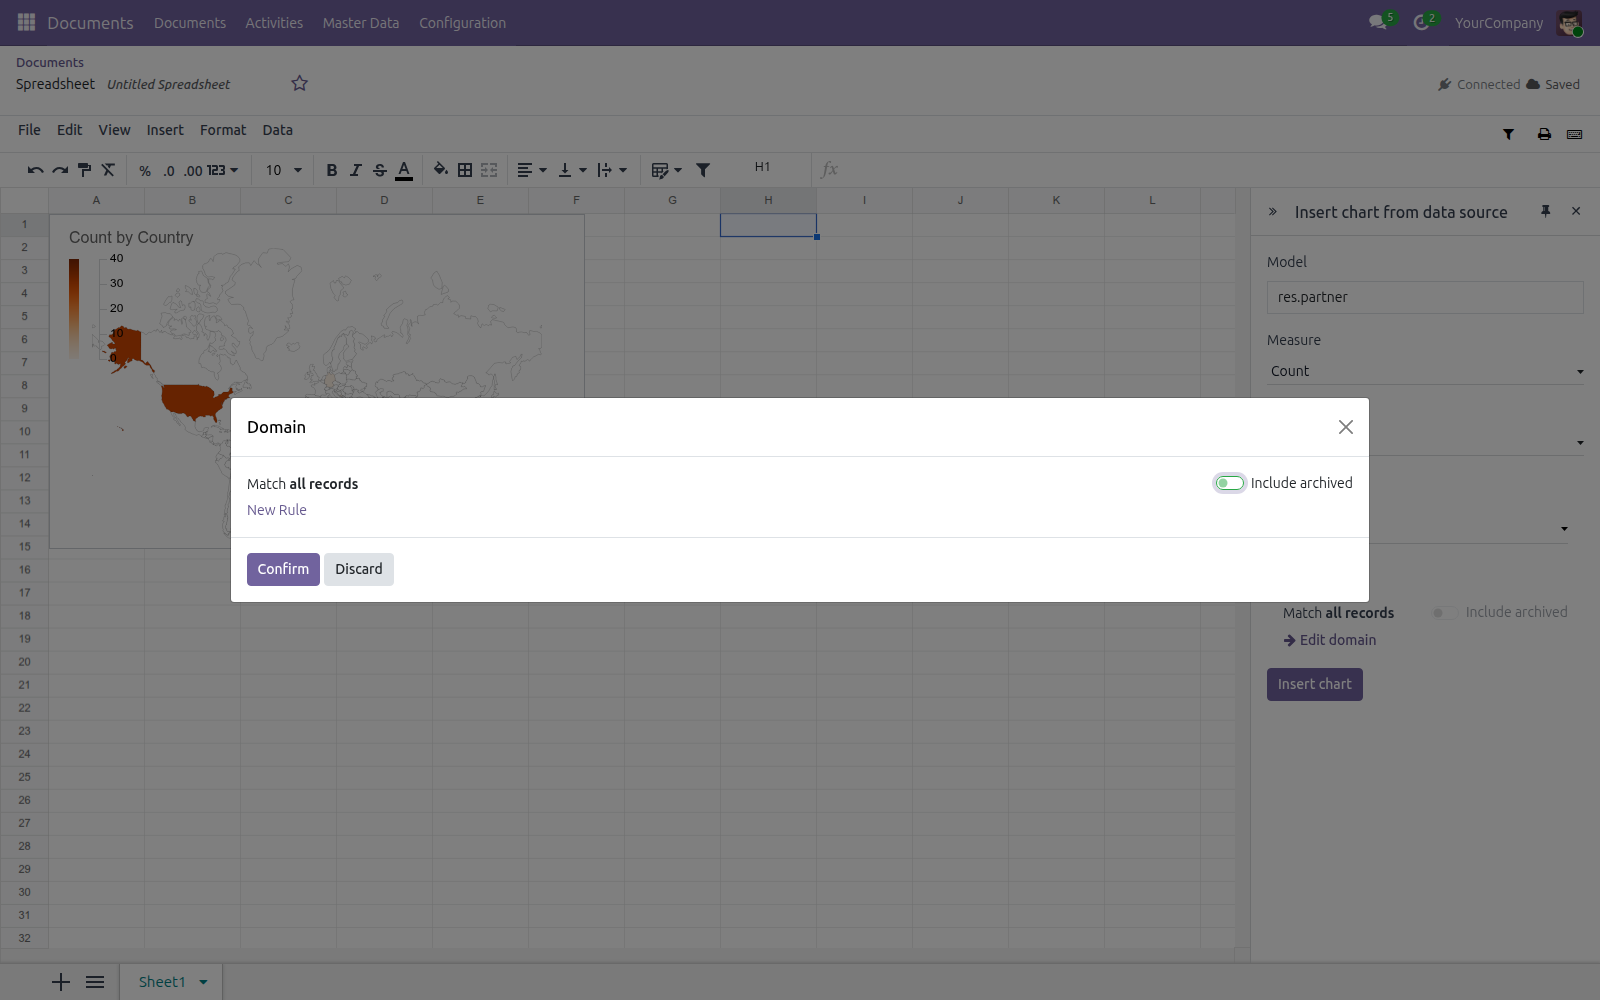
- Open the Insert menu, point to Chart, and click From data source.
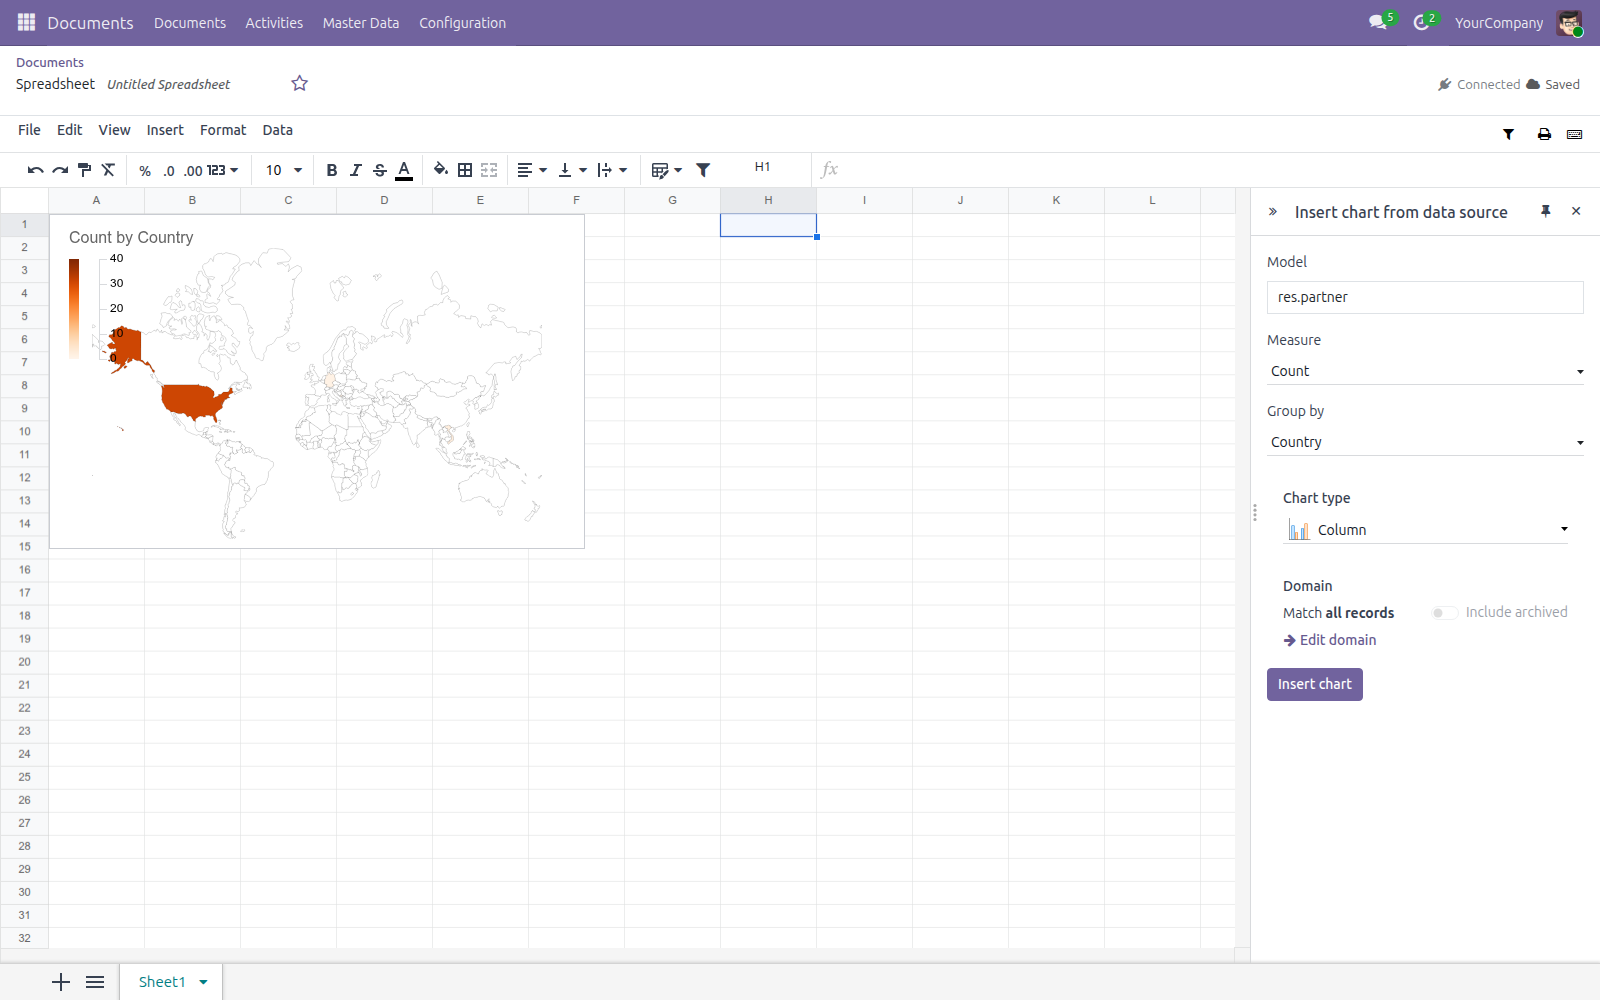
- Under Model, search for the kind of record you want to chart (for example Contact) and pick it from the list.
- Pick a Measure to count or sum, and a field to Group by.
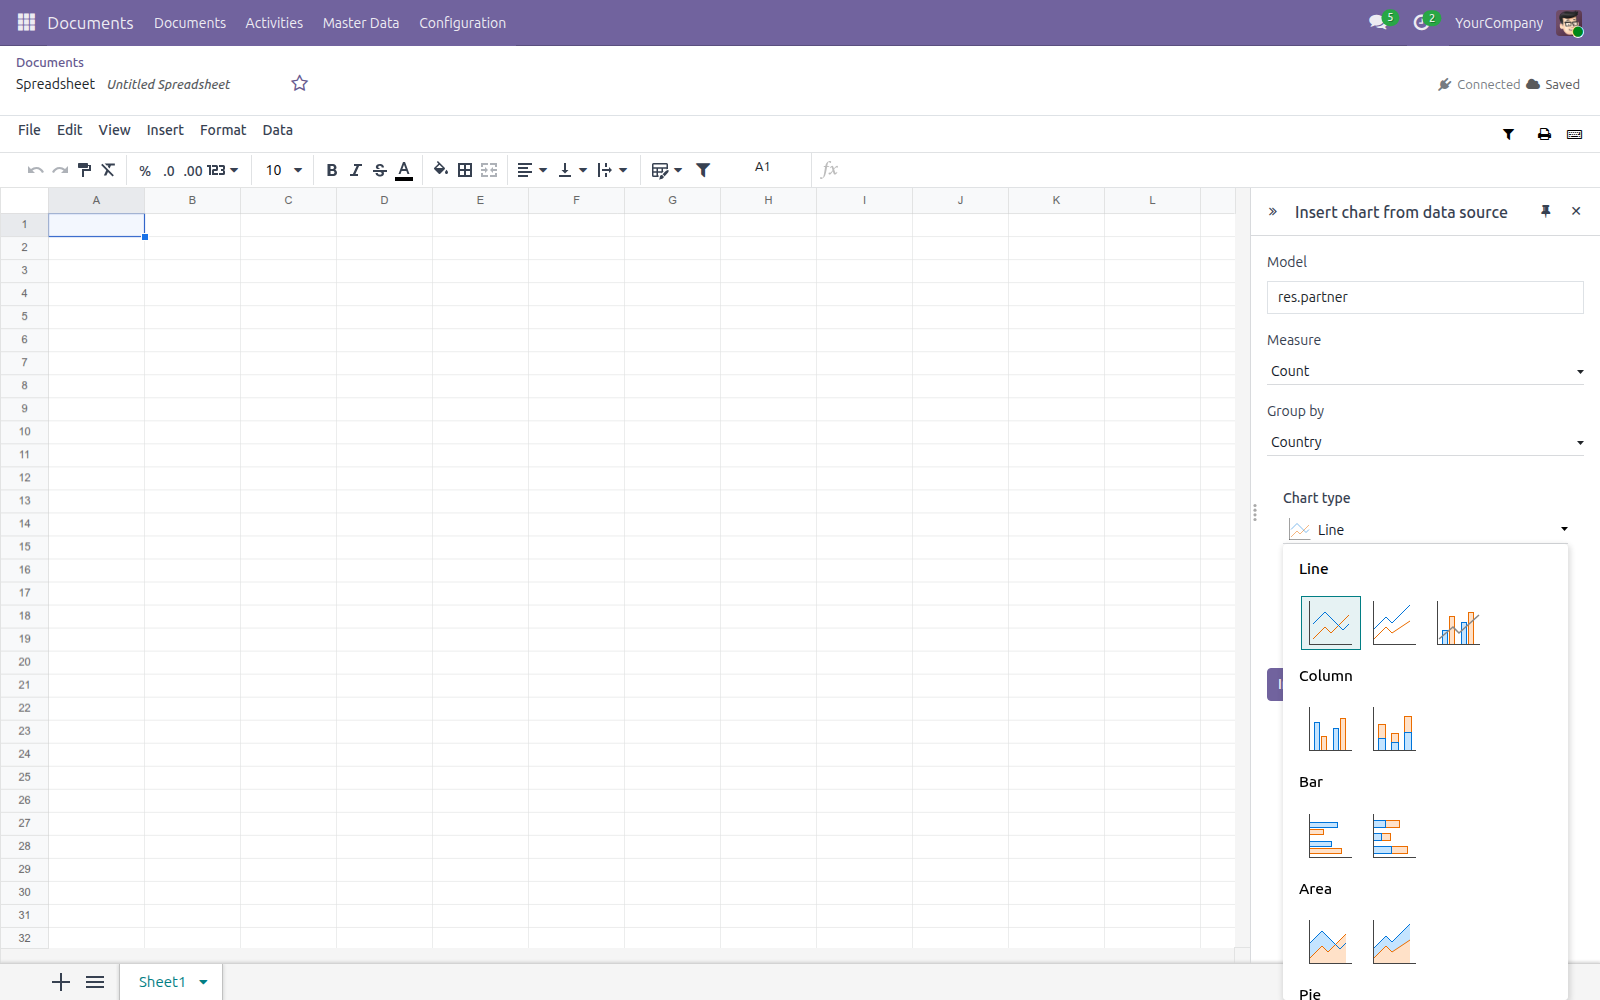
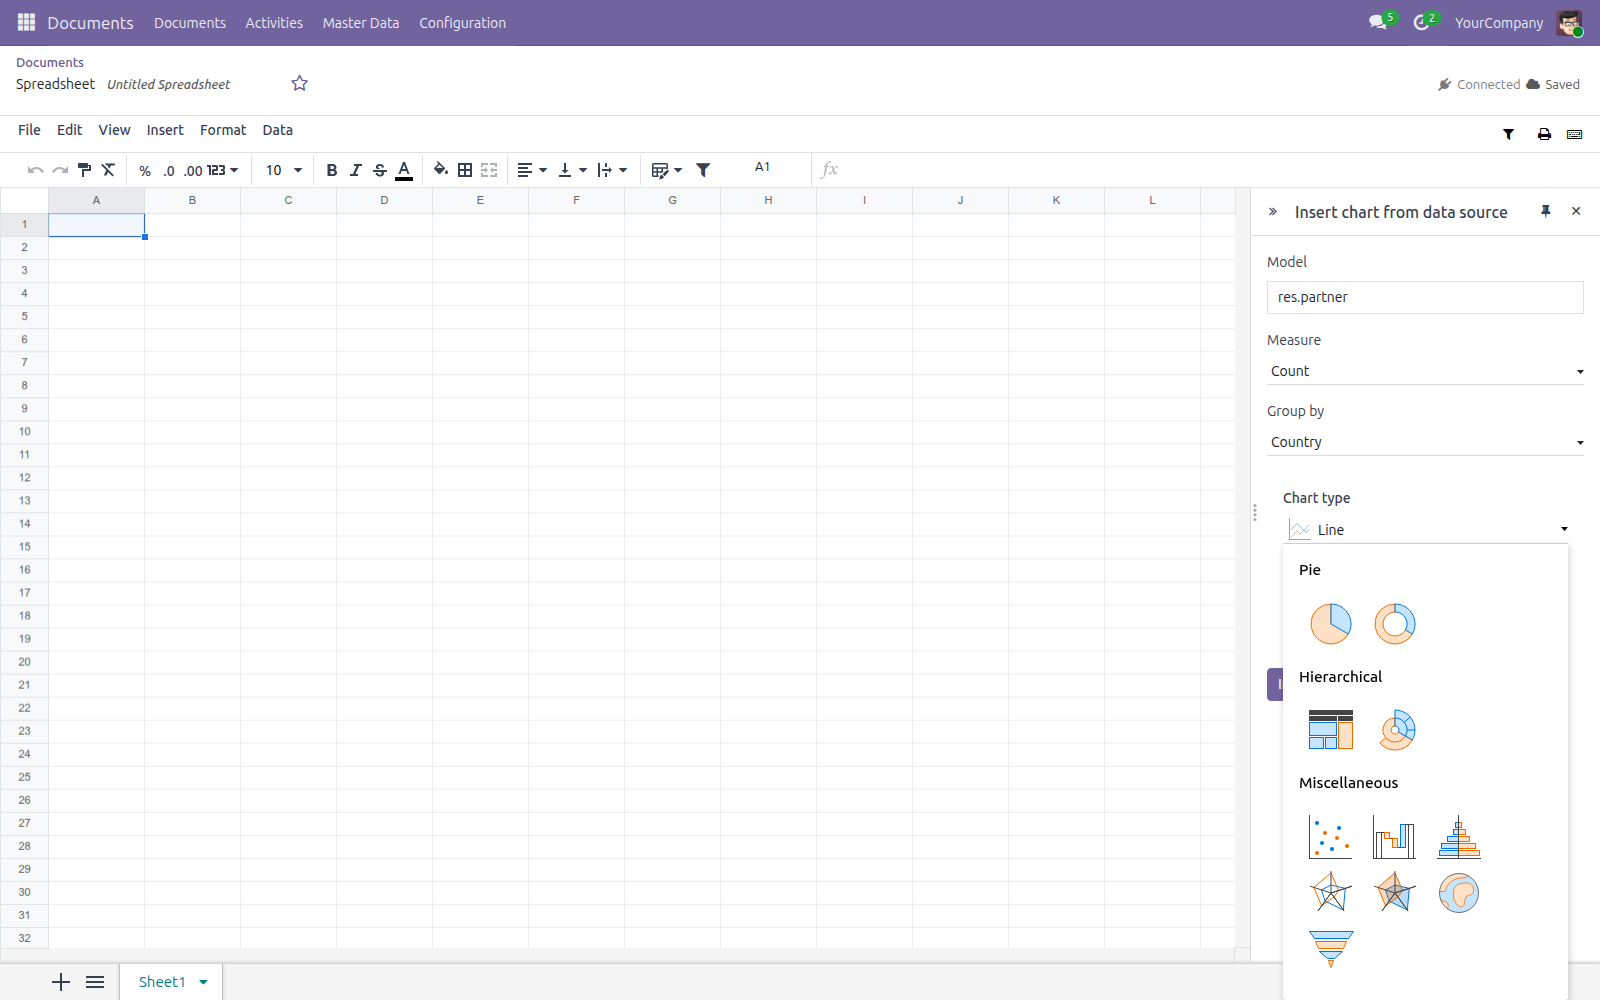
- Click Chart type to open the gallery of shapes, grouped under Line, Column, Bar, Area, Pie, Hierarchical, and Miscellaneous, and click the one you want.
- Domain shows which records are included - Match all records by default. Click Edit domain to narrow it down to a specific set of records instead.
- Click Insert chart.
The chart lands right on the sheet you were looking at.
Put your records on a map
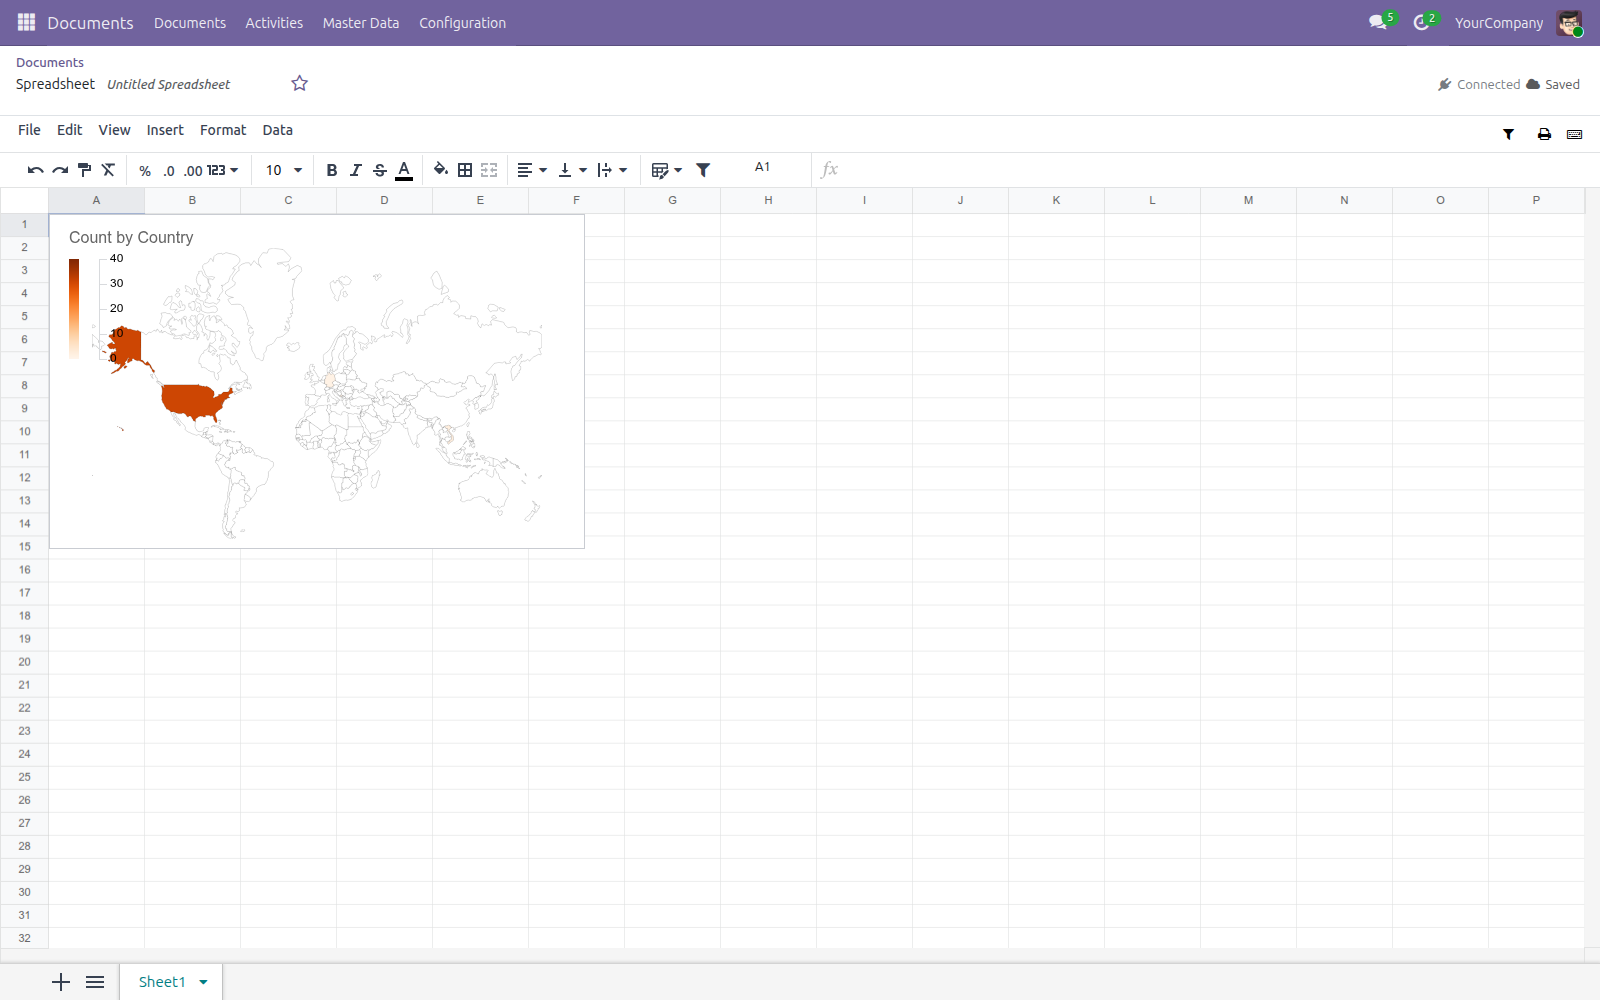
Some charts can be drawn as a map instead of bars or lines. This option only shows up once the Model you picked has a field naming a country or a US state for each record.
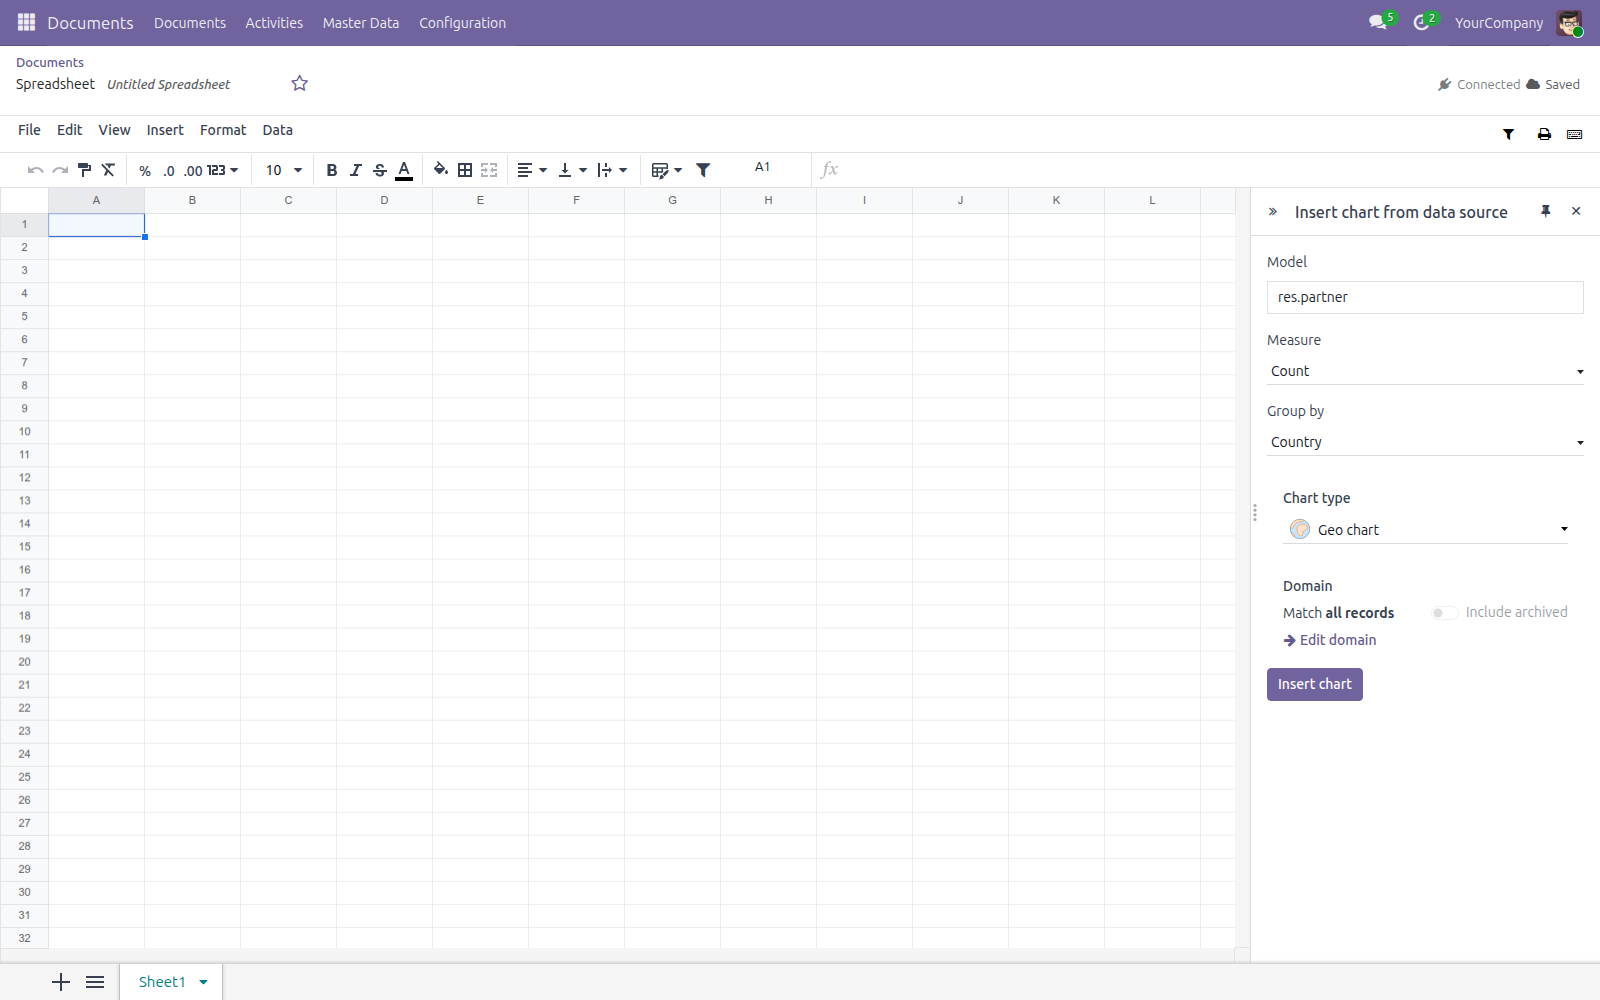
- Open Insert ‣ Chart ‣ From data source as above.
- Pick a Model that keeps a country or state on each record (Contact, for instance, keeps a Country).
- Click Chart type and pick Geo chart, the globe-shaped tile under Miscellaneous.
- Group by now only lists the fields a map can colour - Country or State - pick one.
- Click Insert chart.
Every country or state with matching records is coloured by the Measure you chose, with a colour scale on the left. If the Model you picked has no country or state field, Group by will not offer one, and Geo chart will not help - pick a different model instead.
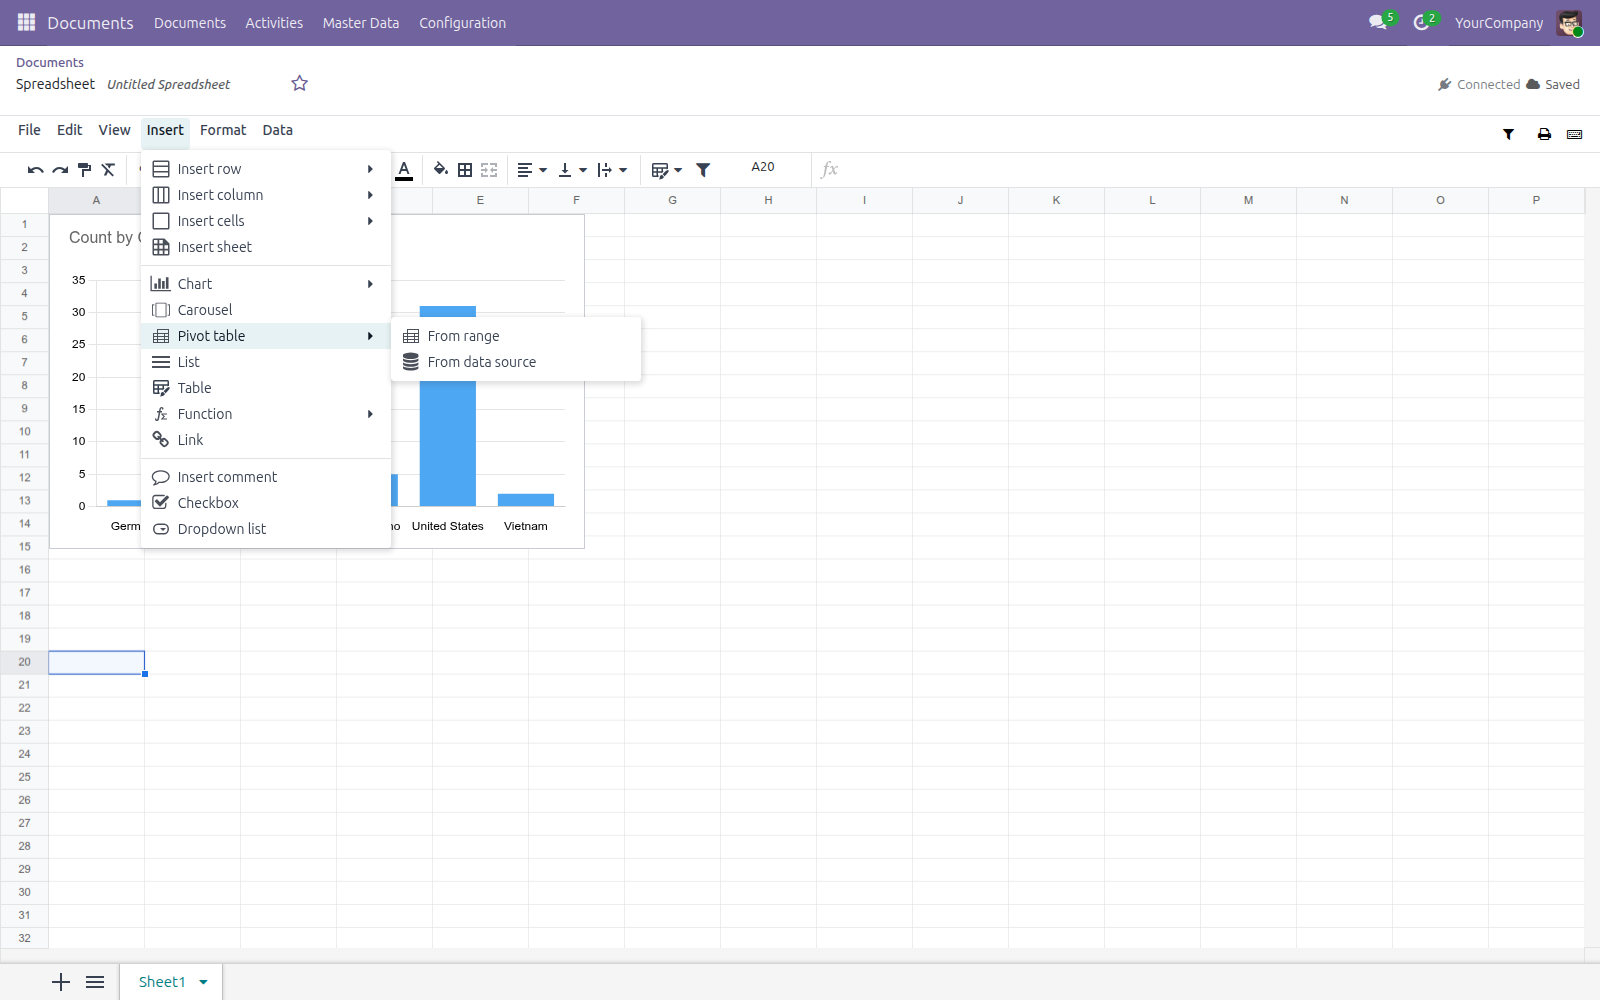
Build a pivot table from your records
A pivot table follows the same two routes as a chart.
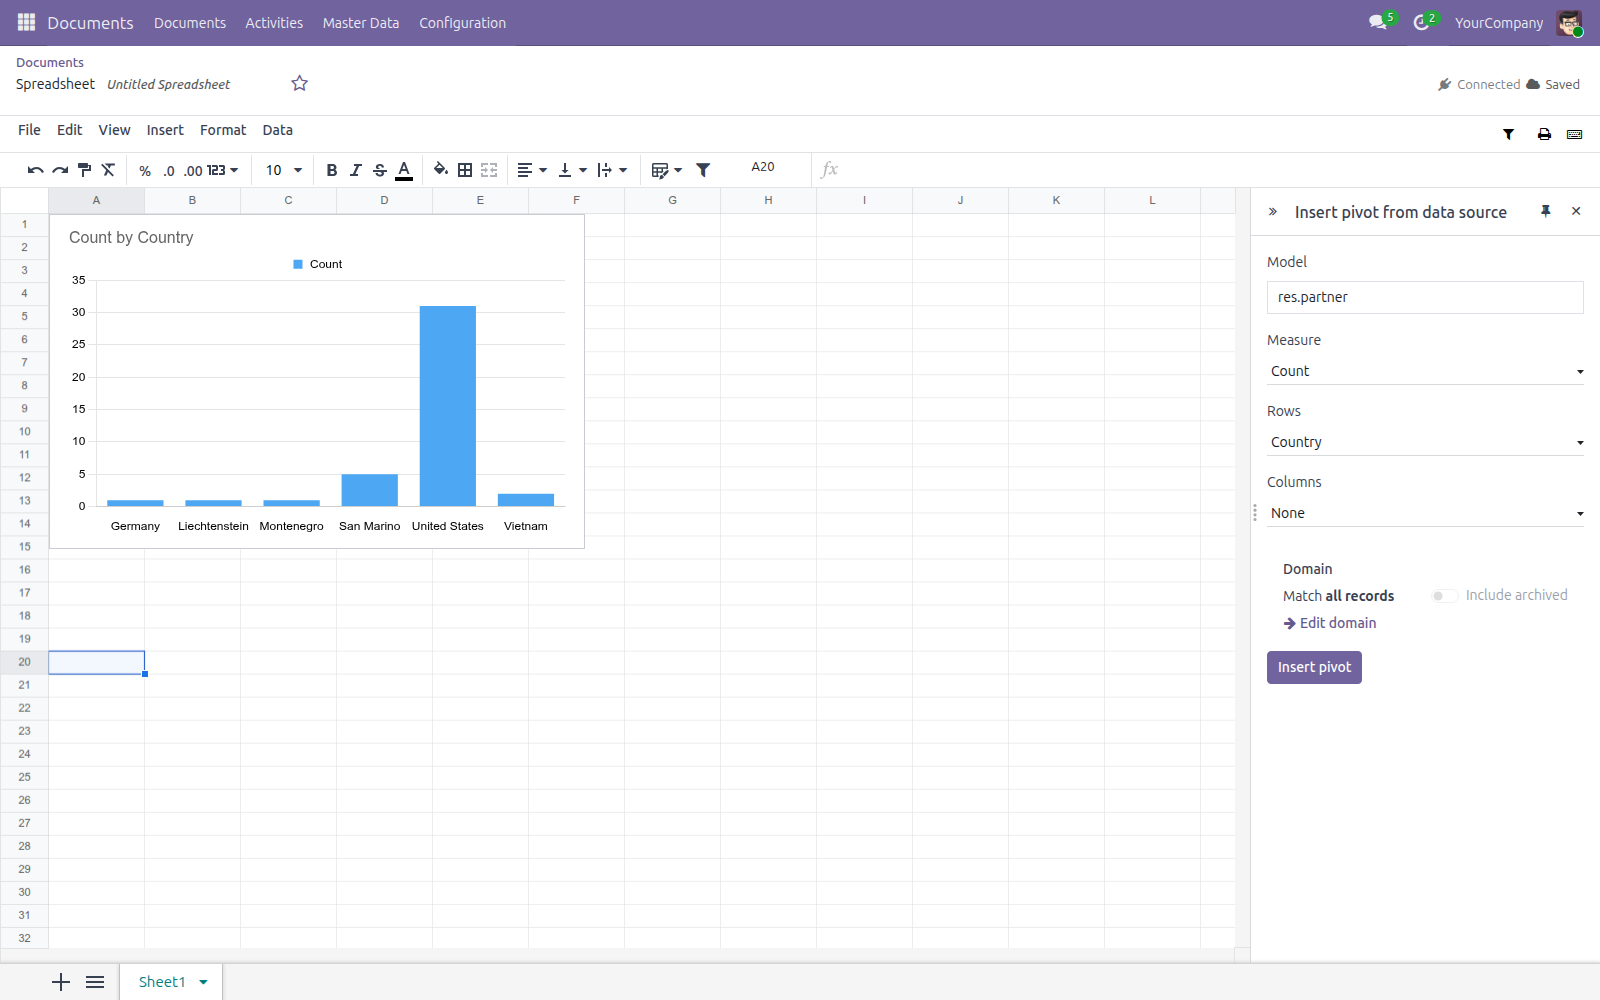
- Open the Insert menu, point to Pivot table, and click From data source.
- Pick a Model, a Measure, a field for Rows, and optionally a field for Columns.
- Narrow Domain the same way as for a chart, if needed.
- Click Insert pivot.
The pivot table opens on its own new sheet tab, named after the pivot's title.
Show several charts in one figure with a carousel
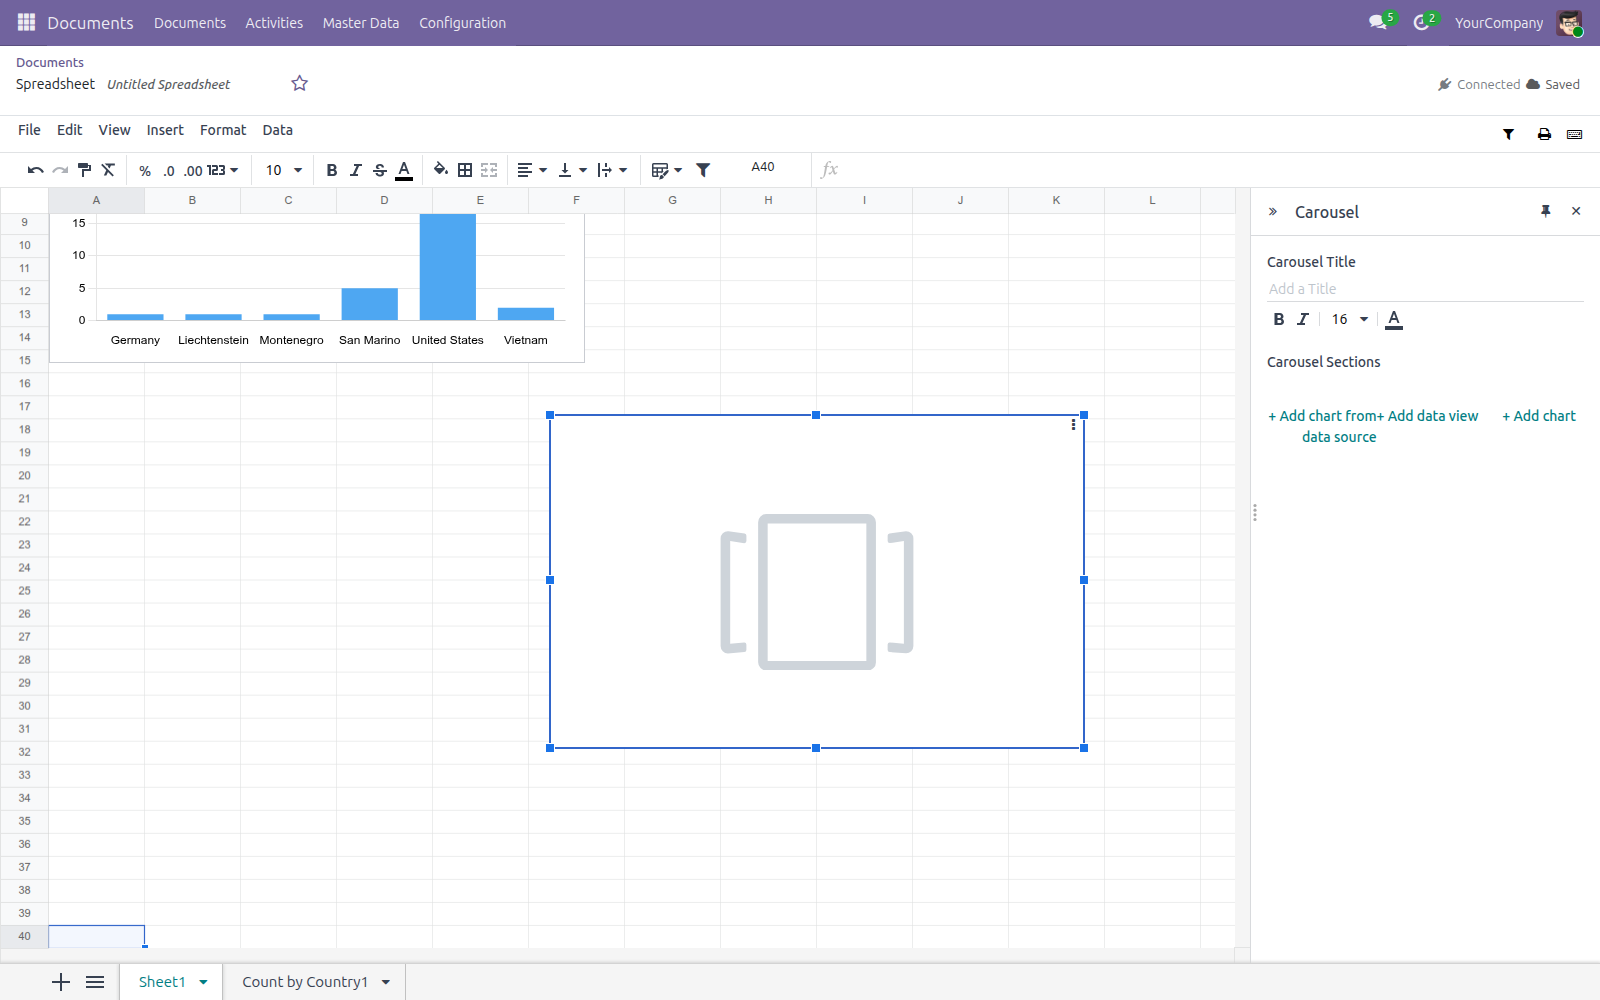
A carousel holds several charts in the same spot on the sheet, behind tabs, so a reader flips between them instead of scrolling past several separate figures.
- Open Insert ‣ Carousel.
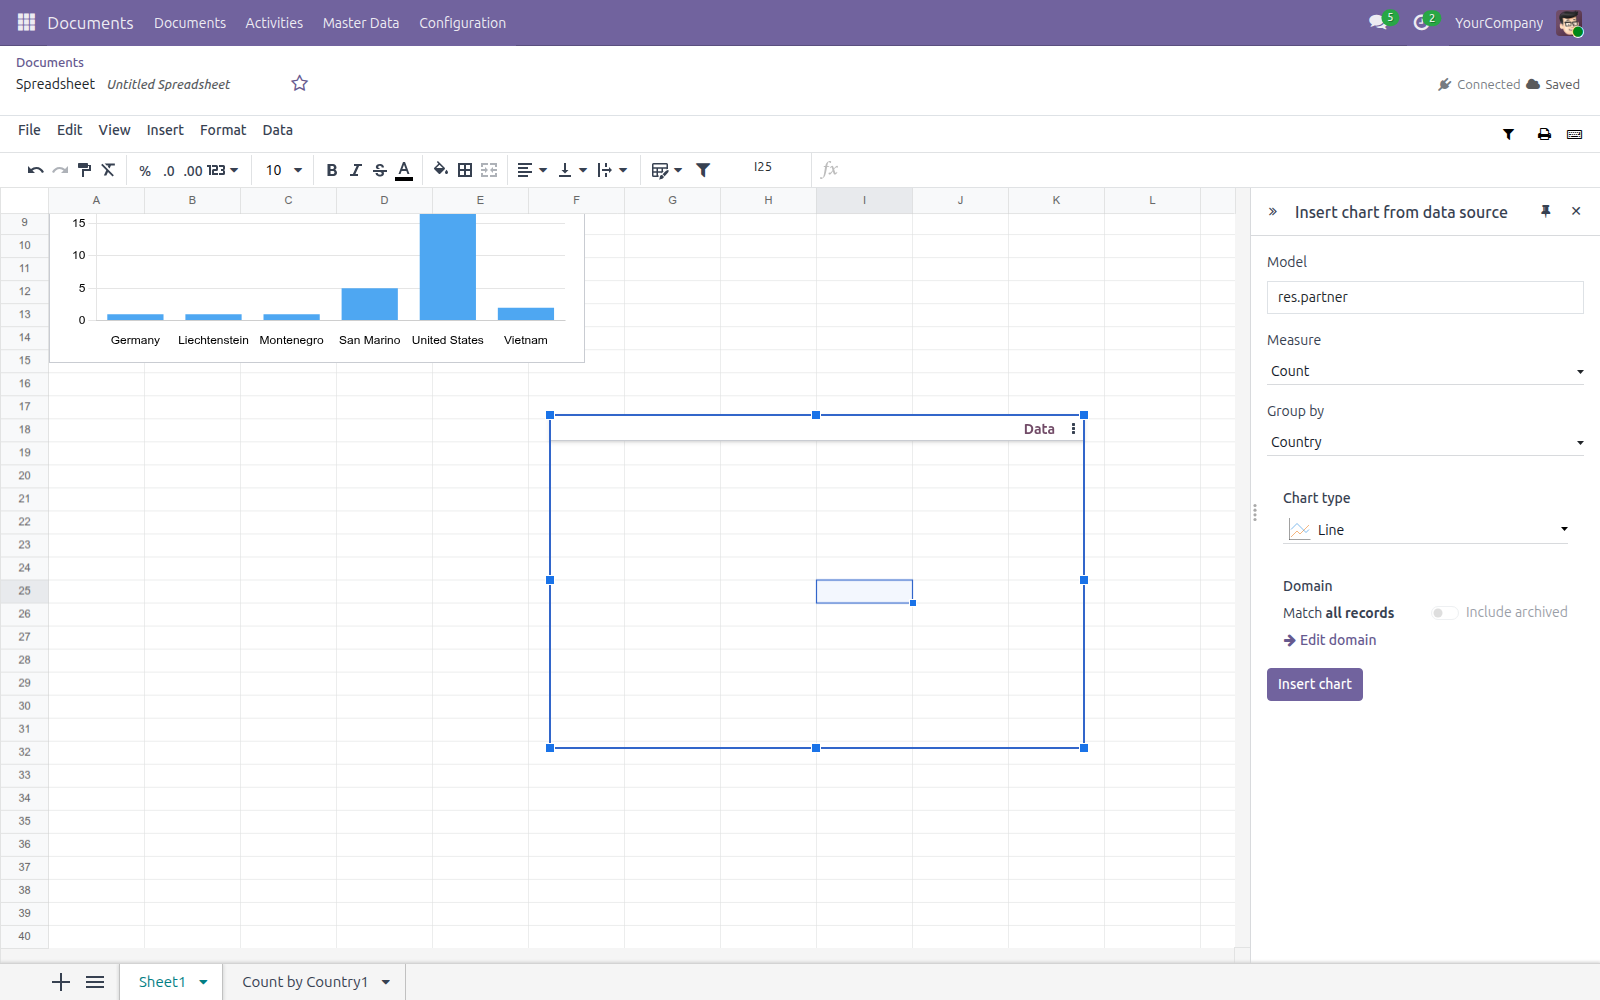
- Under Carousel Sections, click + Add chart from data source.
- Fill in Model, Measure, Group by, Chart type, and Domain the same way as for any other chart, then click Insert chart.
The new chart appears as another tab on the carousel, alongside whatever was already there. Click + Add chart instead for a chart built from cells on the sheet, or drag an existing chart onto the carousel to move it in.
Add a Global Filter that narrows every data source at once
Use this on a spreadsheet that already has at least one list, pivot, or chart bound to Odoo data.
- Click the funnel (Filters) icon in the toolbar, then click New filter.
- Pick a filter type - Text, Date, or a relation - fill in a Label, and choose which field on each linked data source it should match.
- Click Save to store the filter definition.
- Open Filters again, type or pick a value for the filter you just created, and click Filter to apply it.
Every list, pivot, and chart in the workbook that is linked to this filter narrows at once - there is nothing to adjust on each of them individually. Defining a filter alone does not narrow anything by itself; you still need to open Filters again, enter a value, and click Filter.
Send a list's rows into a spreadsheet
- Open any Odoo list view - the Documents app's own document list, for instance.
- Switch to the list view if you are not already on it.
- Open the Actions (cog) menu, then Spreadsheet, then click Insert list in spreadsheet.
- Pick an existing spreadsheet to add the list to, or click New to create one.
The list's visible rows land on their own sheet tab in the target spreadsheet, still linked back to the records they came from - refreshing the sheet pulls the current data again rather than leaving a stale, one-time copy.
Publish a spreadsheet to a dashboard
There are two ways to get a spreadsheet onto a dashboard.
From an open spreadsheet:
- Open the File menu and click Add to Dashboard.
- Pick an existing dashboard group, or type a name under Or a new dashboard group name to create one.
- Click Add to Dashboard to confirm.
From the Dashboards app instead:
- Open the Dashboards app, then Dashboards ‣ Configuration ‣ New Dashboard.
- Click New. The Group column fills in automatically.
- Fill in Name and click Save.
- Click the grid icon on that row (Open Spreadsheet) to start building it directly in the editor.
Either way, the result is a live, still-editable entry: anyone who can see the dashboard group reads it from the Dashboards app, and it keeps reflecting the spreadsheet's current content.

Download a spreadsheet as a genuine Excel file
- Open the spreadsheet.
- Open the File menu and click Download for an .xlsx file, or Download as JSON for the workbook's raw data.
The file downloads through your browser's own download mechanism, matching the workbook's current content at the moment you click.
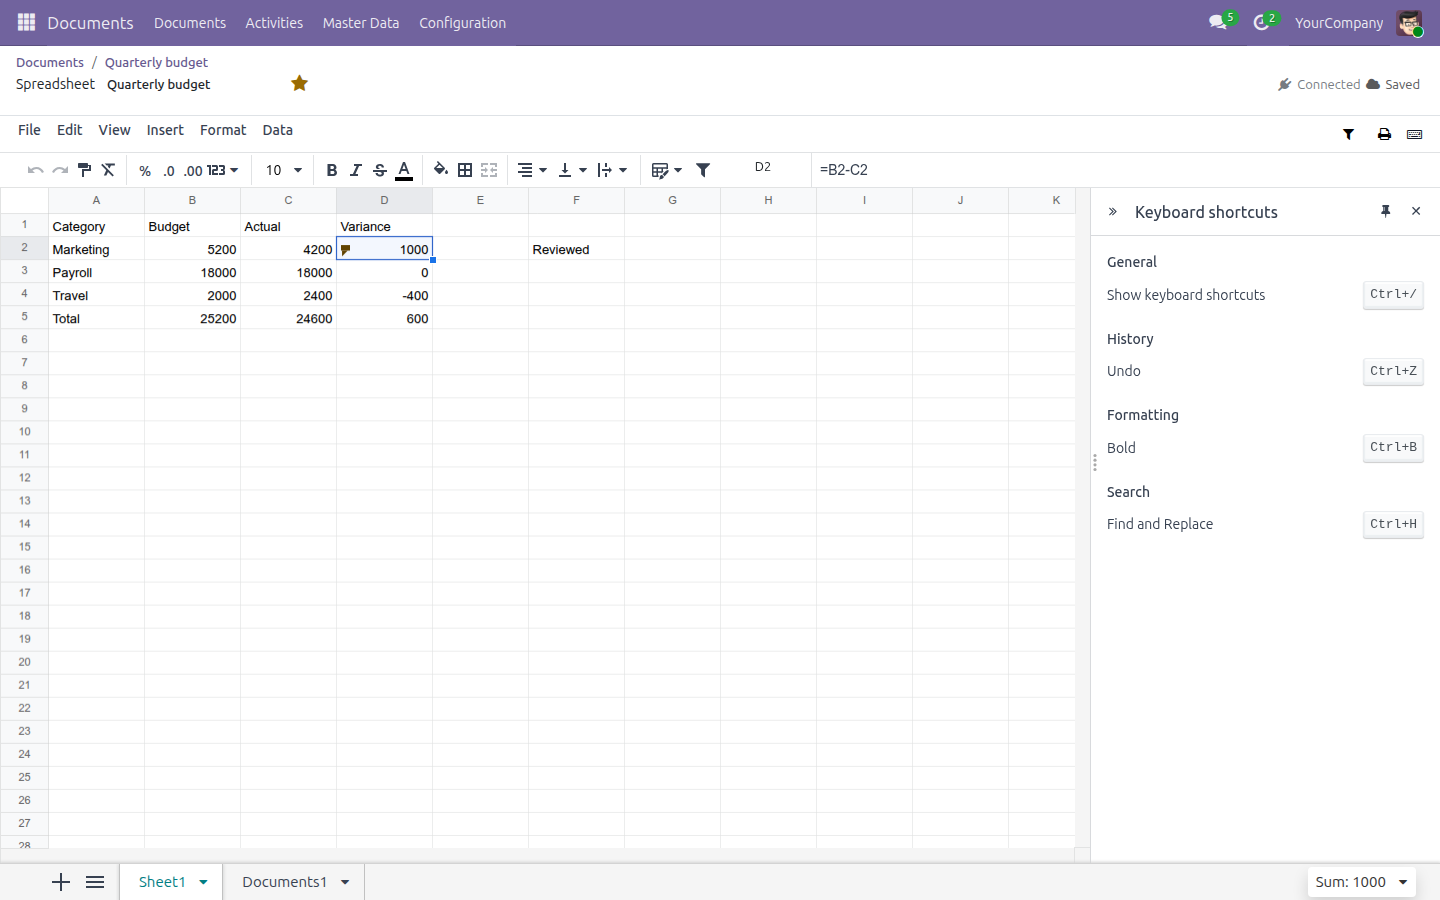
Jump to a cell, check shortcuts, and print
- Open the spreadsheet.
- Type a cell or range reference (for example D2) into the Name Box above the grid, at its top left, and press Enter - the selection jumps straight there.
- Click the keyboard-shortcuts icon in the toolbar (or press Ctrl+/) to open the list of every shortcut the editor supports, grouped by General, History, Formatting, and Search.
- Click the print icon in the toolbar to print the current sheet through your browser's own print dialog.
Troubleshooting
Importing a spreadsheet fails with "This spreadsheet could not be imported. Please try again." This can happen even with a well-formed .xlsx or .csv file. Try again once, try the other of the two supported formats, and if it keeps failing, use New ‣ Spreadsheet and copy the data in by hand, or contact support.
A colleague's public link only lets people download the file, not look at it online. This is expected: opening a link with Access through link set to Viewer takes the visitor to a page that lists the document and offers it for download, not a live in-browser view of its cells. Nothing about the content can be edited from that page either way.
I created a Global Filter but nothing on the sheet changed. Creating a filter only stores its definition. Open Filters again, enter or pick a value for it, and click Filter to actually apply it to the linked lists, pivots, and charts.
File ‣ Add to Dashboard or Dashboards ‣ Configuration ‣ New Dashboard is not available to me. Publishing to a dashboard needs the Dashboard Manager access right. Ask an administrator to grant it under Settings.
A spreadsheet I expect to see is missing from Documents. A spreadsheet is a Document, so it only shows up in a workspace you have access to. Check with whoever owns it, or ask an administrator to check the document's workspace and sharing settings.
FAQ
Do I need Odoo Enterprise to use this app? No. Spreadsheet Documents runs on Odoo Community and on Viindoo SaaS; nothing in it depends on an Enterprise-only feature.
Is there a separate "Spreadsheet" app icon after I install this? No. Spreadsheet Documents extends the Documents app - you keep working from Documents, and it also adds a couple of menus to the Dashboards app.
What do Snapshot Threshold and Snapshots to Keep actually control? They tune how a spreadsheet's saved history is compacted as more changes pile up, and how many past compactions are kept alongside the original. Most teams never need to change the defaults.
Can two people really type into the same spreadsheet at the same time without conflicts? Yes. Every open session shows every other collaborator's cursor live, and every keystroke commits and syncs on its own; there is no Save button and no version to lose.
Does deleting a template remove the spreadsheets that were created from it? No. A template is only a starting point copied at creation time; the documents it produced are completely independent afterwards.
Can someone I share a spreadsheet with edit the version history? Only Restore and Make a copy are available from the history screen - there is no way to delete or edit a past entry from there.
This software and associated files (the "Software") may only be used (executed, modified, executed after modifications) if you have purchased a valid license from the authors, typically via Odoo Apps, or if you have received a written agreement from the authors of the Software (see the COPYRIGHT file).
You may develop Odoo modules that use the Software as a library (typically by depending on it, importing it and using its resources), but without copying any source code or material from the Software. You may distribute those modules under the license of your choice, provided that this license is compatible with the terms of the Odoo Proprietary License (For example: LGPL, MIT, or proprietary licenses similar to this one).
It is forbidden to publish, distribute, sublicense, or sell copies of the Software or modified copies of the Software.
The above copyright notice and this permission notice must be included in all copies or substantial portions of the Software.
THE SOFTWARE IS PROVIDED "AS IS", WITHOUT WARRANTY OF ANY KIND, EXPRESS OR IMPLIED, INCLUDING BUT NOT LIMITED TO THE WARRANTIES OF MERCHANTABILITY, FITNESS FOR A PARTICULAR PURPOSE AND NONINFRINGEMENT. IN NO EVENT SHALL THE AUTHORS OR COPYRIGHT HOLDERS BE LIABLE FOR ANY CLAIM, DAMAGES OR OTHER LIABILITY, WHETHER IN AN ACTION OF CONTRACT, TORT OR OTHERWISE, ARISING FROM, OUT OF OR IN CONNECTION WITH THE SOFTWARE OR THE USE OR OTHER DEALINGS IN THE SOFTWARE.