| Lines of Code | 5274 |
| Technical name | viin_account_reconciliation |
| License | LGPL-3 |
| Website | https://viindoo.com/apps/modules/17.0/viin_account_reconciliation |
| Read description for | v 18.0 v 19.0 |
| Required Apps | Invoicing (account) Discuss (mail) |
| Extensions | Account Bank Statement Import Account Counterpart - Account Reconciliation |

The reconciliation screen Odoo 17 took away
Bank line on the left, matching entries on the right, validate in one click - the payments-matching workflow accountants had before, back on 17.0 and working on statements, payments and journal items alike.
Account Reconciliation Widget (technical name viin_account_reconciliation) is an Odoo 17.0 app for Odoo Community and Odoo Enterprise and Viindoo Cloud, built for accountant, chief accountant, controller.
At a Glance
The facts of Account Reconciliation Widget, version 0.7.4, in one place. Published by Viindoo.
Key Features
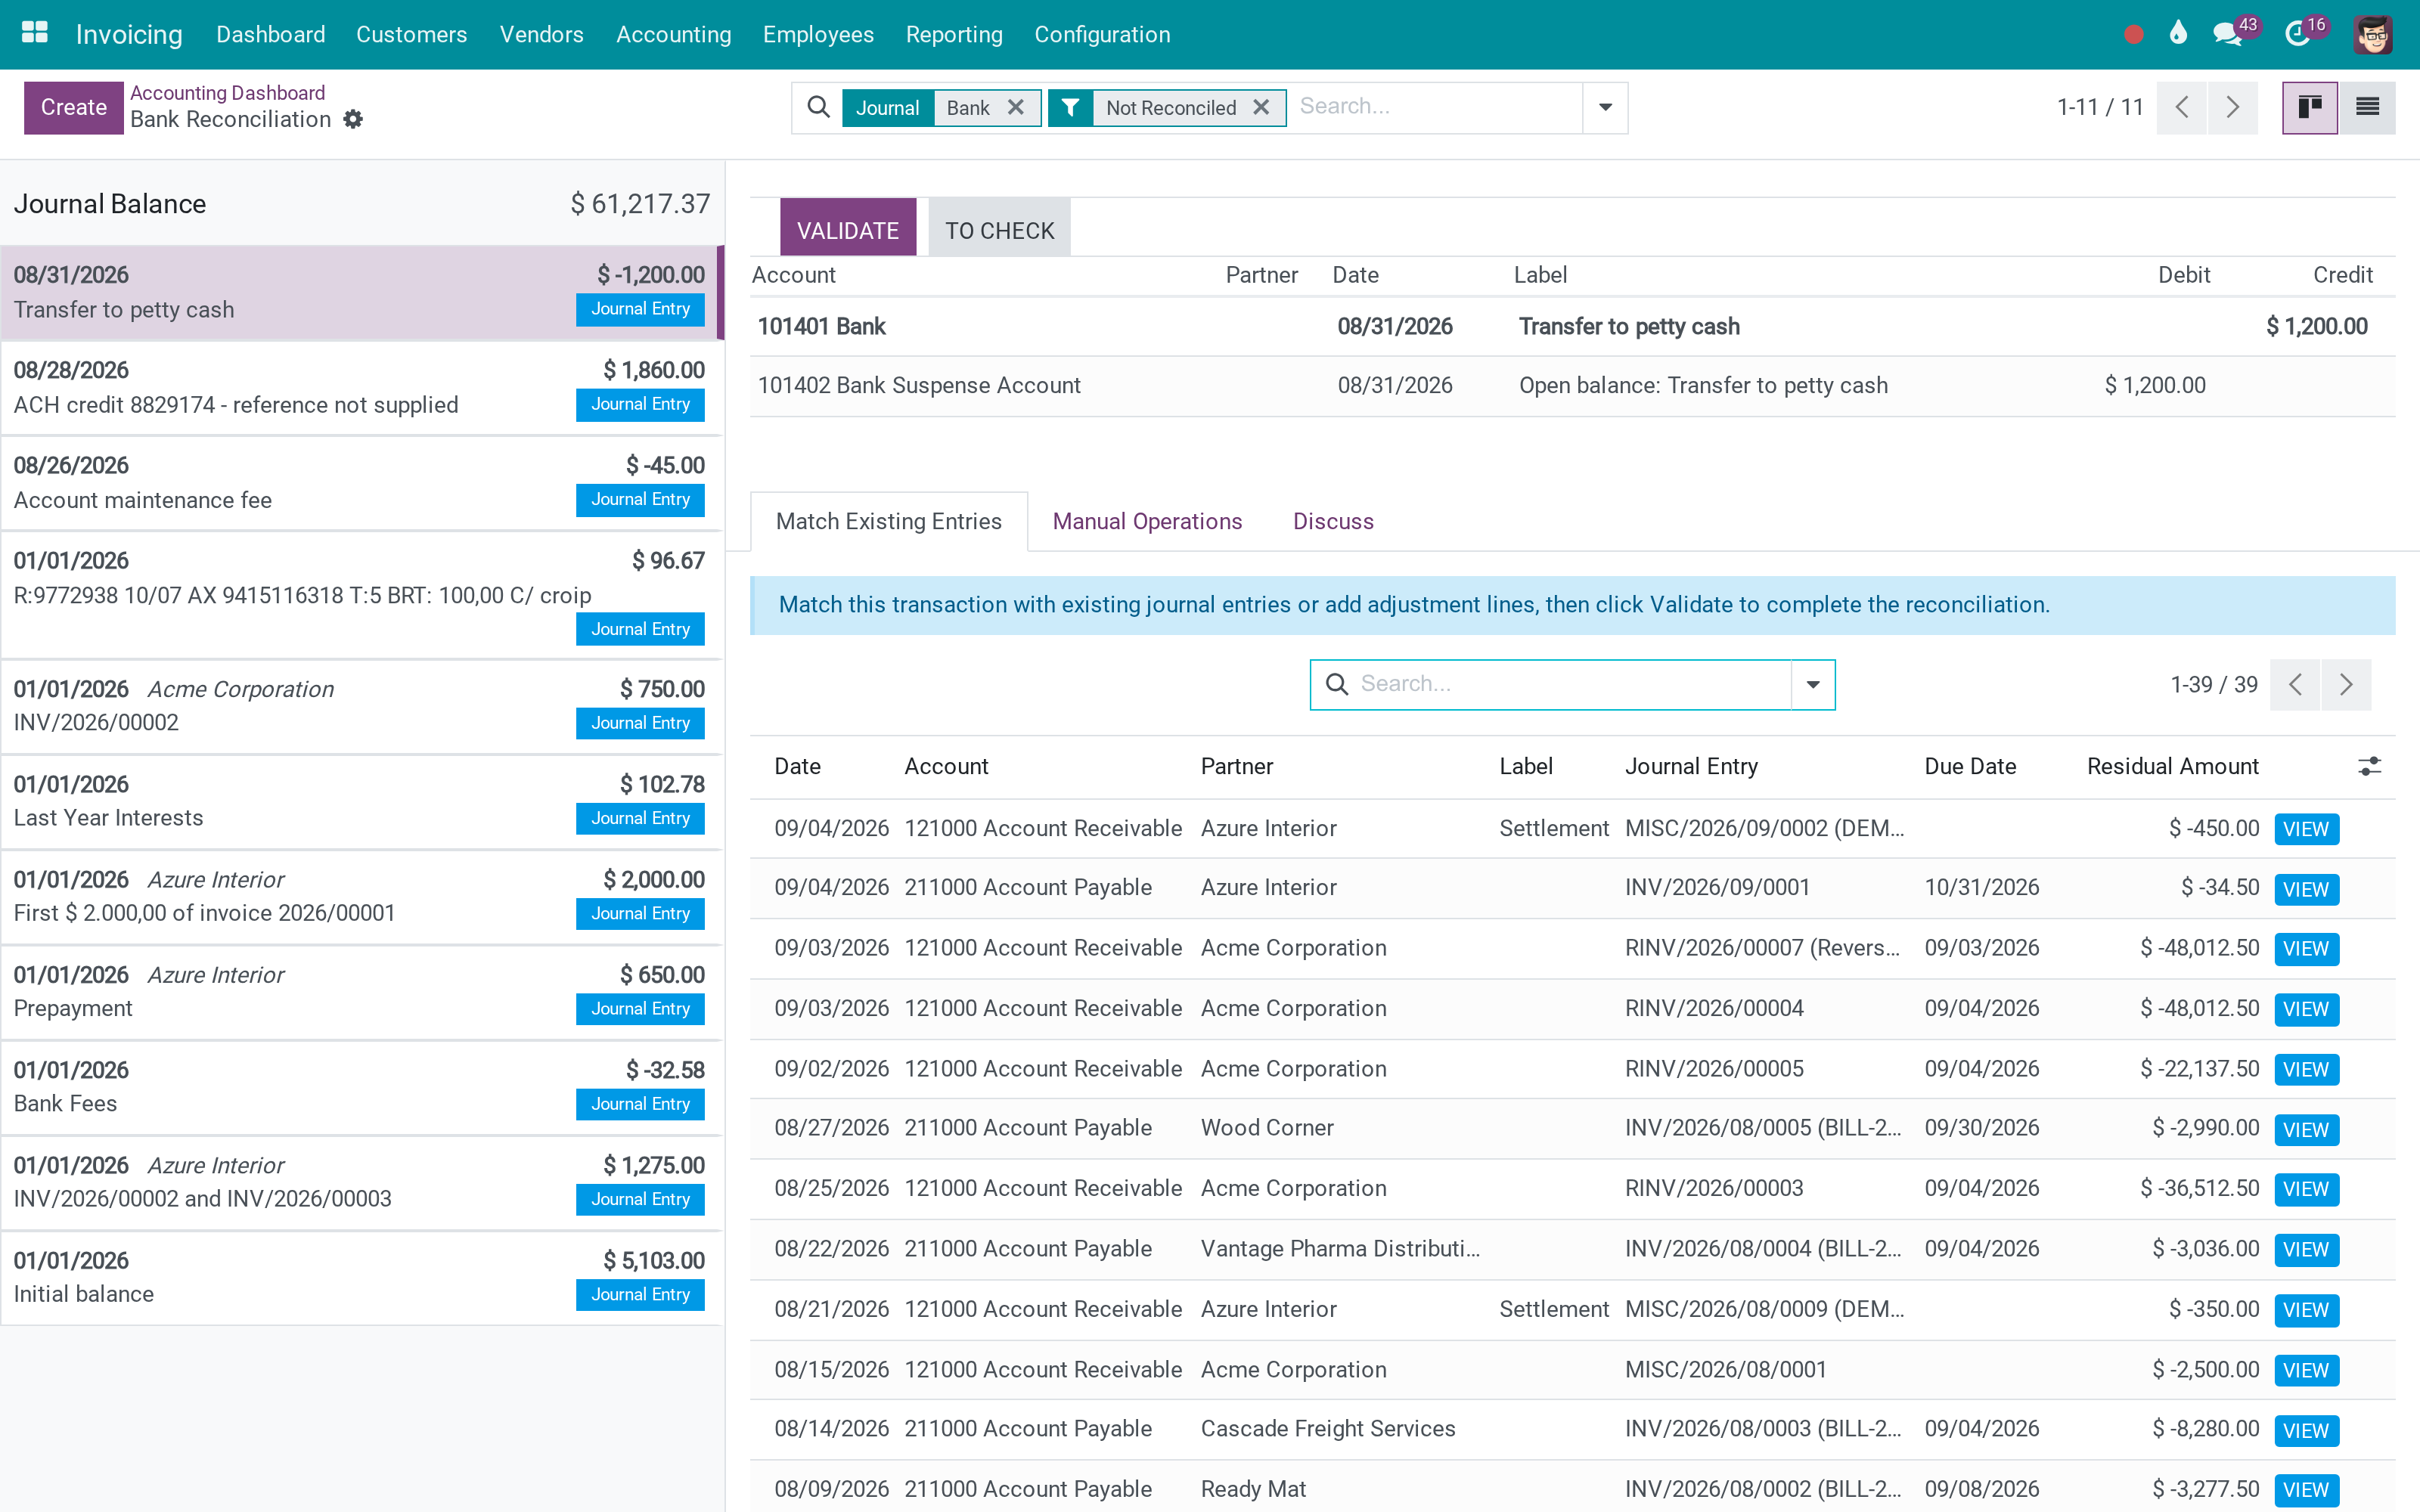
Reconciliation is the one accounting job that is done by eye: this receipt is that invoice, this fee is a bank charge, this credit has no reference and needs a phone call. The screen that made it fast - statement line on one side, candidate entries on the other, one button to validate - is not in Odoo 17 Community. This module brings it back and wires it into the places it belongs: the Accounting dashboard's Reconcile button, a bank statement, a payment, or any selection of journal items. Candidates are proposed with partner, date, journal entry, due date and residual amount; you can match several entries against one line, write off a difference in Manual Operations, or leave a line To Check and come back to it. Lines that match a partner and an amount exactly are reconciled without you.
Statements as they arrive
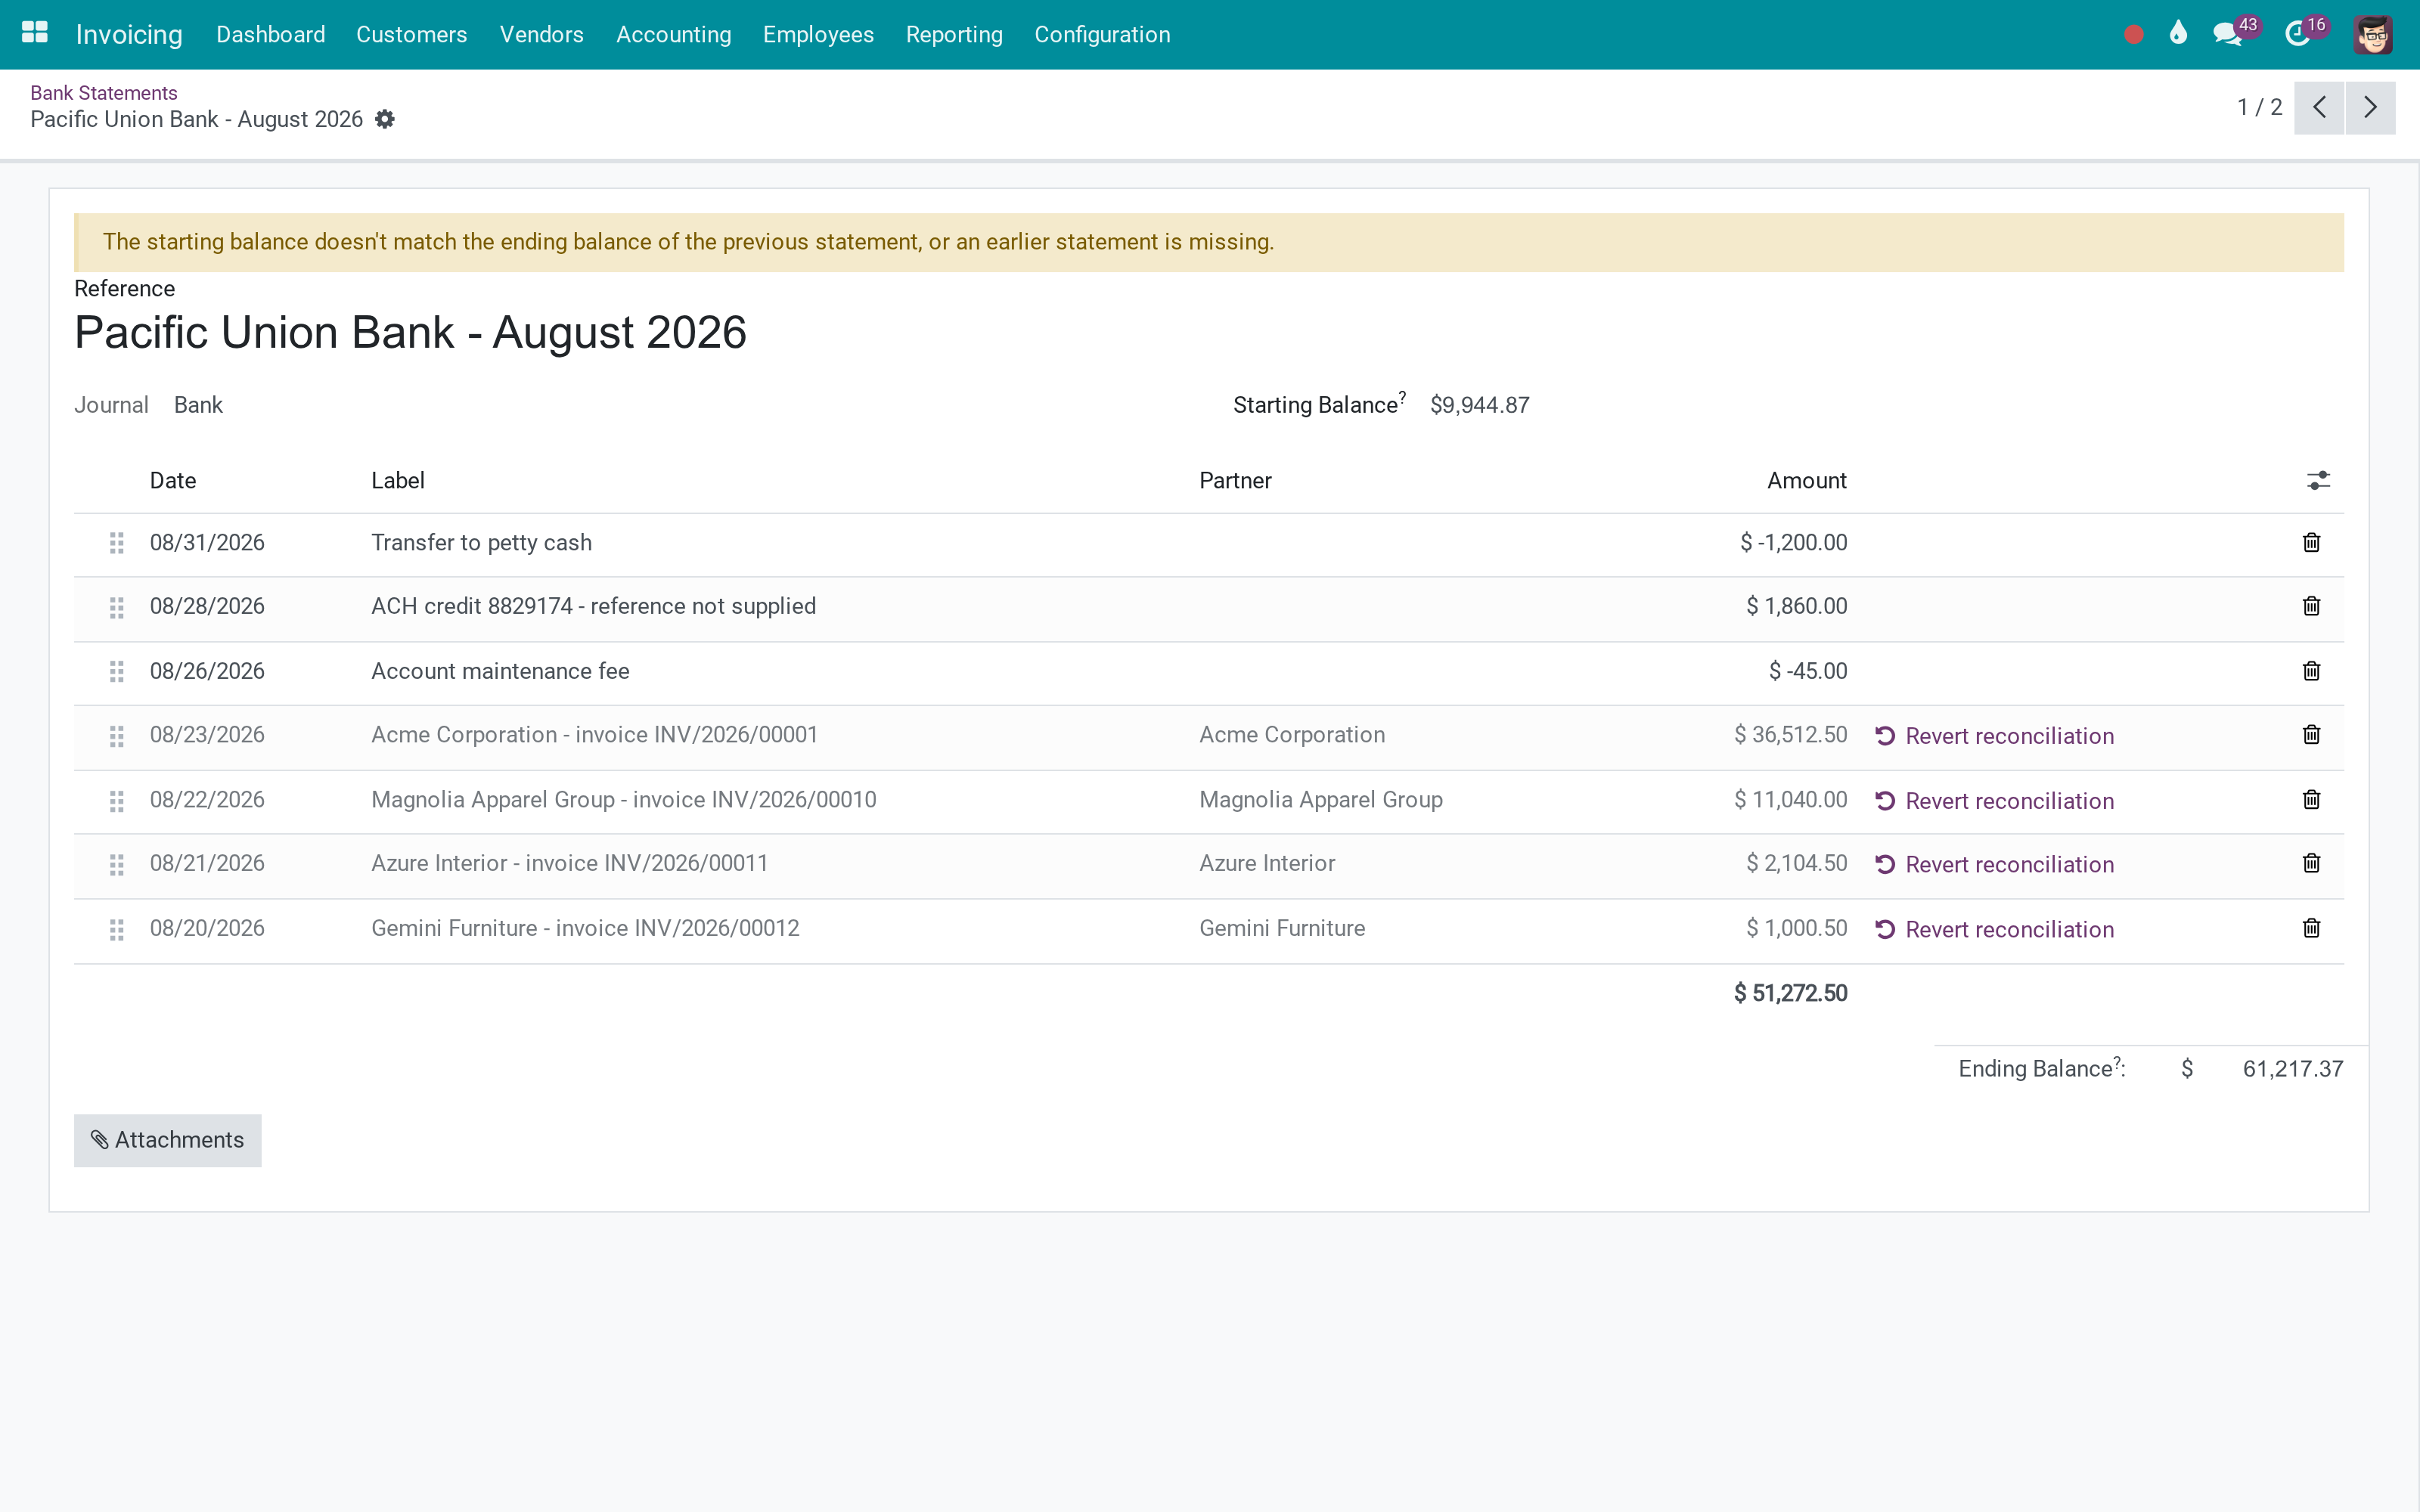
Every imported or entered statement, with its balance and its date.
Journal items, reconciled or not
The same reconciliation reachable from a selection of journal items.
How It Works
Three steps, the way reconciliation was always done.
Start from the journal
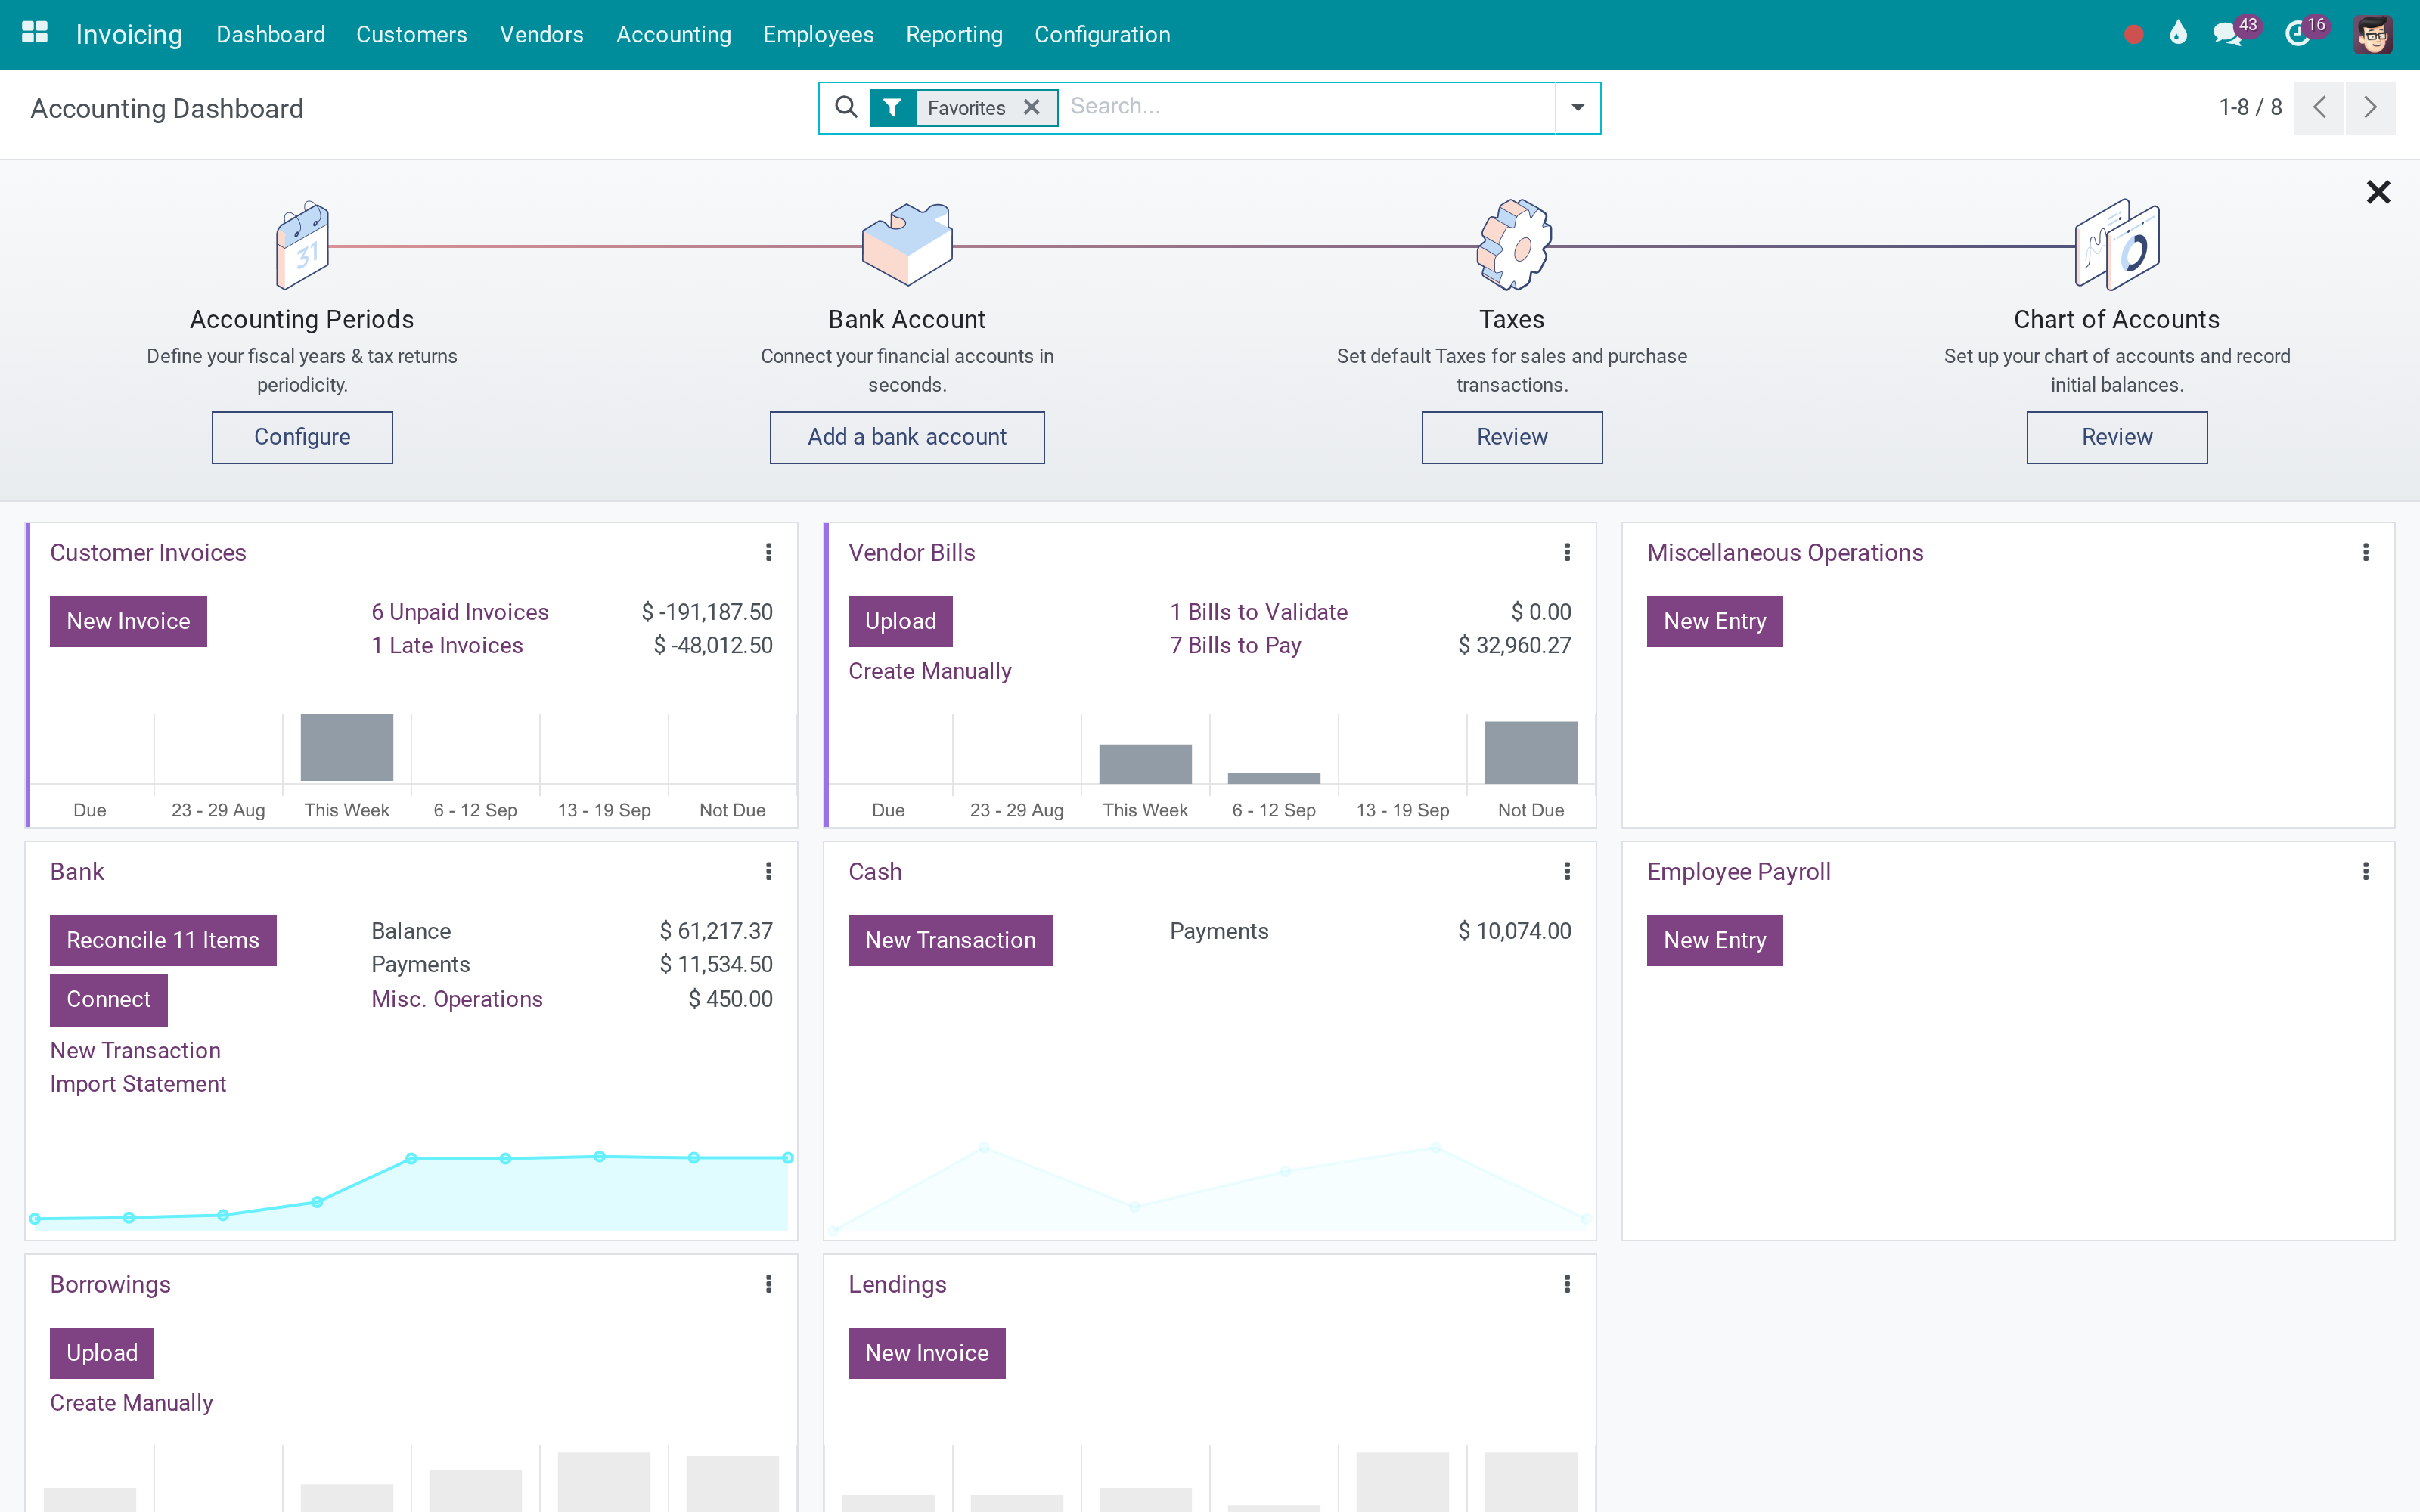
Each journal card carries its outstanding count. Reconcile opens the screen on that journal's lines - no search, no filter to build.
Match what is obvious, decide what is not
Candidates come with partner, date, journal entry, due date and residual amount. Tick what belongs, and Validate. When the amounts do not agree, Manual Operations writes the difference off where you say.
Keep the statement honest
The statement shows which lines are settled and which are not, so the month closes on a fact rather than on a memory.
What You Get
The full payments-matching screen: statement lines on the left, candidate entries on the right, Validate and To Check
Match one line against several entries, or several lines against one entry
Manual Operations for the difference: a write-off, a fee, a rounding, on the account you choose
Reconcile from the dashboard, from a statement, from a payment, or from a selection of journal items
Exact matches on partner and amount reconcile themselves - the widget is for what is left
The journal balance and the outstanding count stay in front of you while you work
More Screens
Everything below was taken on a database seeded with real business data, on this series - not a mock-up and not a screenshot from an older version.
The reconciliation screen
Outstanding per journal, on the dashboard
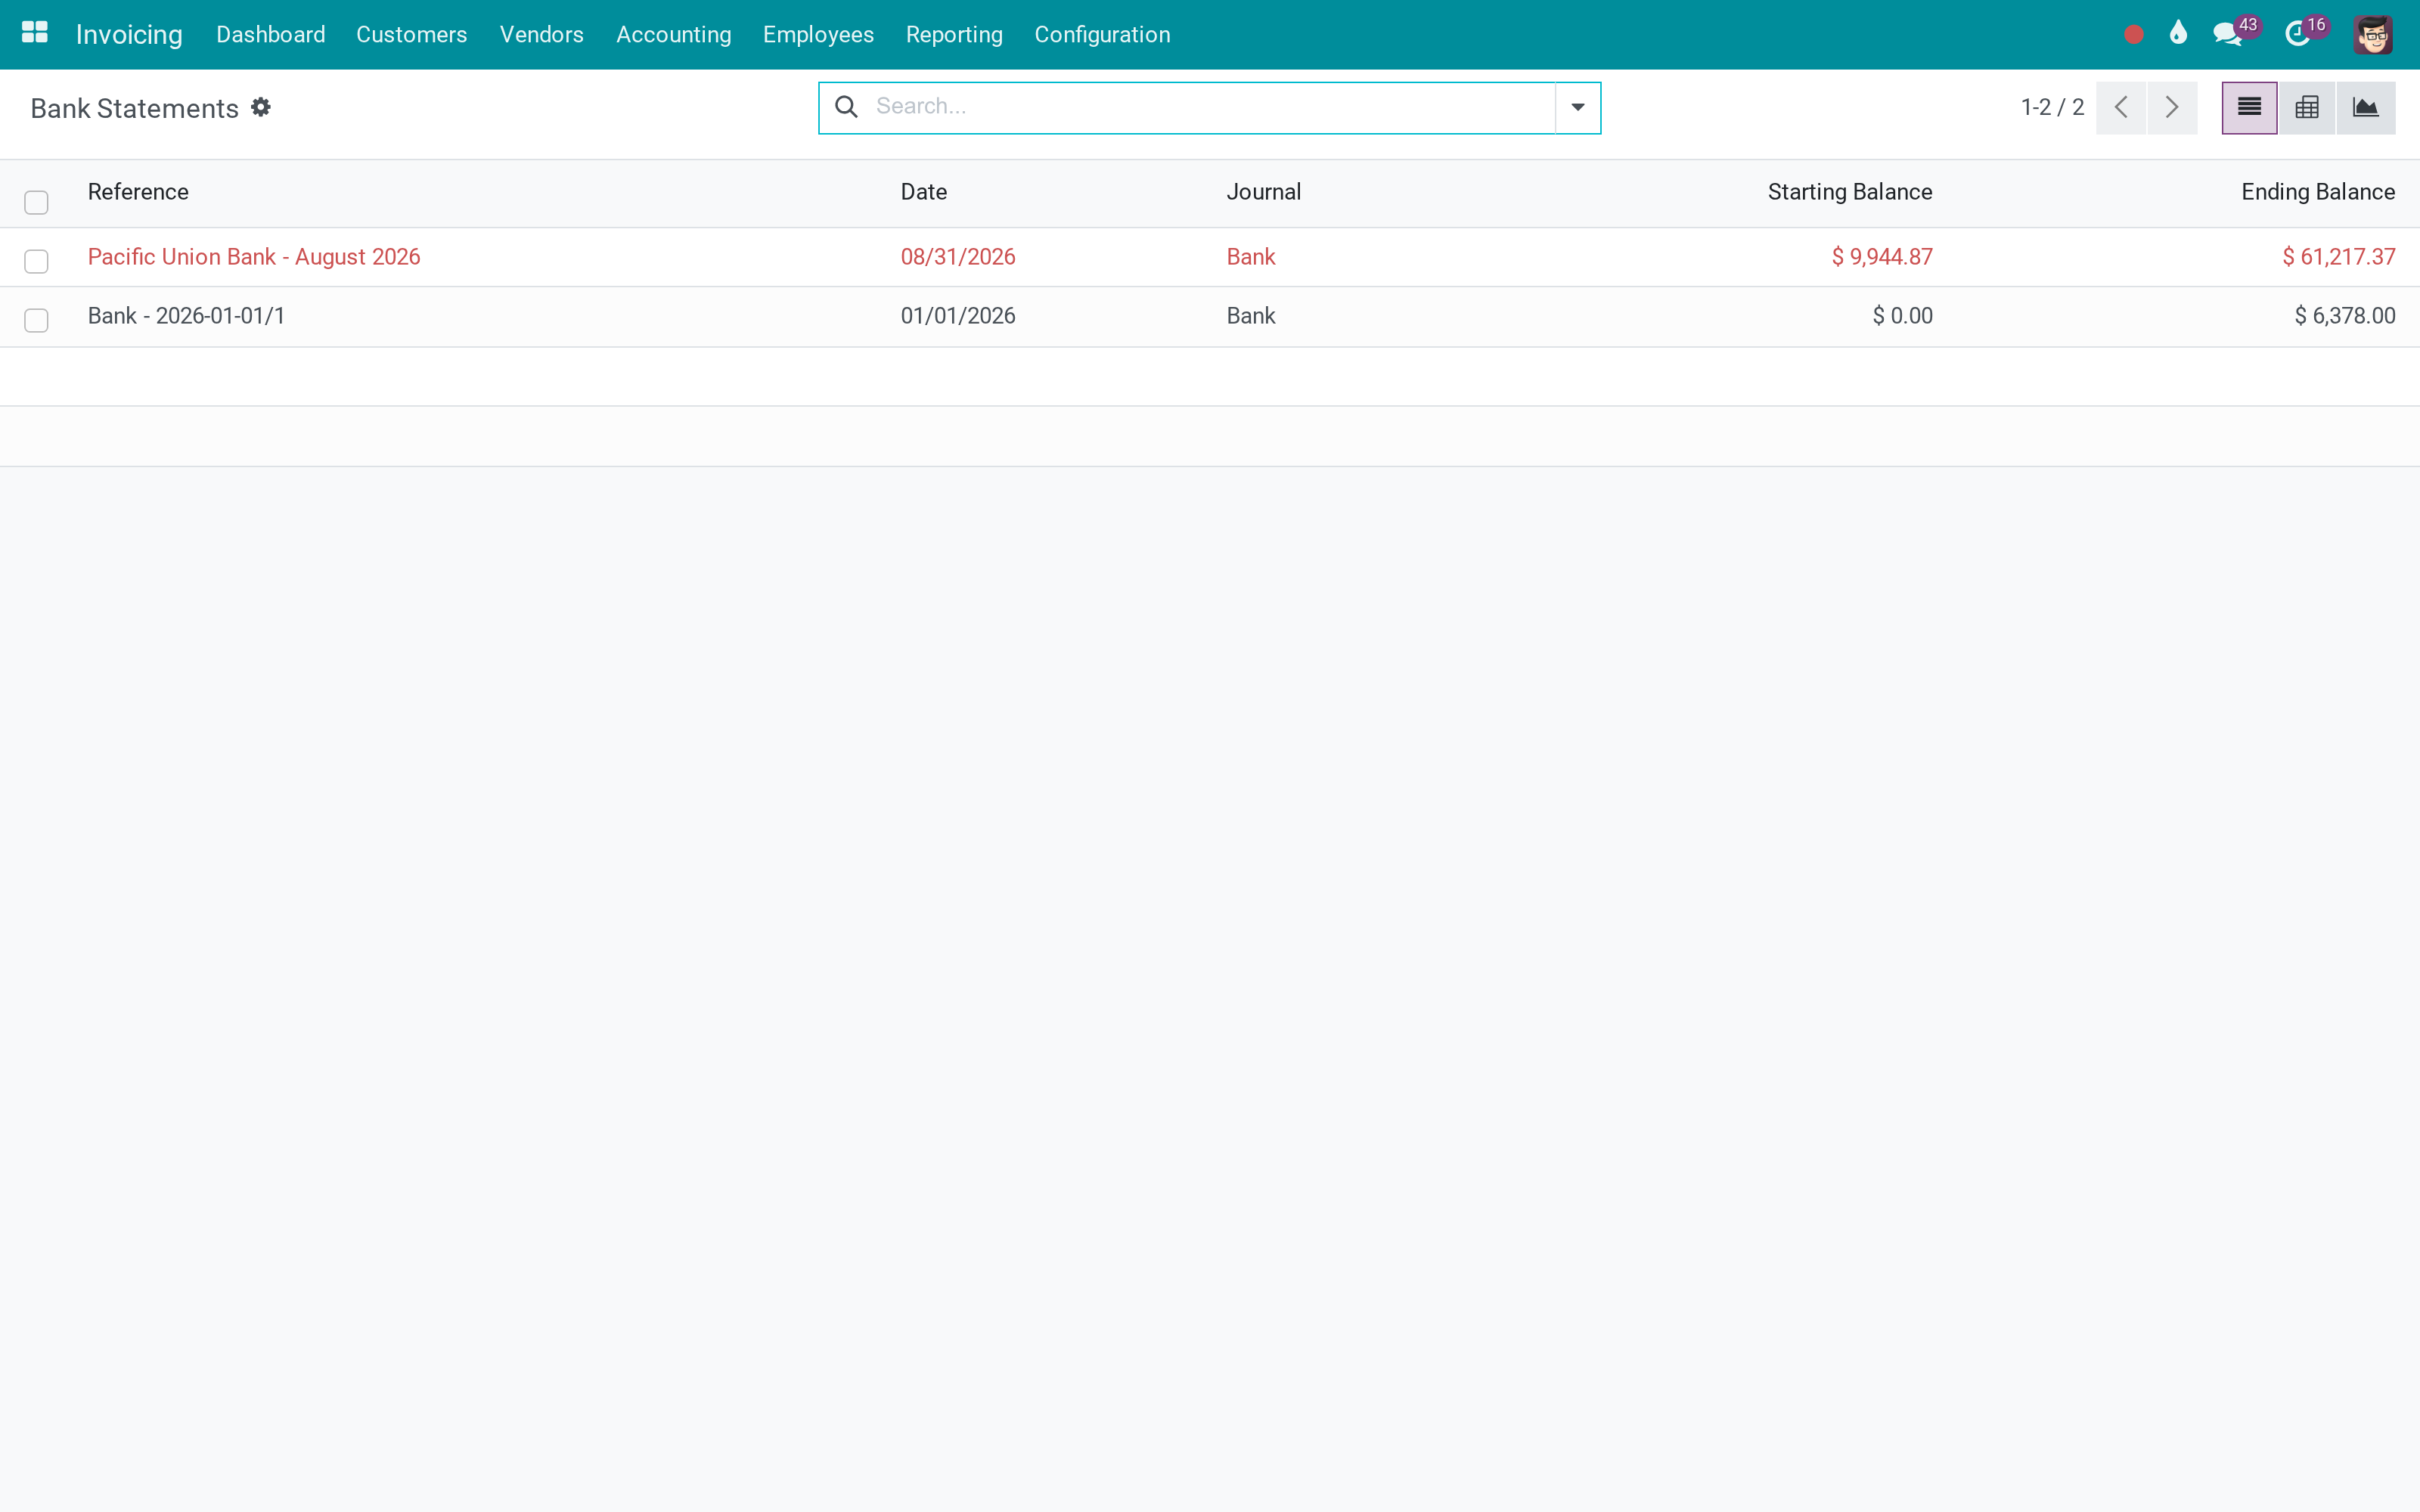
Bank statements
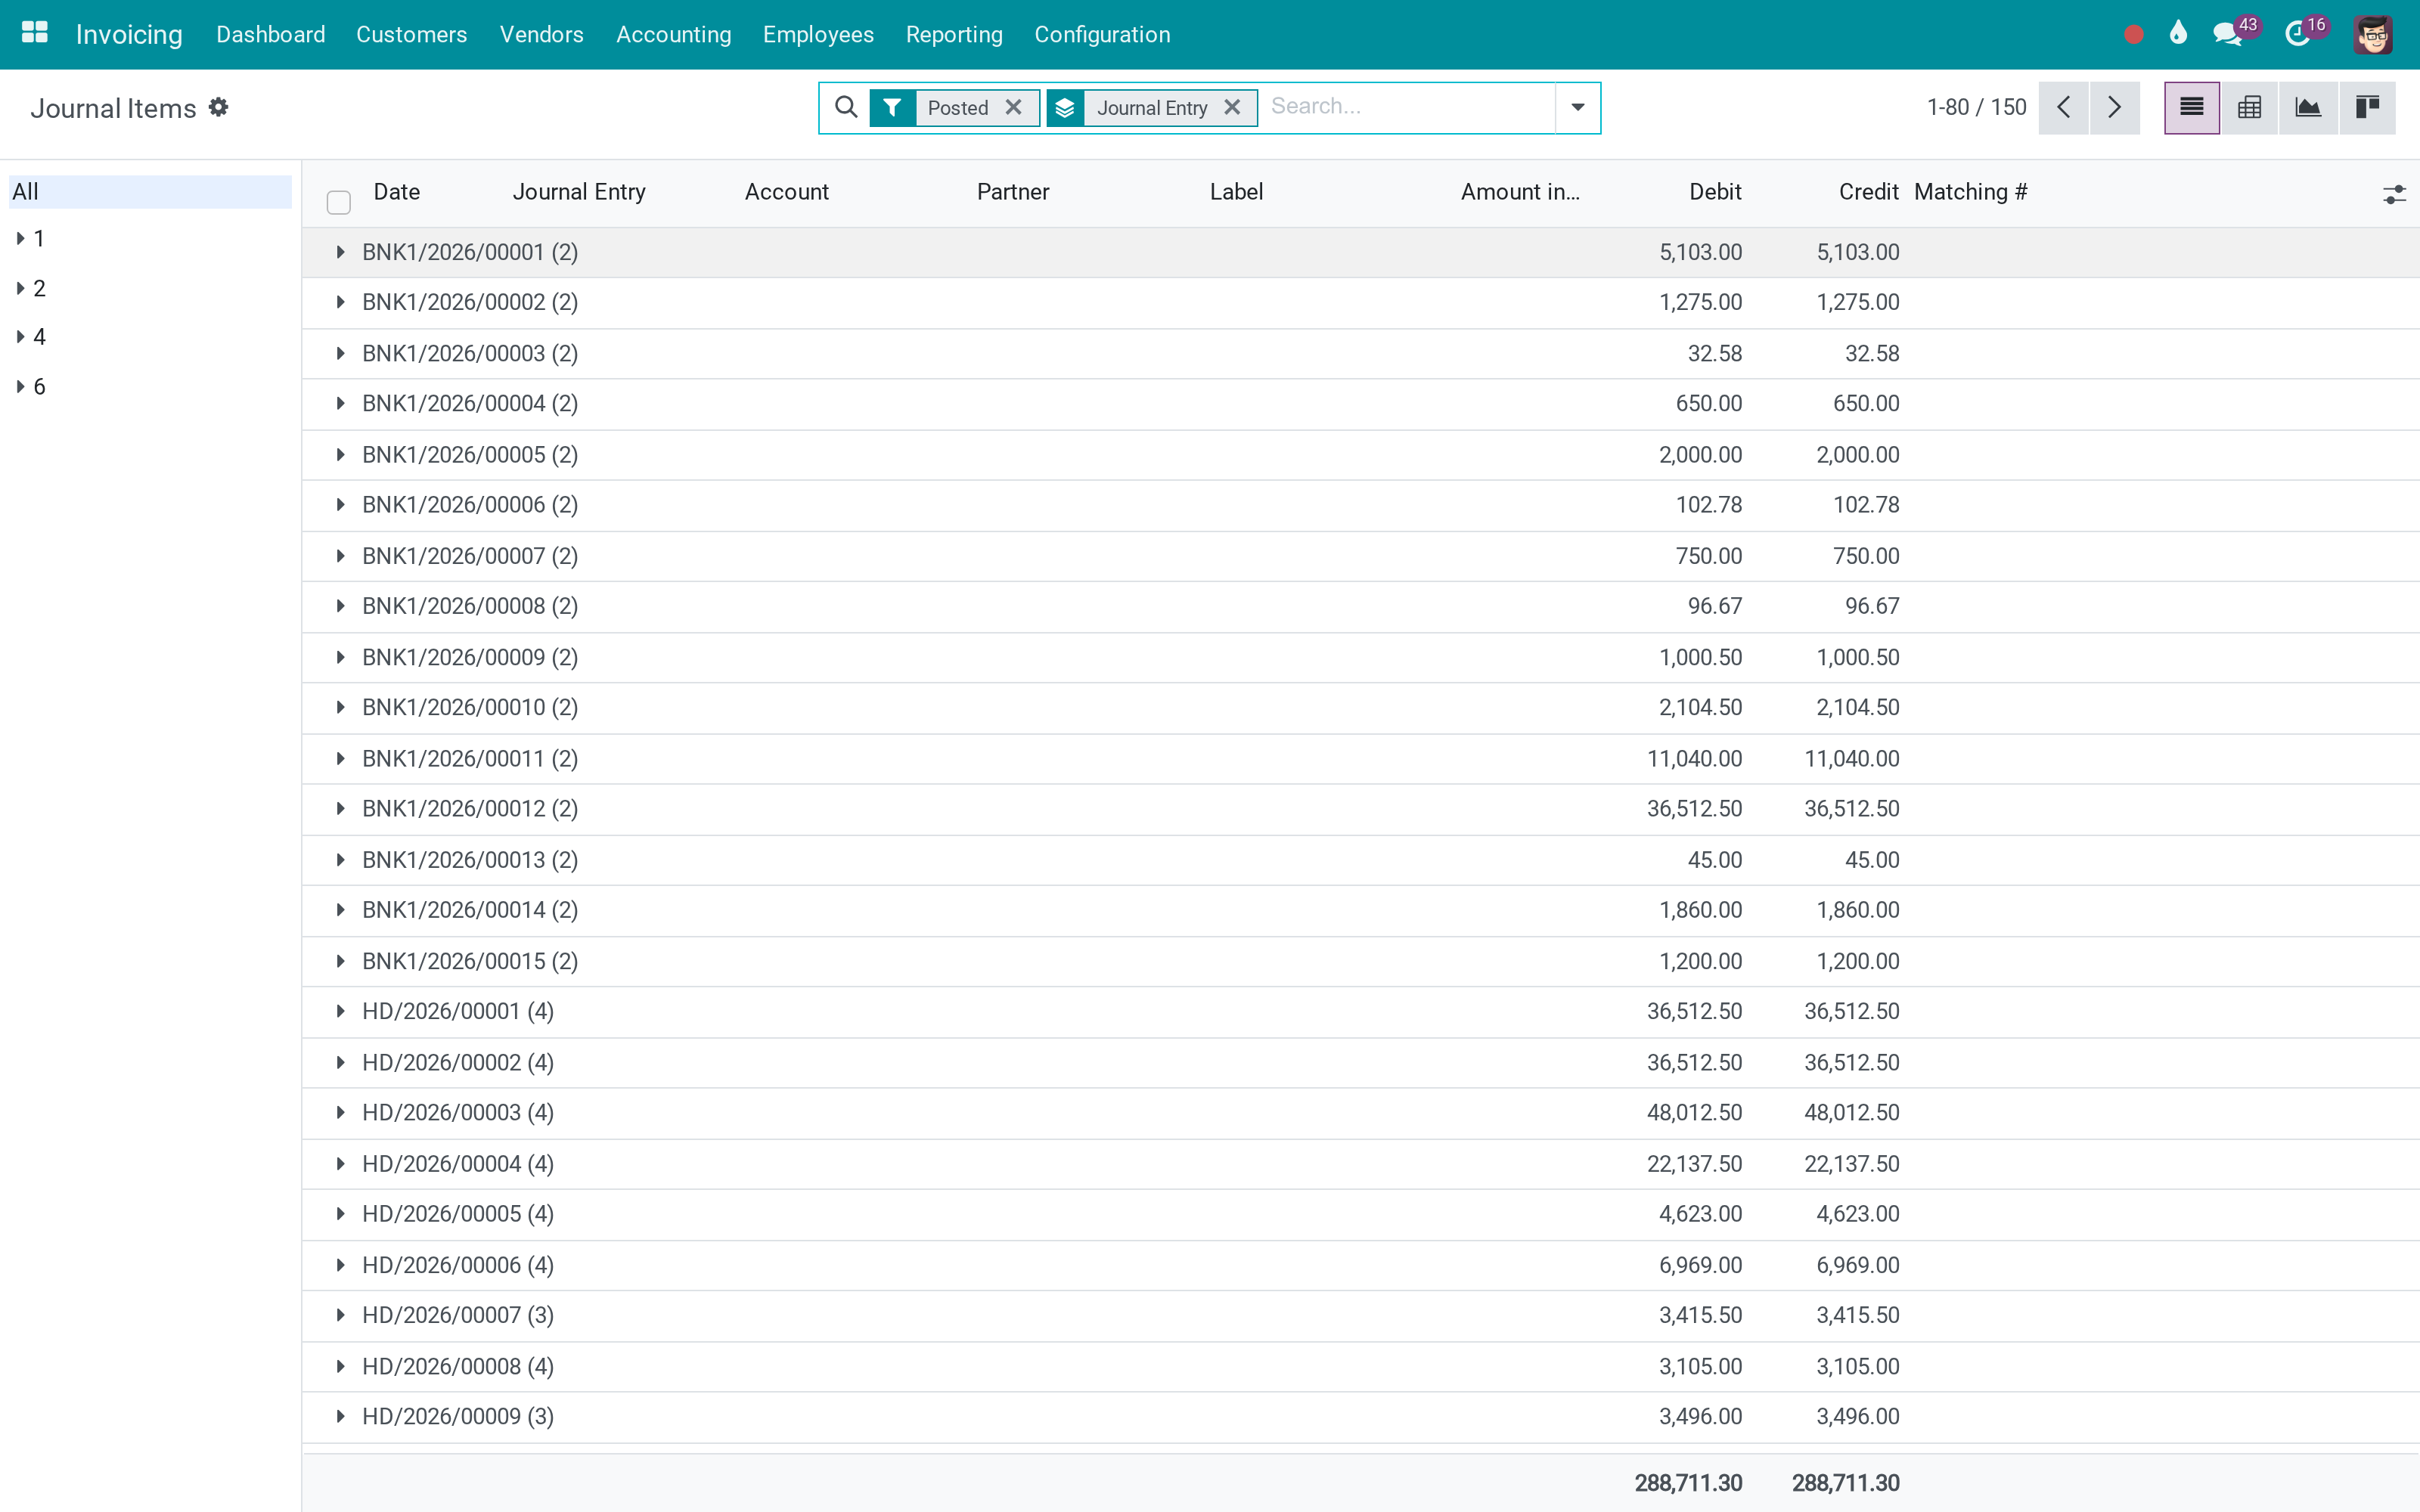
Journal items
What This App Does Not Do
Read this before you buy. Everything below is something the app deliberately leaves to another app or to you.
OFX, CAMT and CSV import are Odoo's own statement-import modules; this is the screen you use afterwards.
Odoo's reconciliation models still define the automatic proposals; this gives them a screen to be accepted in.
Live bank feeds are an Odoo Enterprise service; statements can be imported or entered by hand.
Entries are created by invoicing and payments as usual - reconciliation only says which ones settle which.
Works Well With
Apps from the same stack, built to fit this one:
Account Counterparts
See the other side of an entry while deciding what it settles.
Account CounterpartsWho Should Use Account Reconciliation Widget?
Accountant
Clears a bank statement in one screen instead of opening entries one at a time.
Chief accountant
Sees what is still unreconciled per journal, from the dashboard.
Controller
Leaves a line To Check with a note instead of guessing on the spot.
Frequently Asked Questions
What does Account Reconciliation Widget do?
Bank line on the left, matching entries on the right, validate in one click - the payments-matching workflow accountants had before, back on 17.0 and working on statements, payments and journal items alike.
What does Account Reconciliation Widget not do?
It does not import bank files. OFX, CAMT and CSV import are Odoo's own statement-import modules; this is the screen you use afterwards. It does not invent matching rules. Odoo's reconciliation models still define the automatic proposals; this gives them a screen to be accepted in. No bank synchronisation. Live bank feeds are an Odoo Enterprise service; statements can be imported or entered by hand. It reconciles, it does not post. Entries are created by invoicing and payments as usual - reconciliation only says which ones settle which.
Who is Account Reconciliation Widget for?
Accountant: Clears a bank statement in one screen instead of opening entries one at a time. Chief accountant: Sees what is still unreconciled per journal, from the dashboard. Controller: Leaves a line To Check with a note instead of guessing on the spot.
Which Odoo version and editions does it support?
Odoo 17.0 - Odoo Community, Odoo Enterprise, Viindoo Cloud. Upgrades to a newer Odoo series are a separate purchase for that series.
What does it depend on?
It installs on top of: account. Odoo installs them with it.
How do I set it up?
Three steps, the way reconciliation was always done.
What works well with it?
Accounting Foundation (viin_account): The accounting layer these entries live in. Accounting Analysis (to_accounting_bi): Slice reconciled and unreconciled lines in a pivot. Account Counterparts (to_account_counterpart): See the other side of an entry while deciding what it settles.
Can I try it before buying?
Yes - the Live Preview button at the top of this page opens the module's own screen on a working database.
How do I get support?
Write to apps.support@viindoo.com with your Odoo version and the technical name viin_account_reconciliation; pre-sales questions go to sales@viindoo.com.
See Account Reconciliation Widget in Action
The reconciliation screen Odoo 17 took away
Need help with Account Reconciliation Widget?
For questions, implementation support, or consulting services, contact Viindoo.
Pre-Sales & Partnership
sales@viindoo.comWhen contacting us, please include:
- Odoo/Viindoo version (Odoo CE / Viindoo Editions).
- Number of users and business scope.
- Other modules currently in use.
Technical Support
apps.support@viindoo.comFor faster troubleshooting, please provide:
- Order number or app reference.
- Odoo/Viindoo version & edition.
- Steps to reproduce the issue.
- Screenshots/logs if available.
Upgrades to a newer Odoo series are a separate purchase for that series.
Technical Requirement
Changes log
0.7.4 - Latest on the 17.0 line
- The payments-matching screen is available again on 17.0, from the dashboard, a statement, a payment or a selection of journal items.
- Match several entries against one statement line, or write the difference off in Manual Operations.
- Lines whose partner and amount match an open entry exactly are reconciled automatically.
Installation
- Navigate to Apps.
- Search with keyword viin_account_reconciliation.
- Press Install.
Instruction
Instruction video: Account Reconciliation Widget
Who can reconcile
The reconciliation screens are meant for accountants. Their entry points are shown only to users who have the Accountant access right (named Show Full Accounting Features when the Viindoo accounting app is not installed):
- the Reconcile button of a bank or cash journal on the Accounting dashboard (for example Reconcile 11 Items) and the link to the transactions to check;
- Payments Matching in the menu of a journal on the Accounting dashboard;
- Actions ‣ Reconcile in the list of journal items.
Reconciliation between invoices and payments
1. Create an invoice and record a payment independently.
You can create a customer invoice from many views, such as on a sale order.
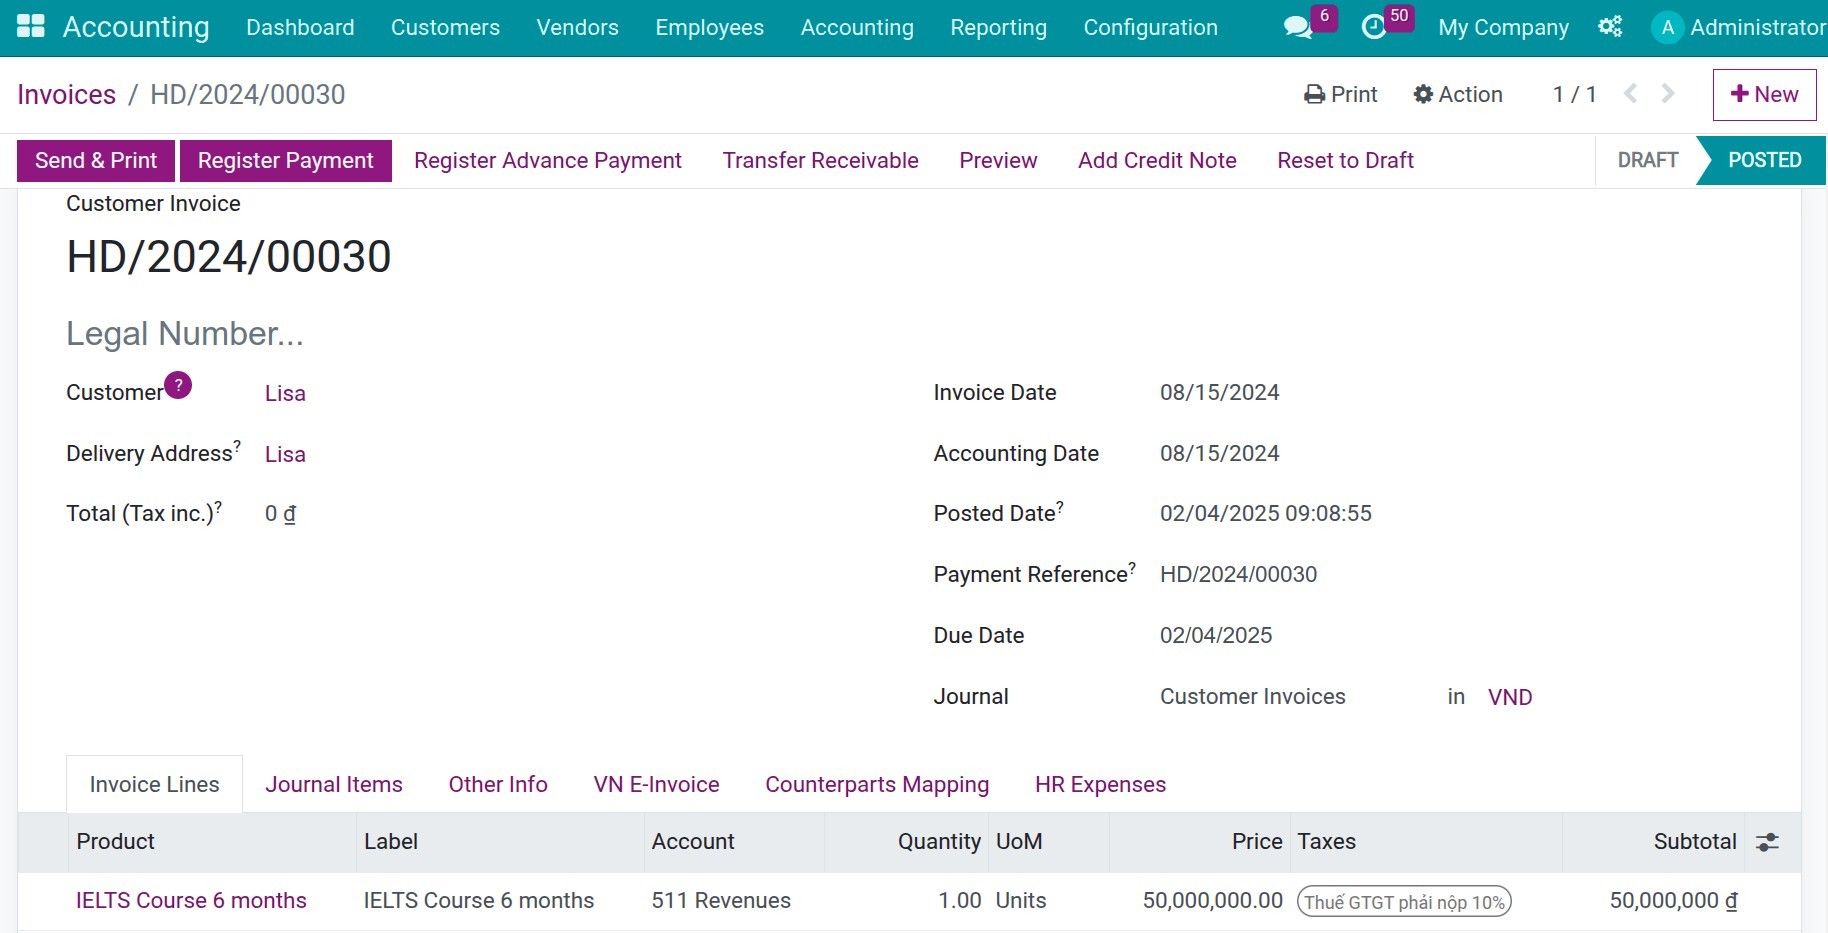
In some situations, you need to create a stand-alone payment, for example, customer's payments in advance or over payments, etc.
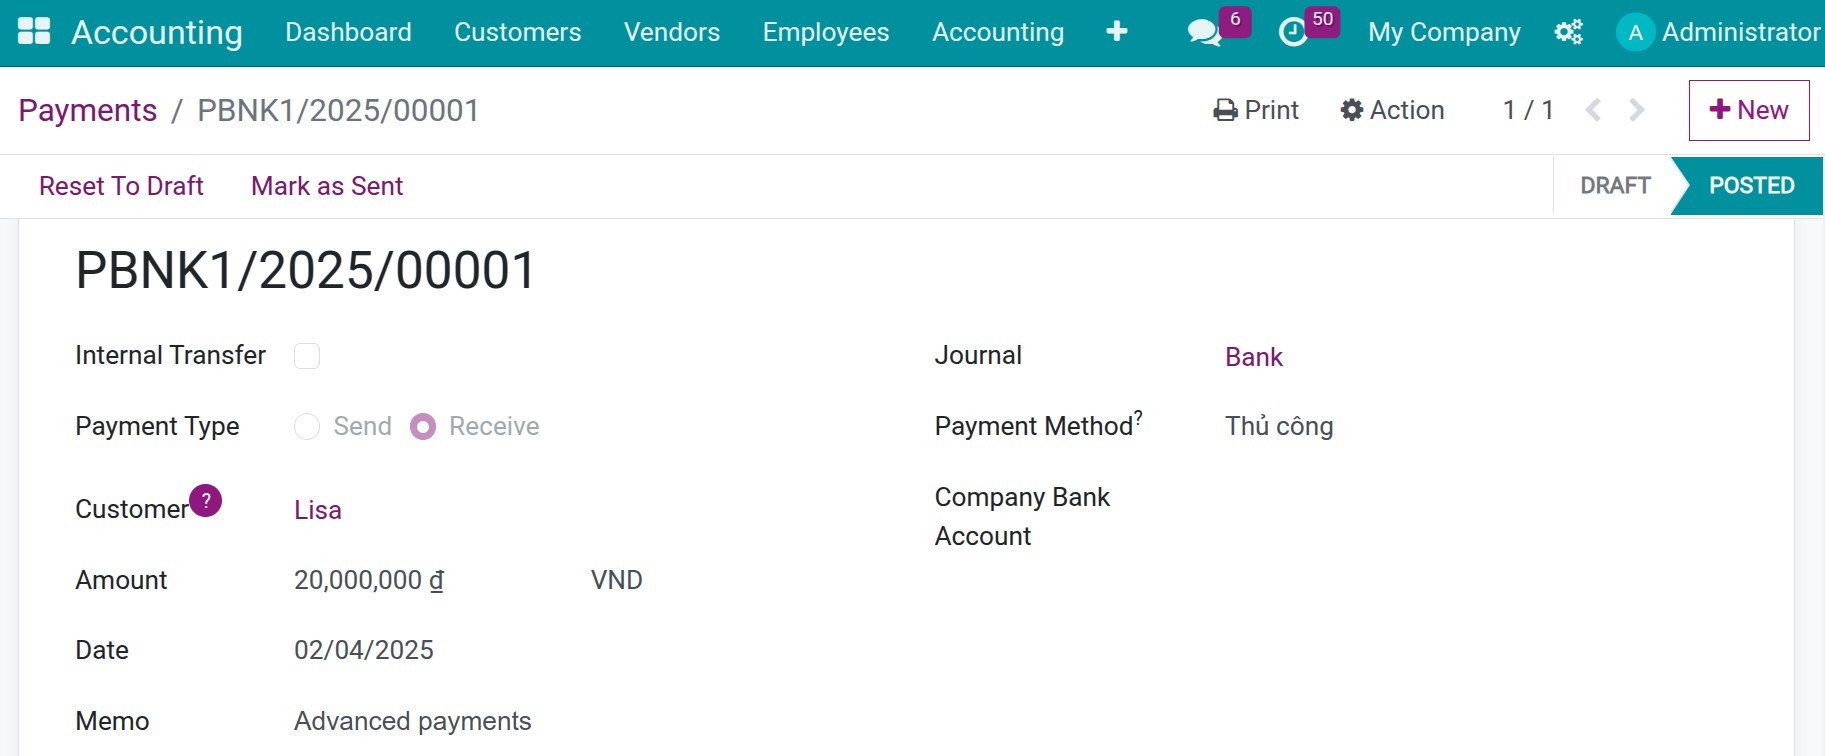
2. Reconciliation.
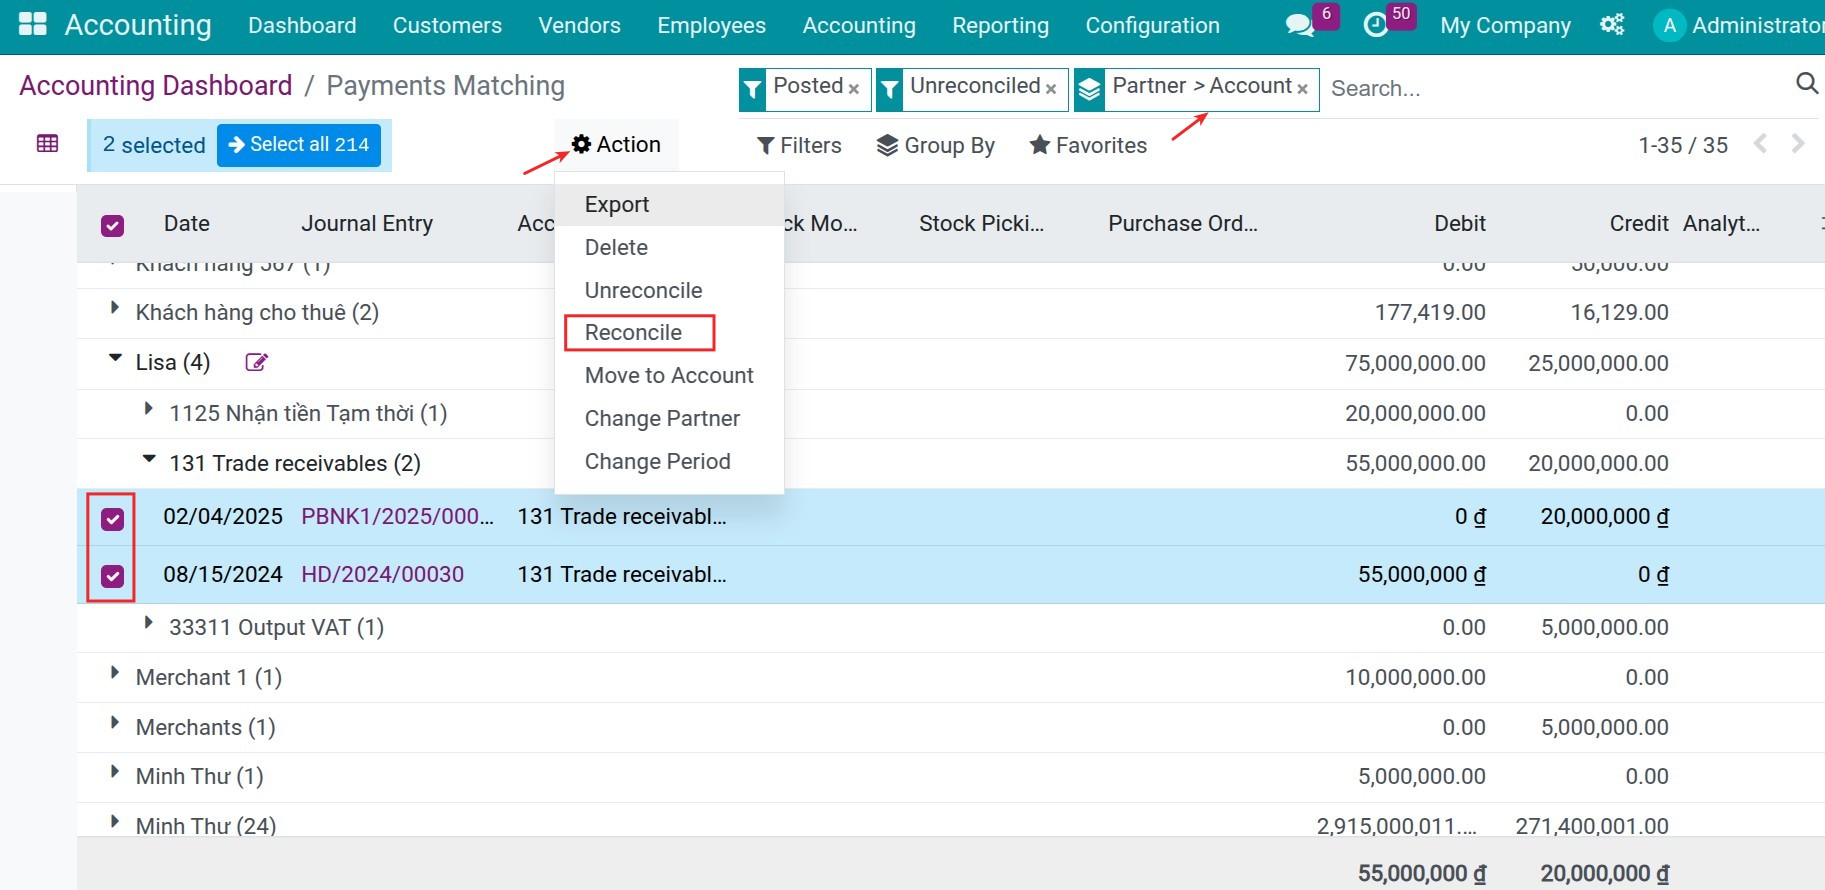
Go to Accounting ‣ Dashboard, open the menu of the Customer Invoices journal (the three dots at the top right of the card), then choose Payments Matching.
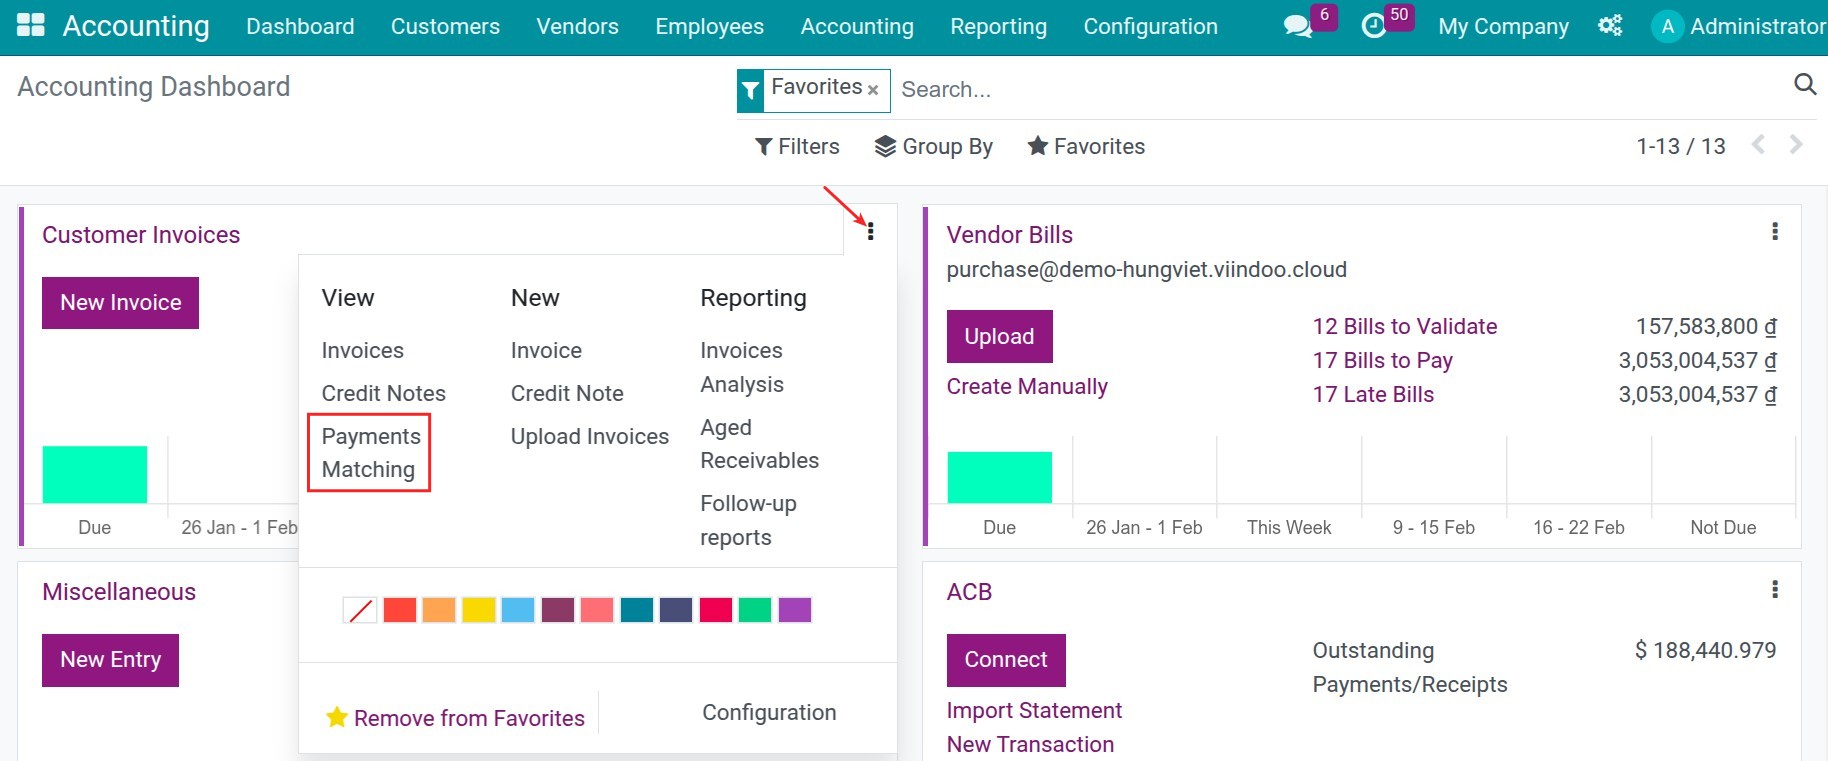
The list shows the posted journal items that are not reconciled yet, grouped by account and partner. Expand the groups, or use the filters and Group By, to find the items you need. Tick them, then click Actions ‣ Reconcile.
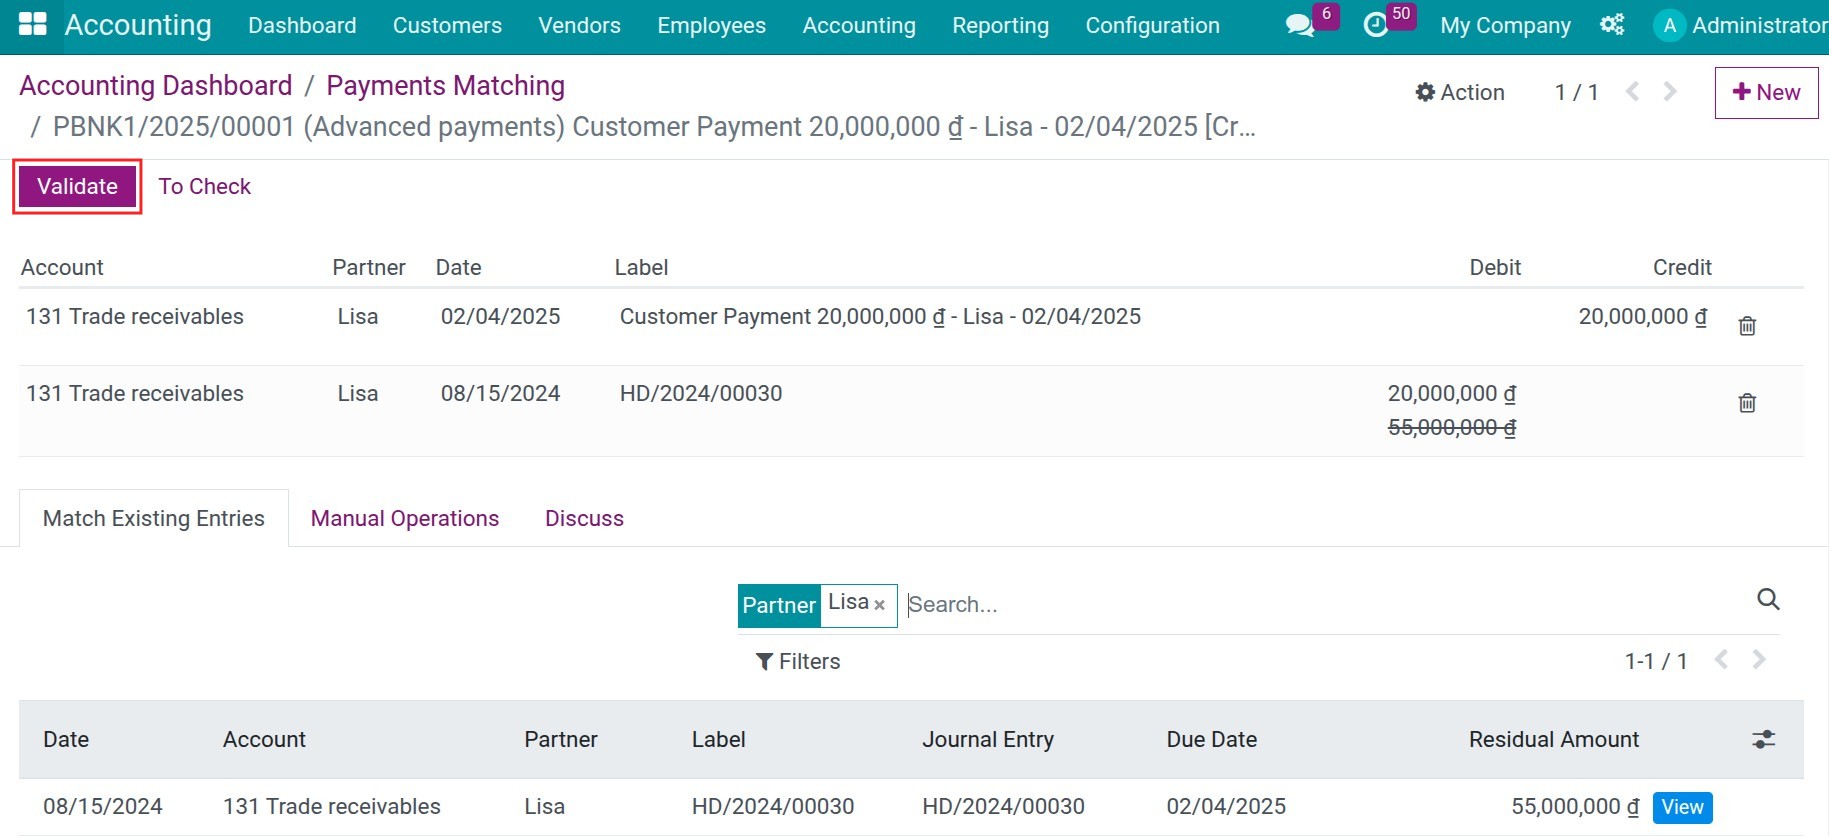
The Reconciliation screen opens with the selected items. When they offset each other exactly, as an invoice and a payment of the same amount do, there is no payment difference: click Validate.
Clearing journal items with a payment difference
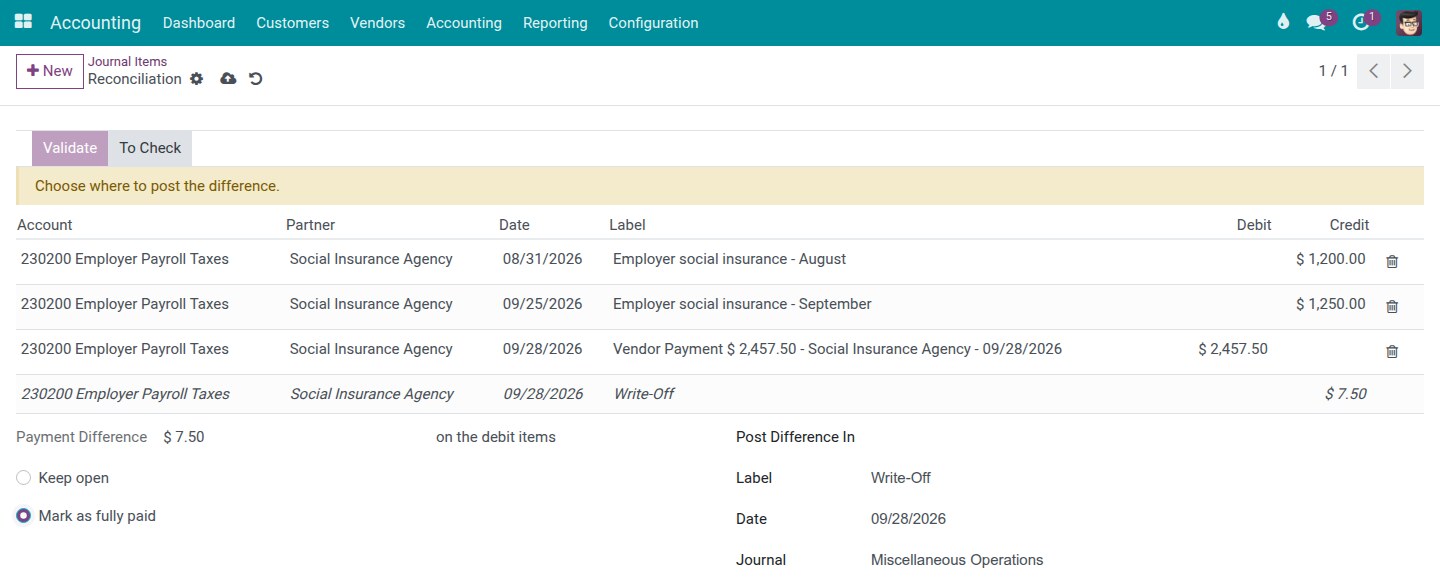
Use this screen to clear a balance-sheet account: accrued liabilities (social insurance, withheld taxes, salaries payable) against the payments that settle them, an invoice against a credit note or an earlier payment, or an interim account. The example below clears two months of accrued social insurance against one payment that includes a small late-payment interest.
1. Select the journal items to reconcile.
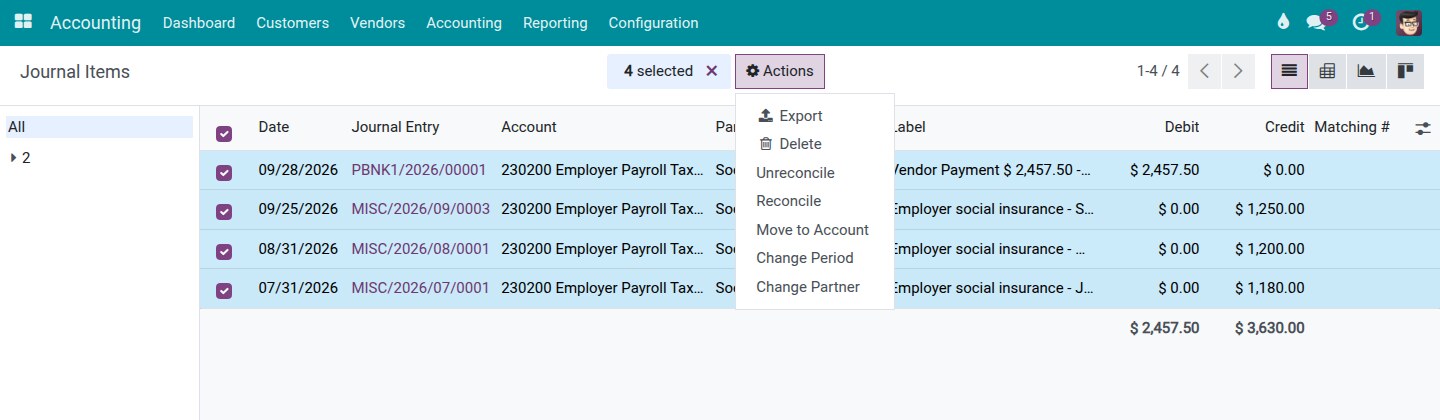
Go to Accounting ‣ Accounting ‣ Journals ‣ Journal Items. Search the account or the partner (type its name in the search box and choose Search Account for or Search Partner for), add the Unreconciled filter, tick the items, then click Actions ‣ Reconcile.
2. Check the lines and take out a wrong line.
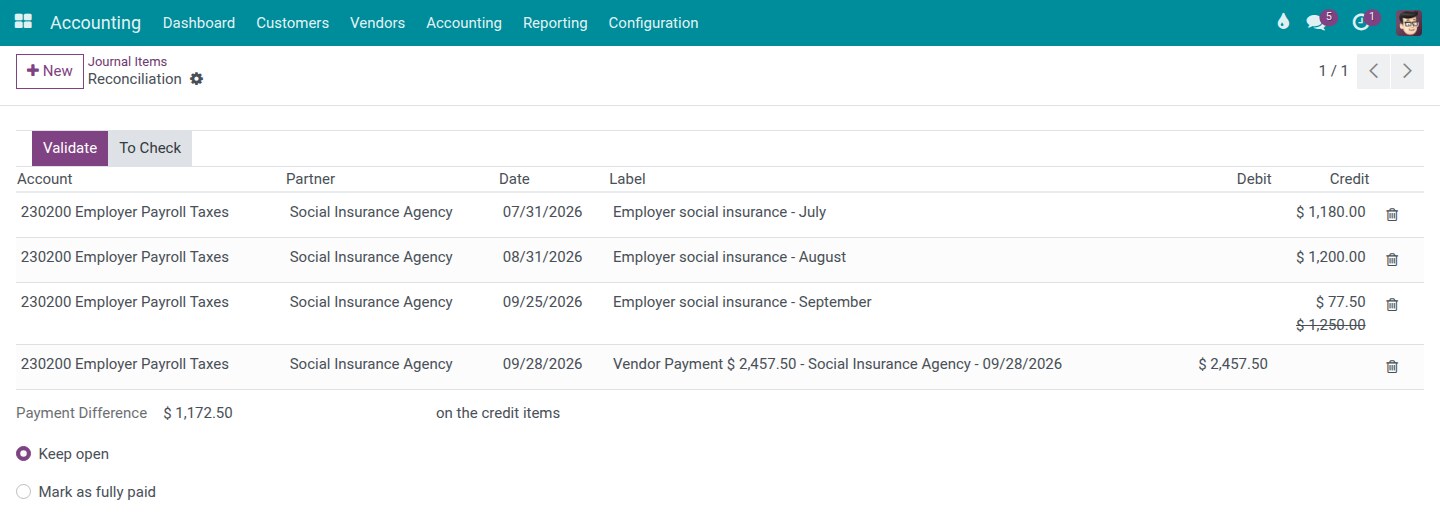
The Reconciliation screen lists the selected items. Each row shows the amount that will be reconciled; when an item is only partly settled, its full open amount is shown struck through below it. Under the table, Payment Difference shows the amount that stays open and on which side it stays (on the debit items or on the credit items).
If you selected a line by mistake, click the trash icon on its row. The line leaves the table and the payment difference is recomputed. The line stays out until you add it again: you find it in the Match Existing Entries tab below the table, where you can click it to bring it back.
3. Decide what to do with the difference.
This is the same question as in the Register Payment window of an invoice:
- Keep open (the default): nothing extra is posted. The items are partly reconciled and the difference stays open on them, for a later payment.
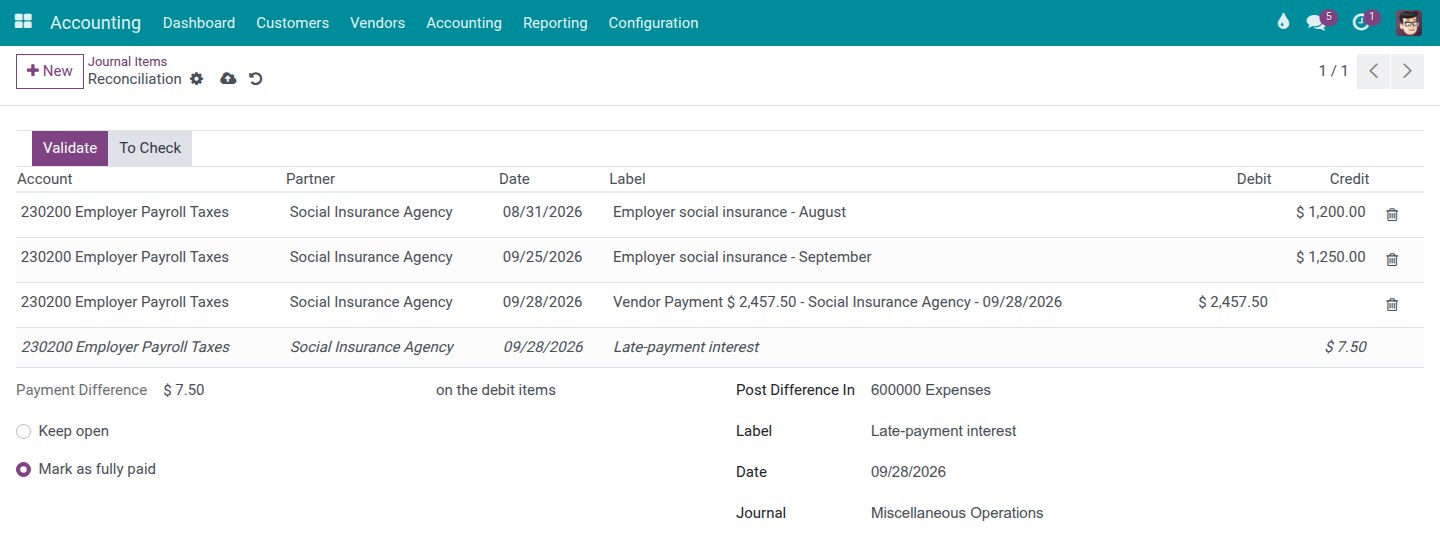
- Mark as fully paid: the items are closed in full by one difference entry. Fill in:
- Post Difference In: the account that receives the difference, for example an expense account for a late-payment interest or a rounding, or an income account for a small overpayment;
- Label: the label of the difference lines (Write-Off by default);
- Date: the date of the difference entry, today by default;
- Journal: the journal of the difference entry, a miscellaneous journal proposed by default.
With Mark as fully paid, the table shows one more line in italics: the line the difference entry posts on the reconciled account, with the partner of the items. Until everything needed is filled in, Validate stays disabled and a message above the table says what to do, for example "Choose where to post the difference." or, when the date is locked, "The difference date 12/15/2025 is on or before the lock date 12/31/2025. Choose a later date."
4. Validate.
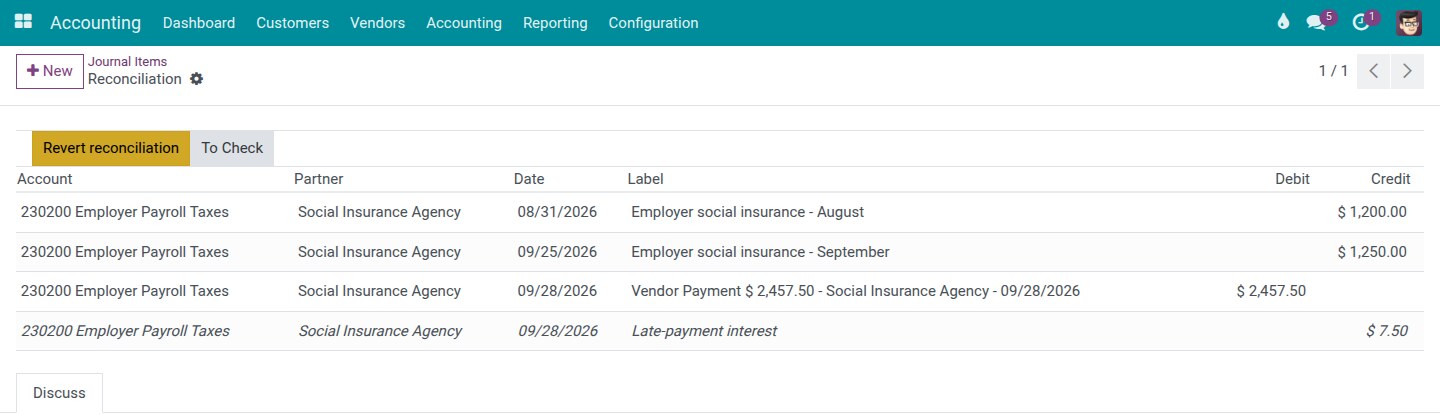
Click Validate. The software posts exactly what the screen shows: with Mark as fully paid, one difference entry in the chosen journal and on the chosen date, which moves the difference to the Post Difference In account and closes the items in full. The items are reconciled and the Revert reconciliation button appears.
5. Revert the reconciliation.
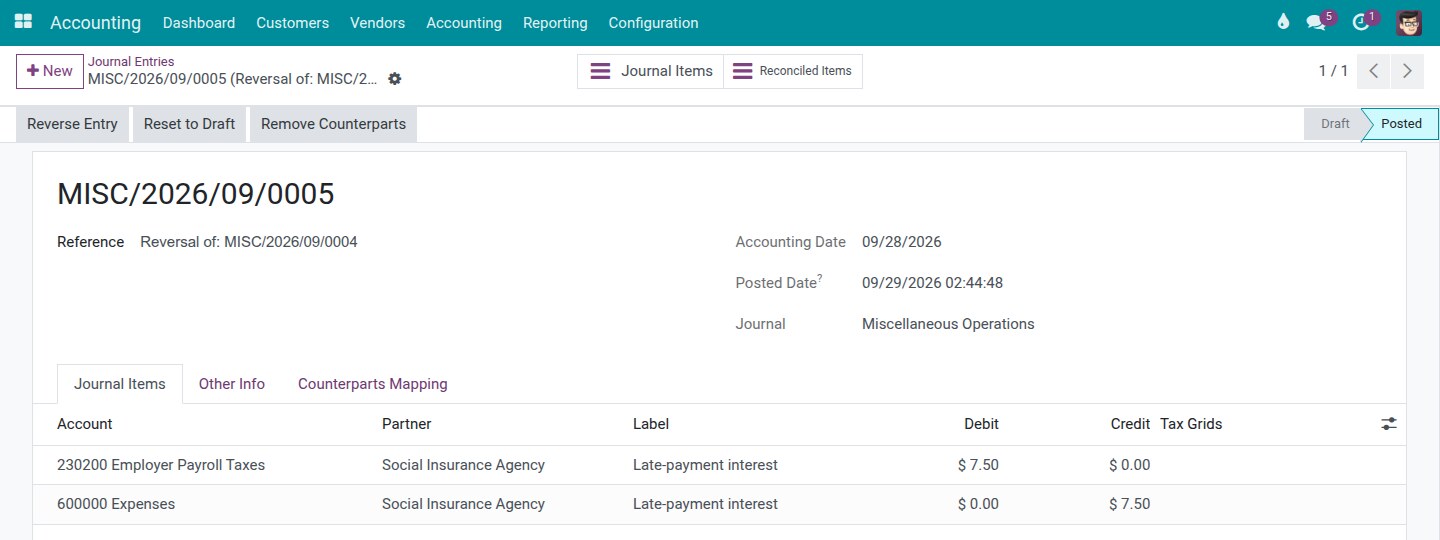
Click Revert reconciliation and confirm. Only what this validation did is undone: the items are open again, and the difference entry is cancelled by a reversal entry whose reference reads "Reversal of: ..." followed by the difference entry's number. Nothing posted is deleted. The screen comes back with Keep open selected, ready for a new decision.
Bank reconciliation
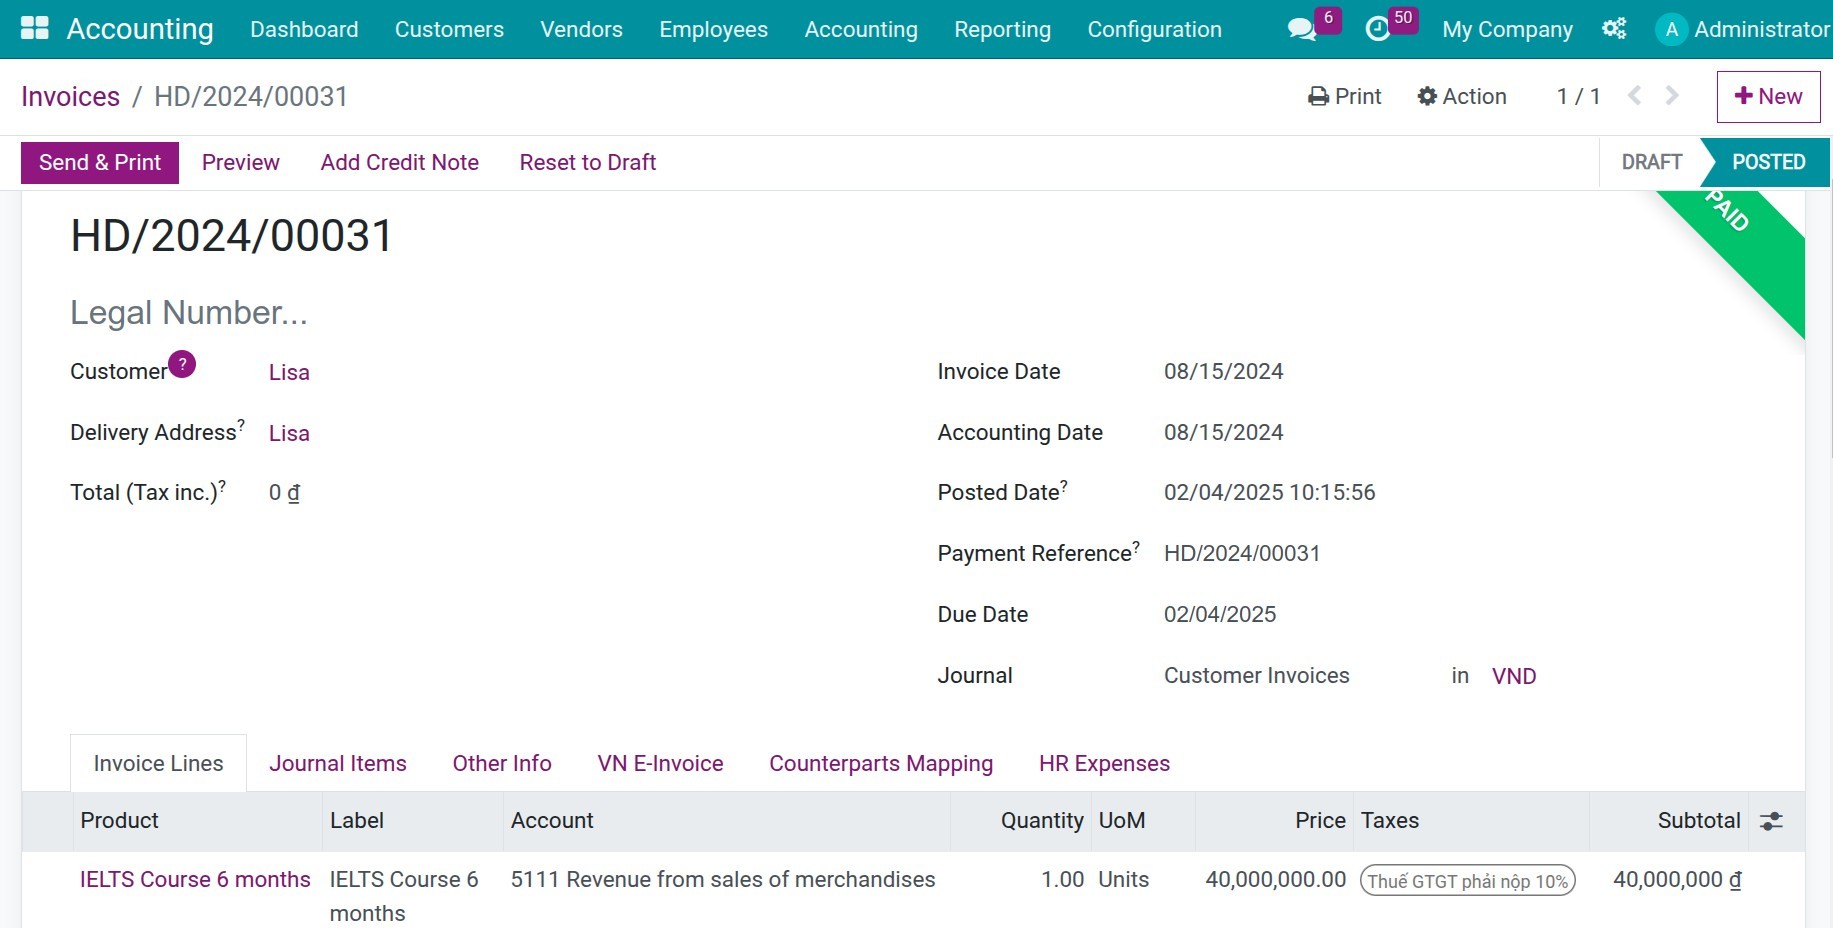
1. Create an invoice and record a payment by bank.
You can directly register payment on the interface of invoice.
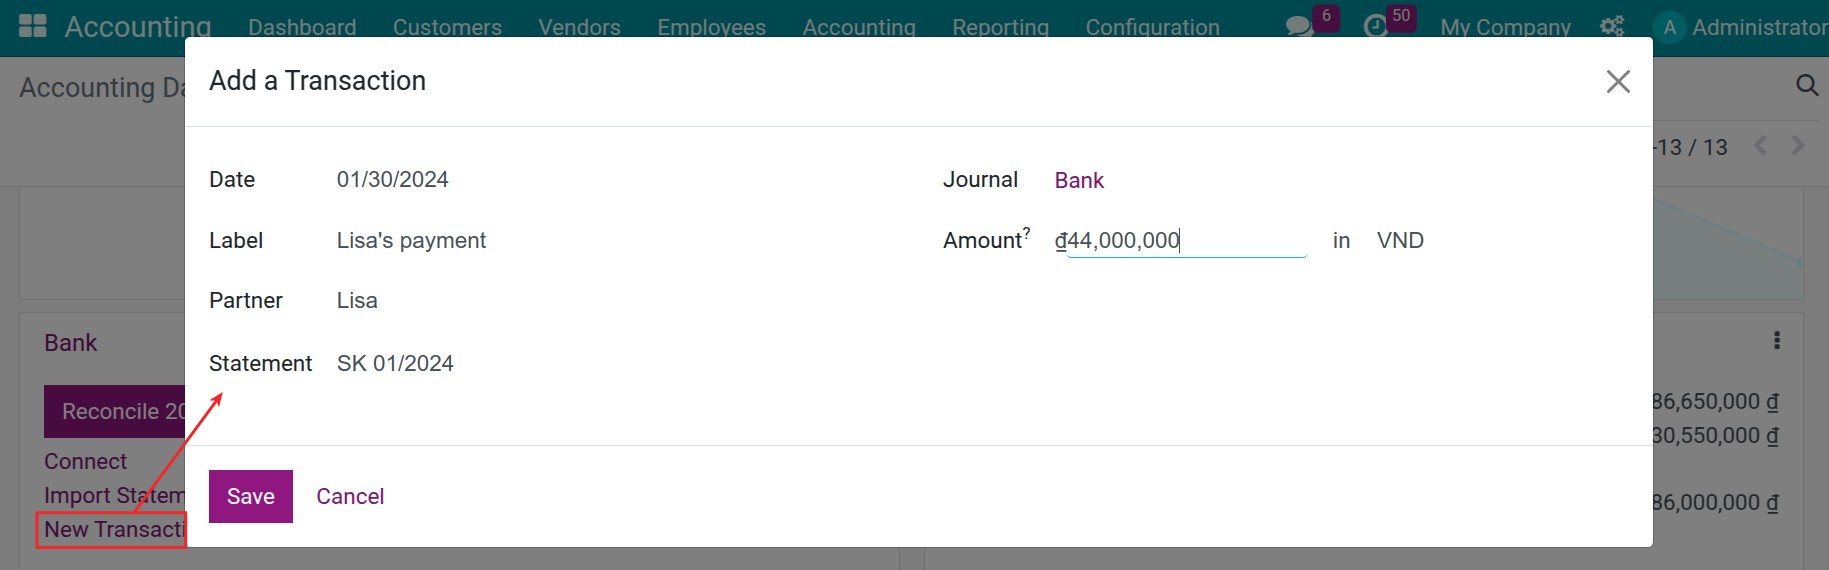
2. Create a bank statement and proceed to the bank reconciliation.
In the Accounting Software, create the bank statements and process the bank reconciliation. On the card of a bank journal in Accounting ‣ Dashboard, Import Statement imports a bank statement and New Transaction records one transaction by hand.
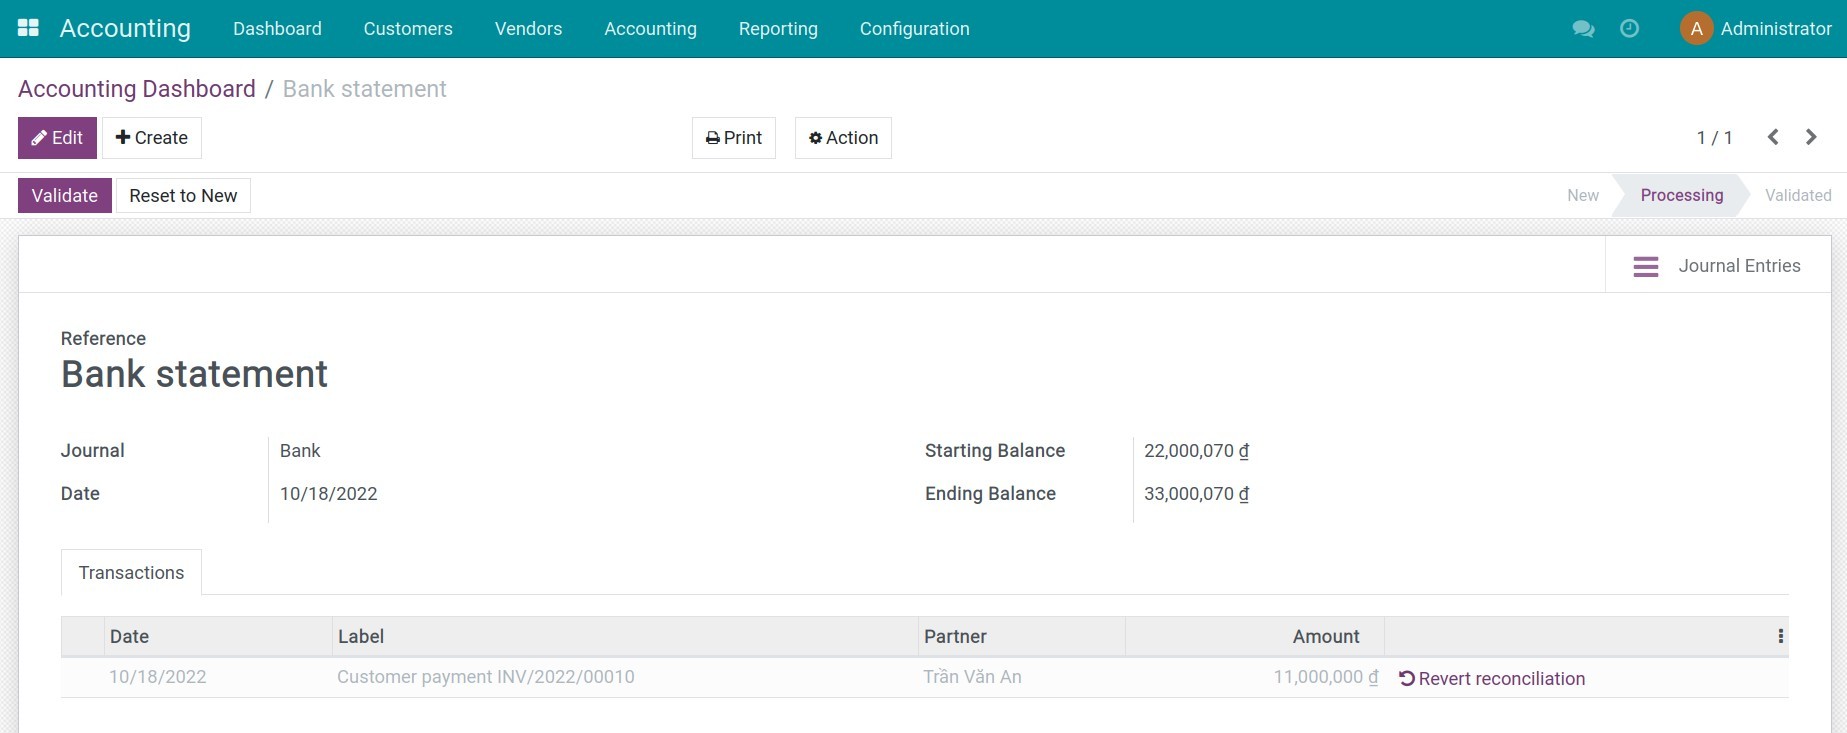
Reconciled transactions are listed with the Reconciled filter in the list view of the bank reconciliation screen. Revert reconciliation on a row undoes that reconciliation: the transaction goes back to the transactions to reconcile, with its amount on the bank suspense account again.
Reconciling a bank transaction
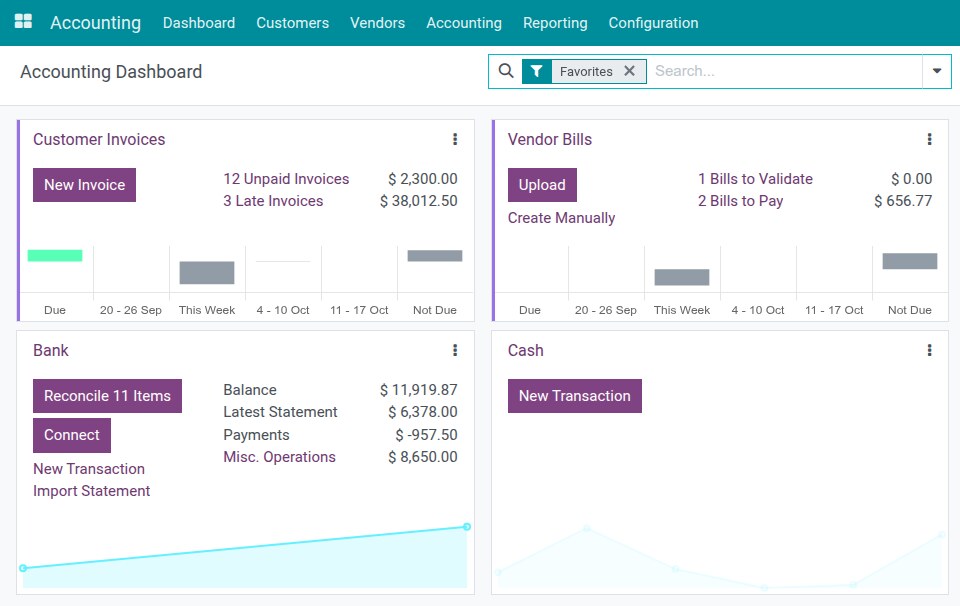
1. Open the reconciliation screen.
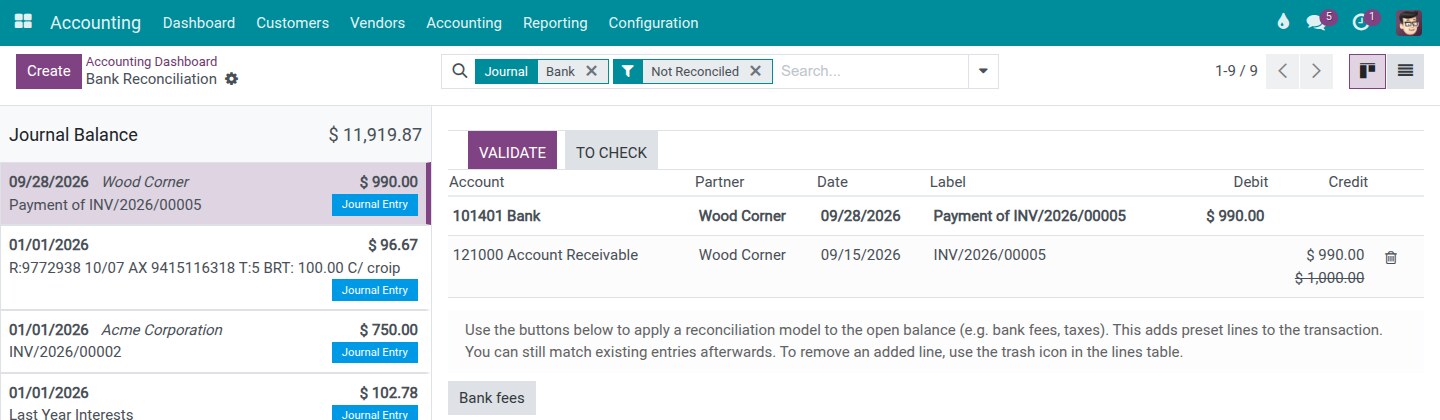
Go to Accounting ‣ Dashboard and click the Reconcile button on the card of a bank or cash journal (for example Reconcile 11 Items). The transactions to reconcile are listed on the left; the lines of the selected transaction are on the right. The first line is the bank line; the other lines are what will be posted against it.
2. Start from the proposal.
When a reconciliation model finds matching items, for example the open invoices of the customer who paid, the transaction opens with them already matched. When an item is only partly paid, the row shows the amount allocated to it, with its full open amount struck through below.
3. Match existing entries.
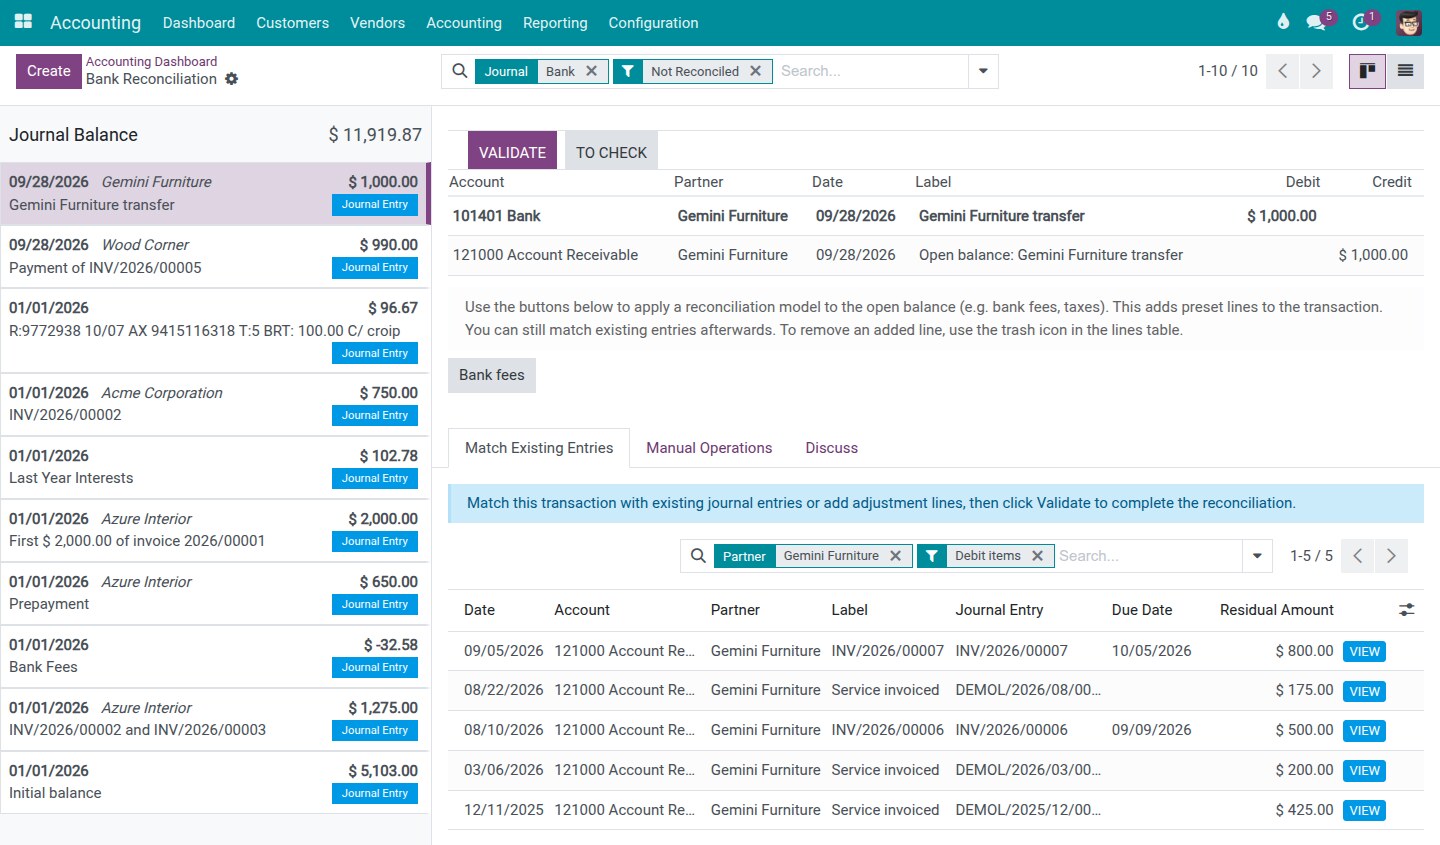
The Match Existing Entries tab lists the open items of the partner. For money received the list opens with the Debit items filter, for money paid with Credit items; remove the filter to see both sides, for example to settle a customer invoice and a vendor bill of the same partner together. Click an item to match it.
- A matched item leaves the list. Clicking its row in the lines table selects it; it does not remove it.
- To take a line out, click the trash icon on its row. It stays out until you add it again, also when you switch to another transaction and come back.
- Whatever the matched items do not use appears as the Open balance line: on the partner's account when the payer is known (the receivable account for a customer), on the bank suspense account when it is not.
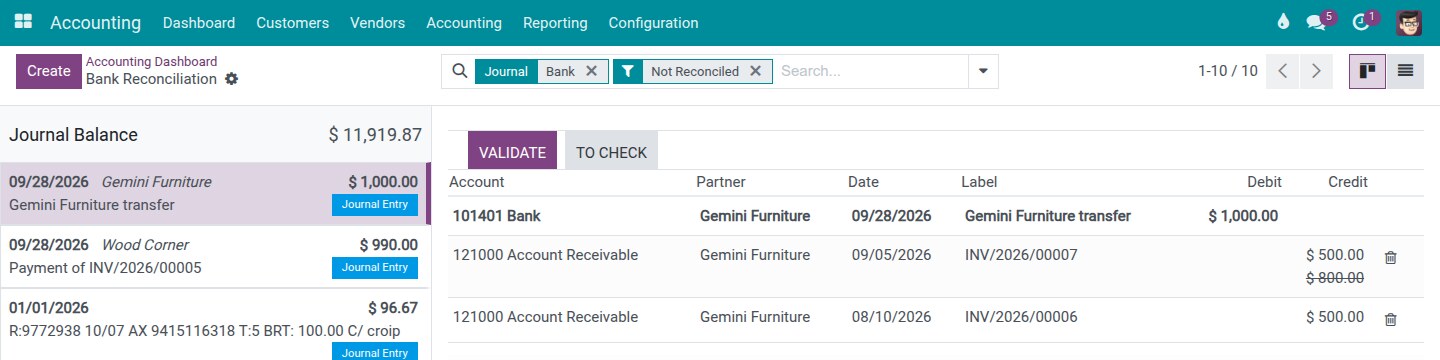
4. Several items: the oldest due first.
When one transaction pays several items, the money goes to the item with the oldest due date first, whatever order you clicked them in. The next item gets what is left, and its remaining amount stays open unless you decide otherwise (next step).
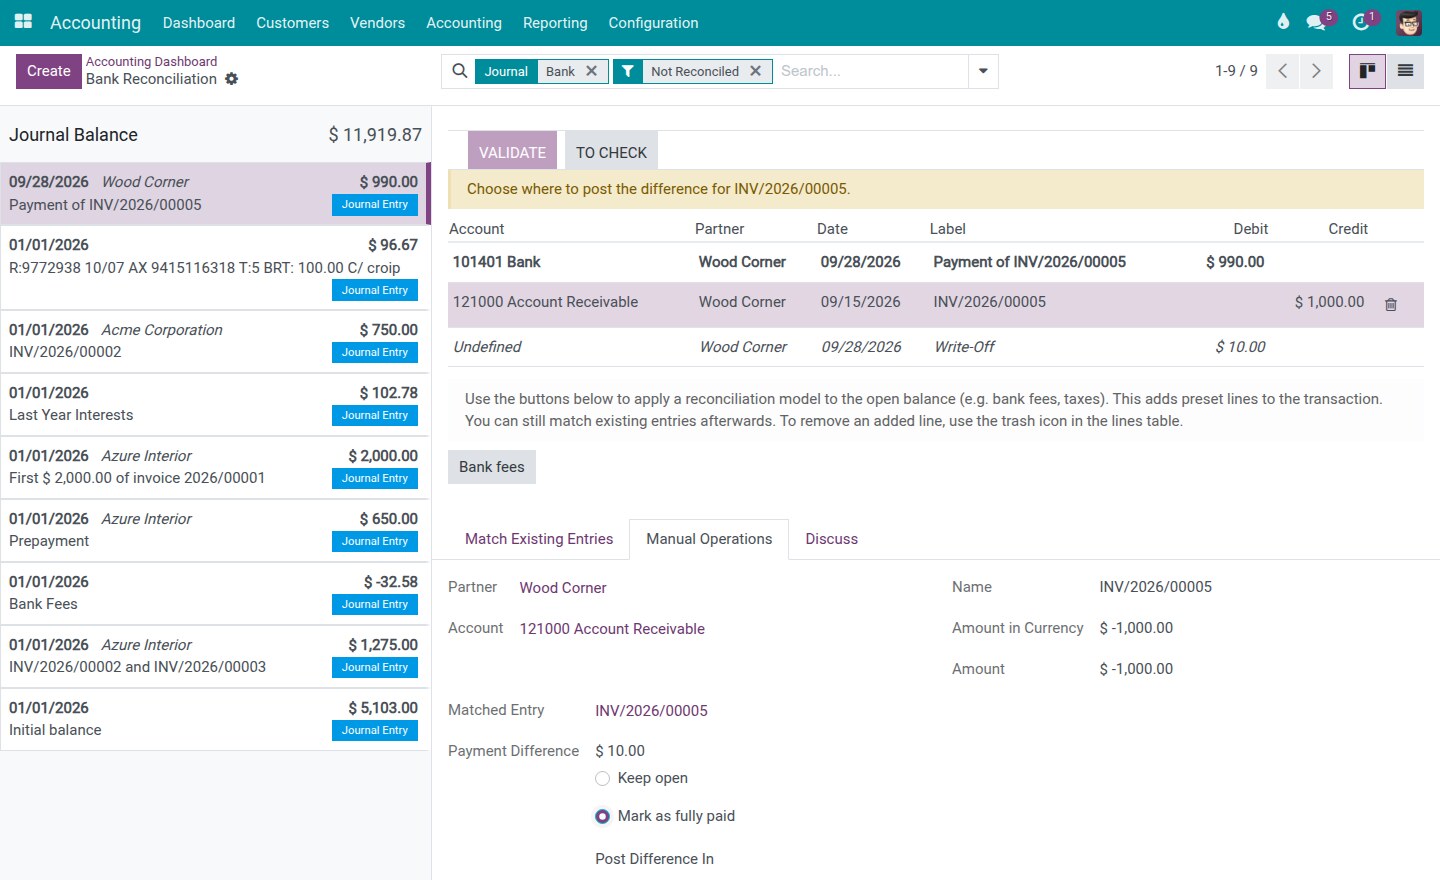
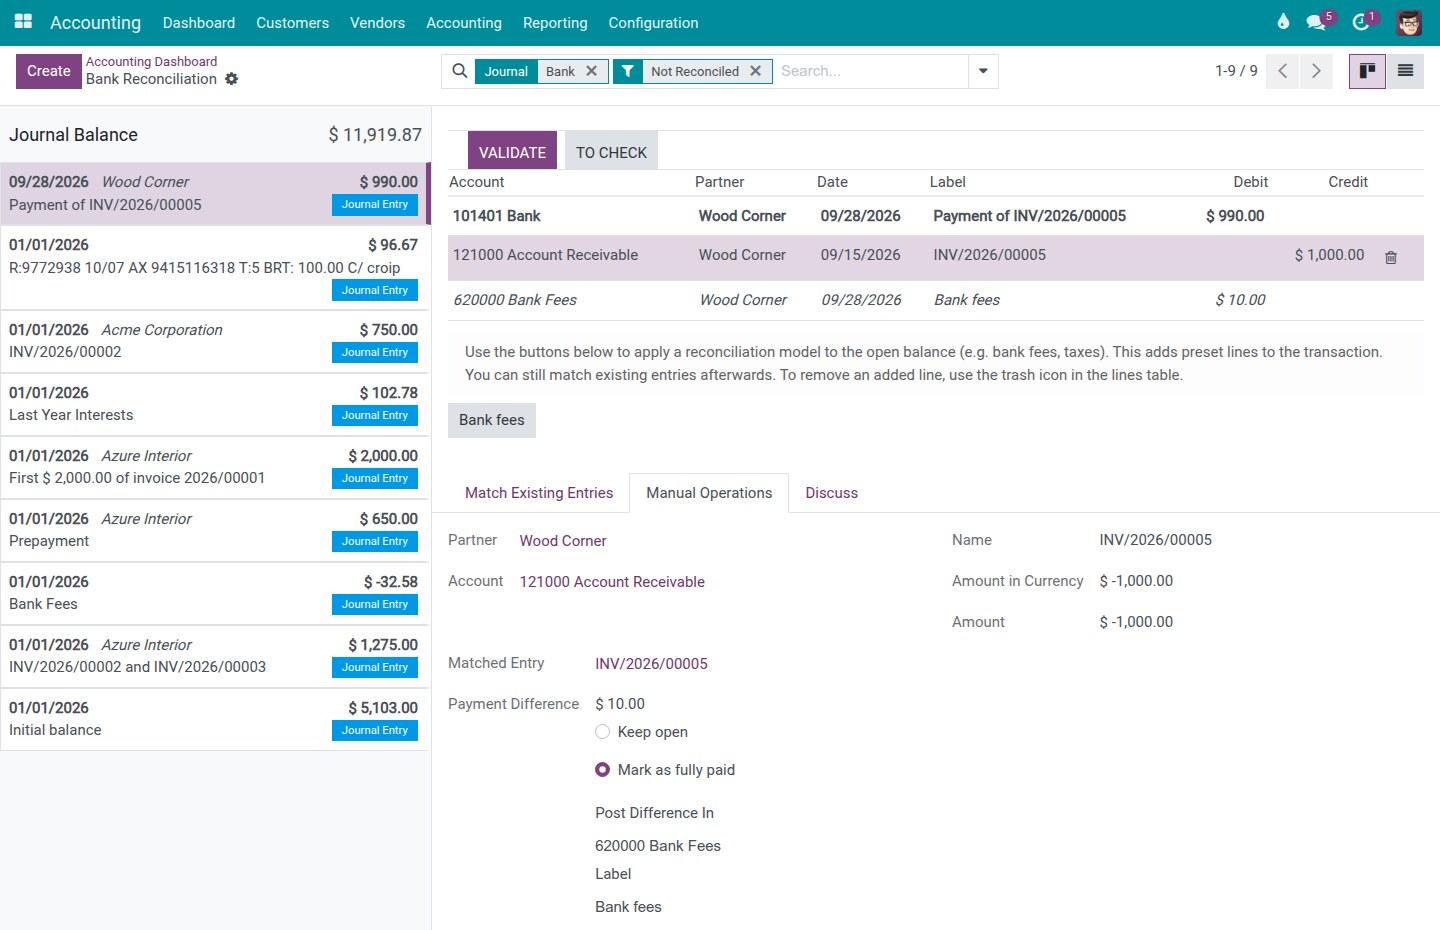
5. Decide what to do with a difference, item by item.
Click the row of a matched item that is not fully paid. The Manual Operations tab shows its Payment Difference and the same choice as on the invoice's Register Payment window:
- Keep open (the default): the item is partly paid and the rest stays open on it.
- Mark as fully paid: the item is closed in full and a difference line is added to the transaction's own journal entry. Choose the account in Post Difference In (for example the bank fees expense account when the bank took a fee) and check the Label.
The difference line appears in italics in the table. It shows Undefined as account until you choose one; meanwhile Validate is disabled and the message names the item, for example "Choose where to post the difference for INV/2026/00005." The difference line has no trash icon: to undo it, choose Keep open again.
6. Use reconciliation model buttons.
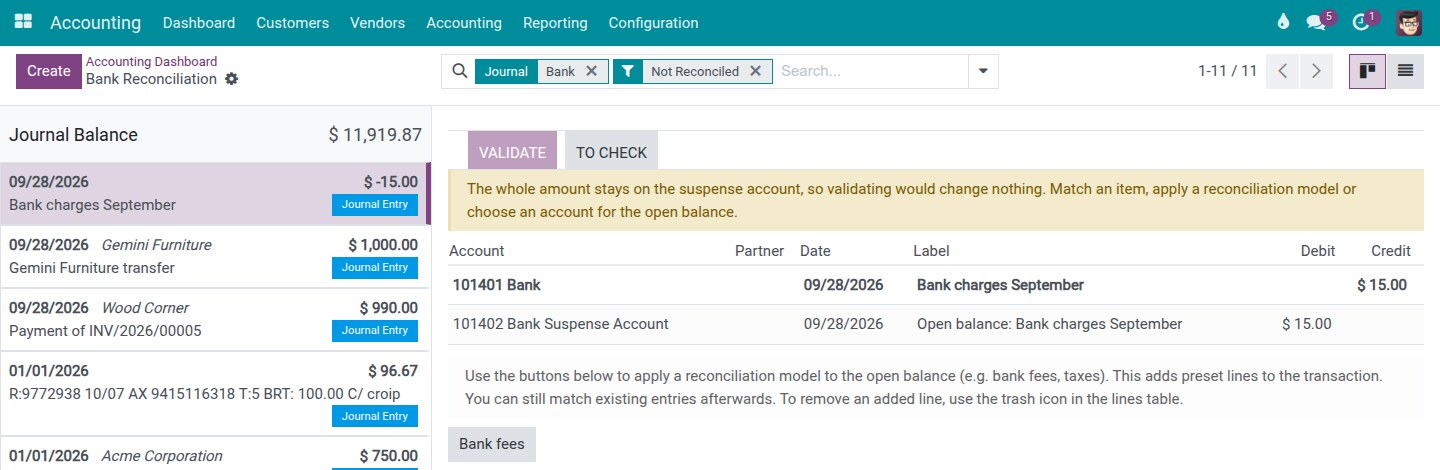
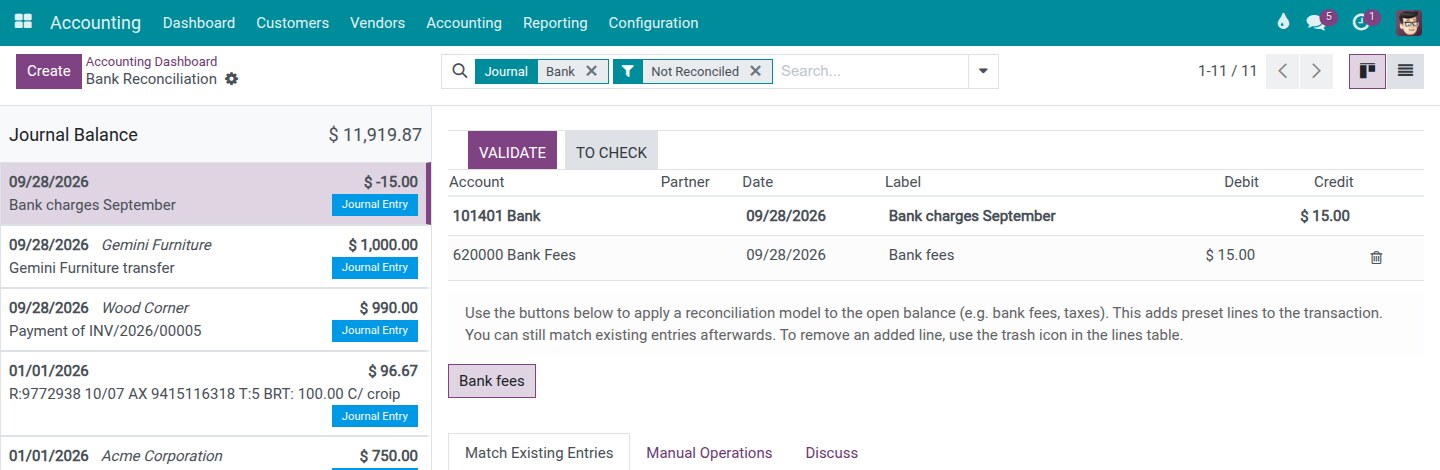
Reconciliation models set up as buttons appear under the lines table, for example Bank fees. Click one to add its preset lines for the part of the transaction that is not allocated yet. Click it again to uncheck it: only the lines of that model are removed, your matches and other lines are kept.
When no line would move the amount off the bank suspense account, Validate is disabled with the message "The whole amount stays on the suspense account, so validating would change nothing. Match an item, apply a reconciliation model or choose an account for the open balance."
7. Validate.
Click Validate. The software posts exactly the lines the screen shows and reconciles each matched item. If something must be fixed first, Validate is disabled and the message above the table says what, for example where to post a difference, a line on a deprecated account, a transaction dated on or before the lock date, or a transaction on which nothing would be posted. When a reconciliation model identified the partner (for example from the transaction label), the screen shows that partner and the software writes it on the transaction when you validate.
Changes you will notice
- Both reconciliation screens ask the same question as Register Payment when there is a difference: Keep open (the default) or Mark as fully paid, with Post Difference In and Label. The former "fully paid" link is gone.
- On Journal Items ‣ Reconcile, a difference can be closed with one difference entry, dated today by default, in the journal you choose. Revert reconciliation cancels it with a reversal entry. The Manual Operations tab is no longer on this screen.
- On a bank transaction, several matched items are paid in order of due date, the oldest first, whatever order you clicked them in.
- Clicking a matched item again no longer removes it: use the trash icon. A line taken out with the trash icon stays out until you add it again.
- Unchecking a reconciliation model button removes only the lines of that model; your manual work is kept.
- Validate posts exactly what the screen shows, or stays disabled with a message that says what to fix first: where to post the difference, a deprecated account, the lock date, or nothing to post.
- The partner identified for a bank transaction is written on the transaction when you validate.
- The reconciliation entry points (the Reconcile button and the link to the transactions to check on the dashboard, Payments Matching, Actions ‣ Reconcile on journal items) are offered to users with the Accountant access right.
This is an unofficial translation of the GNU Lesser General Public License into Vietnamese. It was not published by the Free Software Foundation,
and does not legally state the distribution terms for software that uses the GNU LGPL - only the original English text of the GNU LGPL does
that. However, we hope that this translation will help language speakers understand the GNU LGPL better.
GNU LESSER GENERAL PUBLIC LICENSE
Version 3, 29 June
2007
Copyright (C) 2007 Free Software Foundation, Inc. <https://fsf.org/>
Everyone is permitted to copy and distribute verbatim copies of this license document, but changing it is not allowed.
This version of the GNU Lesser General Public License incorporates the terms and conditions of version 3 of the GNU General Public License,
supplemented by the additional permissions listed below.
0. Additional Definitions.
As used herein,"this License" refers to version 3 of the GNU Lesser General Public License, and the "GNU GPL" refers to version 3 of
the GNU "General" Public License.
"The Library" refers to a covered work governed by this License, other than an Application or a Combined Work as defined below.
An "Application" is any work that makes use of an interface provided by the Library, but which is not otherwise based on the Library.
Defining a subclass of a class defined by the Library is deemed a mode of using an interface provided by the Library.
A "Combined Work" is a work produced by combining or linking an Application with the Library. The particular version of the Library
with which the Combined Work was made is also called the "Linked Version".
The "Minimal Corresponding Source" for a Combined Work means the Corresponding Source for the Combined Work, excluding any source code
for portions of the Combined Work that, considered in isolation, are based on the Application, and not on the Linked Version.
The "Corresponding Application Code" for a Combined Work means the object code and/or source code for the Application, including any data
and utility programs needed for reproducing the Combined Work from the Application, but excluding the System Libraries of the Combined Work.
1. Exception to Section 3 of the GNU GPL.
You may convey a covered work under sections 3 and 4 of this License without being bound by section 3 of the GNU GPL.
2. Conveying Modified Versions.
If you modify a copy of the Library, and, in your modifications, a facility refers to a function or data to be supplied by an Application that
uses the facility (other than as an argument passed when the facility is invoked), then you may convey a copy of the modified version:
a) under this License, provided that you make a good faith effort to ensure that, in the event an Application does not supply the function or data, the facility still
operates, and performs whatever part of its purpose remains meaningful, or
b) under the GNU GPL, with none of the additional permissions of this License applicable to that copy.
3. Object Code Incorporating Material from Library Header Files.
The object code form of an Application may incorporate material from a header file that is part of the Library. You may convey such
object code under terms of your choice, provided that, if the incorporated material is not limited to numerical parameters, data structure
layouts and accessors, or small macros, inline functions and templates (ten or fewer lines in length), you do both of the following:
a) Give prominent notice with each copy of the object code that the Library is used in it and that the Library and its use are covered by this License.
b) Accompany the object code with a copy of the GNU GPL and this license document.
4. Combined Works.
You may convey a Combined Work under terms of your choice that, taken together, effectively do not restrict modification of the portions of the
Library contained in the Combined Work and reverse engineering for debugging such modifications, if you also do each of the following:
a) Give prominent notice with each copy of the Combined Work that the Library is used in it and that the Library and its use are covered by this License.
b) Accompany the Combined Work with a copy of the GNU GPL and this license document.
c) For a Combined Work that displays copyright notices during execution, include the copyright notice for the Library among these notices,
as well as a reference directing the user to the copies of the GNU GPL and this license document.
d) Do one of the following:
0) Convey the Minimal Corresponding Source under the terms of this License, and the Corresponding Application Code in a form suitable for, and
under terms that permit, the user to recombine or relink the Application with a modified version of the Linked Version to produce a modified
Combined Work, in the manner specified by section 6 of the GNU GPL for conveying Corresponding Source.
1) Use a suitable shared library mechanism for linking with the Library. A suitable mechanism is one that (a) uses at run time a copy of the
Library already present on the user's computer system, and (b) will operate properly with a modified version of the Library
that is interface-compatible with the Linked Version.
e) Provide Installation Information, but only if you would otherwise be required to provide such information under section 6 of the
GNU GPL, and only to the extent that such information is necessary to install and execute a modified version of the Combined Work produced by
recombining or relinking the Application with a modified version of the Linked Version. (If you use option 4d0, the Installation Information
must accompany the Minimal Corresponding Source and Corresponding Application Code. If you use option 4d1, you must provide the Installation
Information in the manner specified by section 6 of the GNU GPL for conveying Corresponding Source.)
5. Combined Libraries.
You may place library facilities that are a work based on the Library side by side in a single library together with other library facilities that
are not Applications and are not covered by this License, and convey such a combined library under terms of your choice, if you do both of
the following:
a)Accompany the combined library with a copy of the same work based on the Library, uncombined with any other library facilities,
conveyed under the terms of this License.
b) Give prominent notice with the combined library that part of it is a work based on the Library, and explaining where to find the accompanying
uncombined form of the same work.
6. Revised Versions of the GNU Lesser General Public License.
The Free Software Foundation may publish revised and/or new versions of the GNU Lesser General Public License from time to time. Such new
versions will be similar in spirit to the present version, but may differ in detail to address new problems or concerns.
Each version is given a distinguishing version number. If the Library as you received it specifies that a certain numbered
version of the GNU Lesser General Public License "or any later version" applies to it, you have the option of following the terms and
conditions either of that published version or of any later version published by the Free Software Foundation. If the Library as you
received it does not specify a version number of the GNU Lesser General Public License, you may choose any version of the GNU Lesser
General Public License ever published by the Free Software Foundation.
If the Library as you received it specifies that a proxy can decide whether future versions of the GNU Lesser General Public License shall
apply, that proxy's public statement of acceptance of any version is permanent authorization for you to choose that version for the Library.